
HR Payroll Setup
AlignBooks provides a process through which you can manage employee salaries, benefits, deductions, and compliance with tax and labor laws. It involves defining salary structures, integrating attendance and leave data, automating tax calculations, and setting up workflows for payroll processing and approvals. This setup is crucial for ensuring accurate and timely salary disbursement, maintaining compliance with legal requirements, and reducing manual errors.
By streamlining payroll processes, organizations save time, enhance transparency, and improve employee satisfaction. An effective payroll setup also integrates seamlessly with HR and accounting systems for efficient operations.
The HR Payroll Setup has Four parts:
-
Salary Structure
-
Statutory
-
Overtime
-
Others
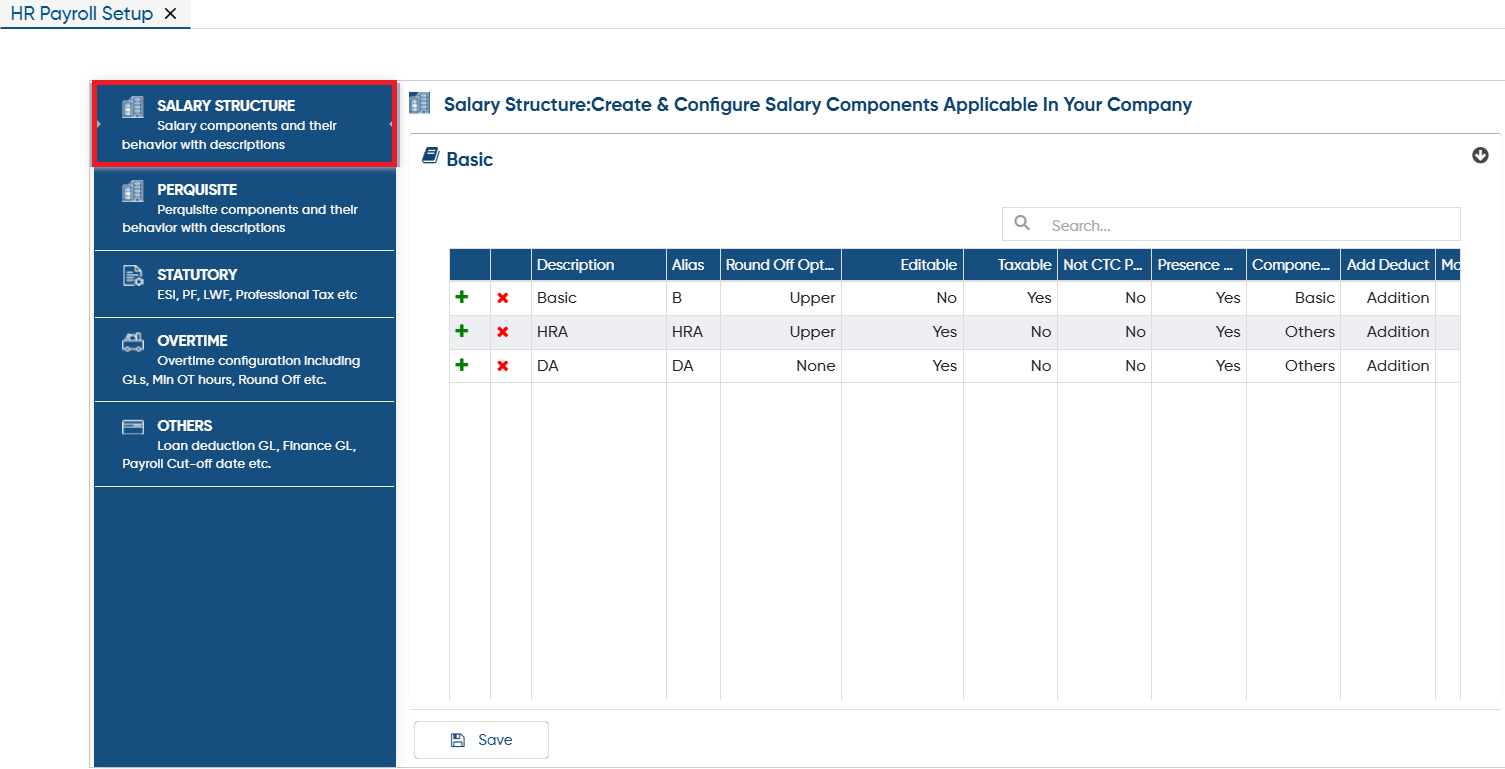
The system will default display the 'Salary Structure'. You can navigate to any other setup option by selecting the corresponding tab on the left-hand side panel.
-
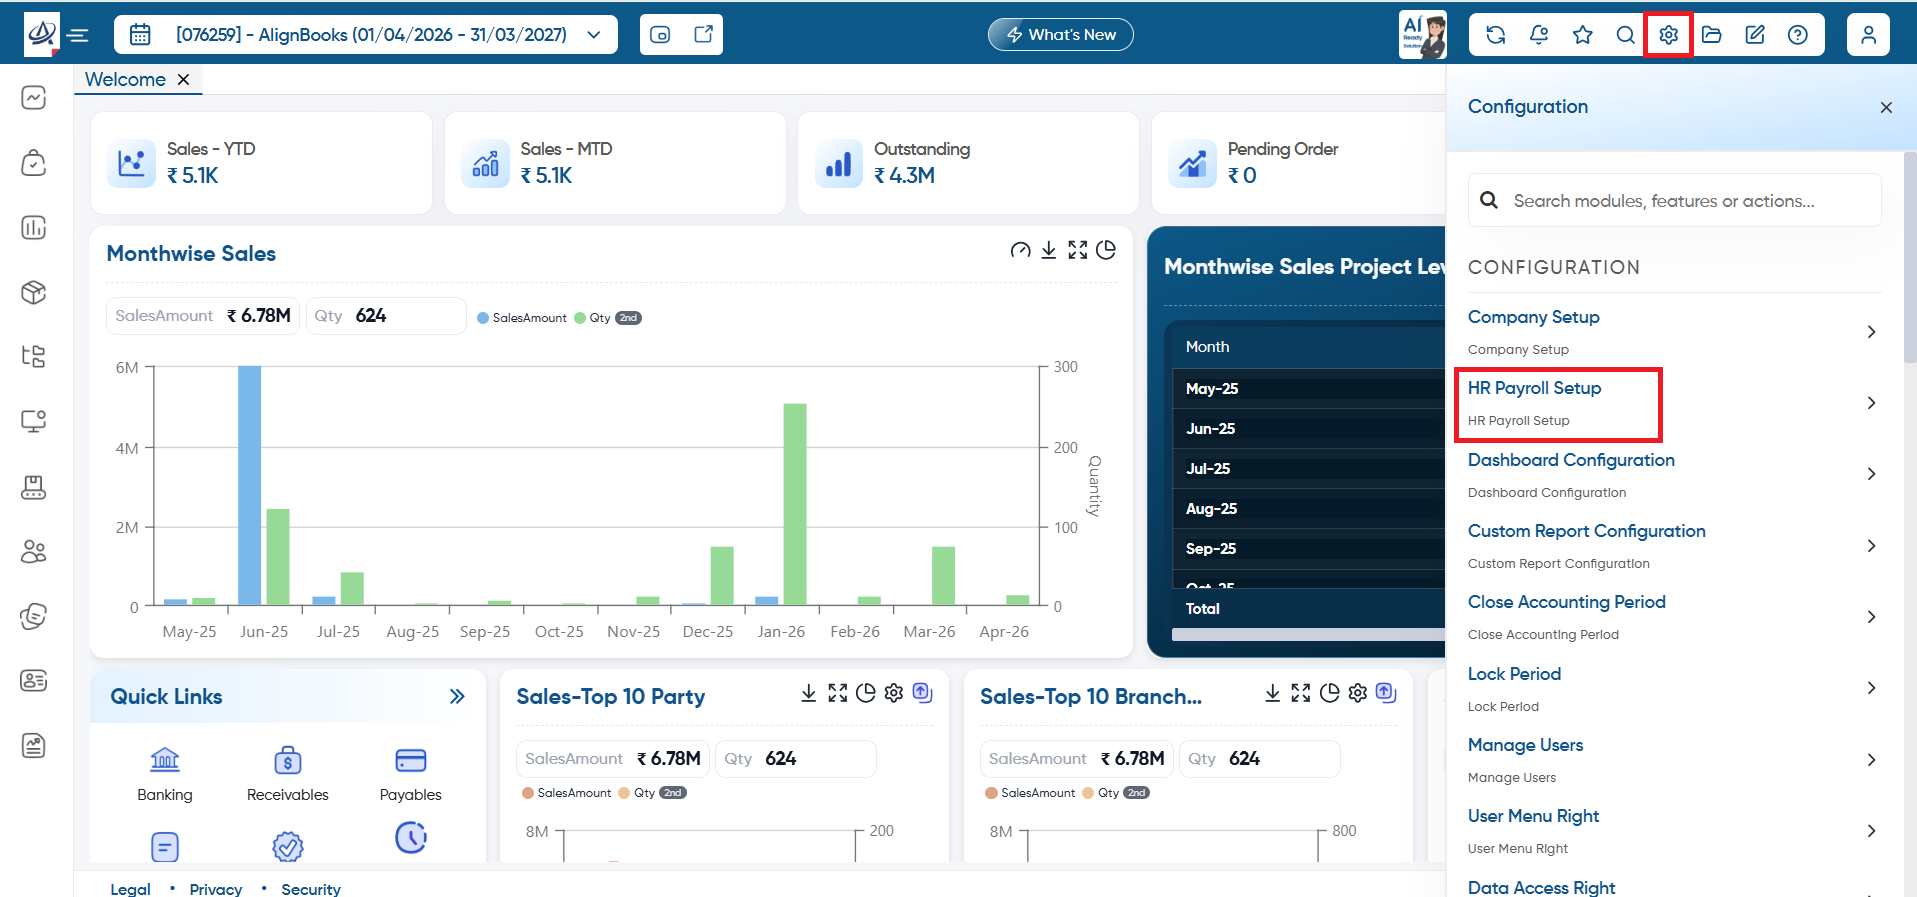
First, click on 'Configuration' icon and select 'HR Payroll Setup' option.
-
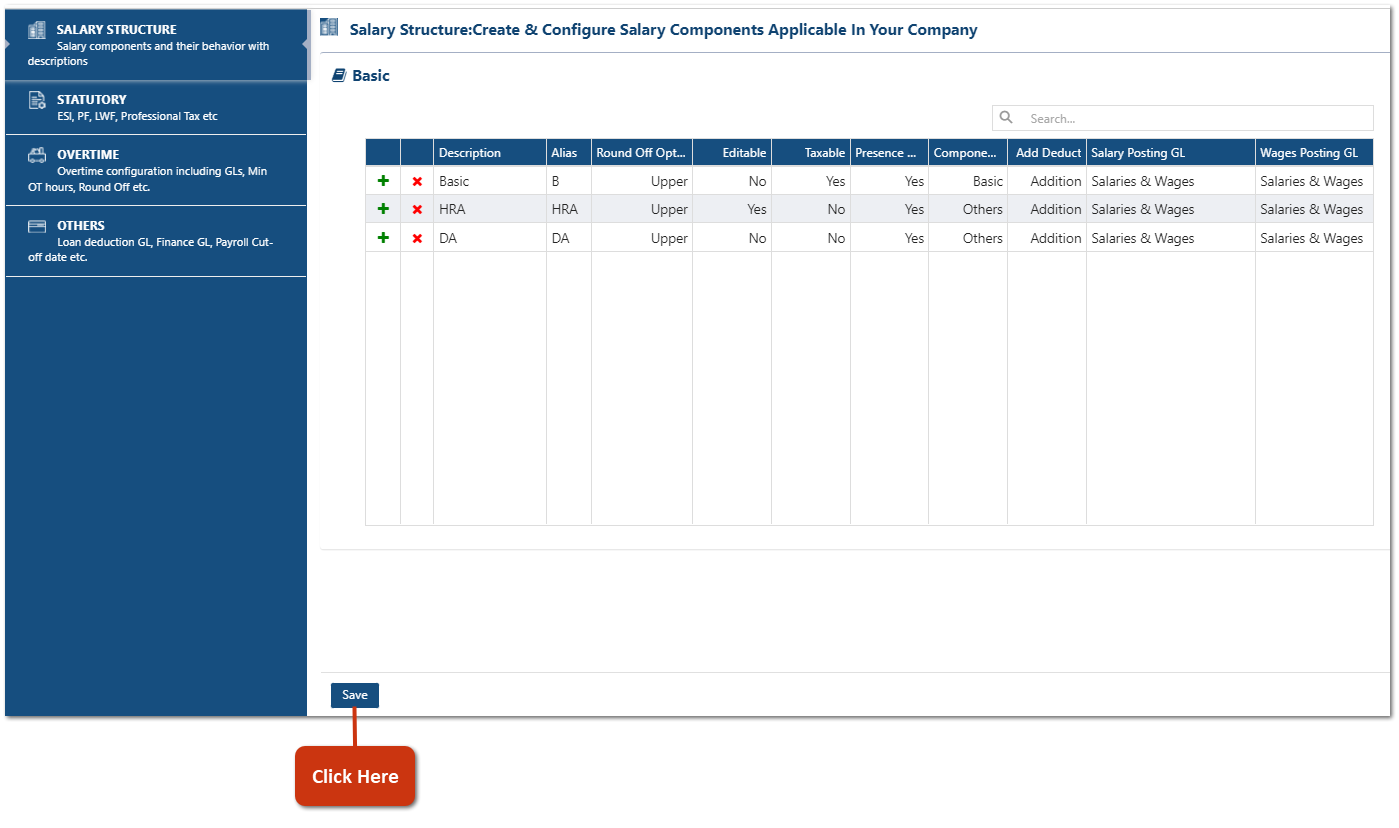
The software will auto display the 'Salary Structure'. In Salary structure you can define or Add the Salary components, how an employee's total compensation is broken down into various components. You can Add upto 10 Components of Salary.
-
It typically includes fixed elements like basic pay, allowances (e.g., housing, transportation), variable elements like performance bonuses, and deductions such as taxes, provident fund, or other statutory contributions.
-
The salary structure ensures transparency, compliance with legal standards, and consistency across an organization, aligning employee compensation with roles, responsibilities, and company policies.
-
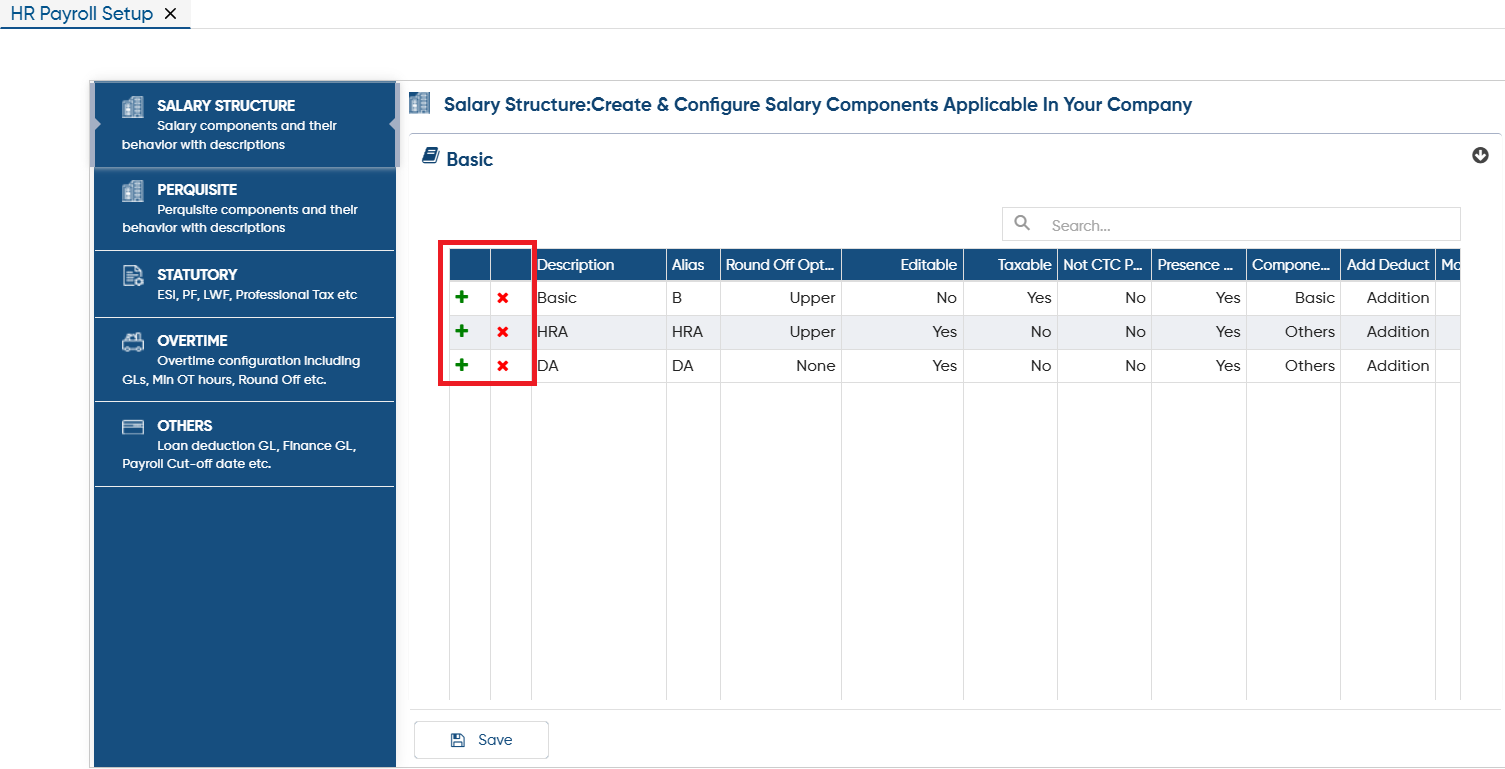
 : Through the Plus icon, you can Add any components of Salary.
 -
 : Through the cross icon, you can Remove or Delete any components of Salary.
-
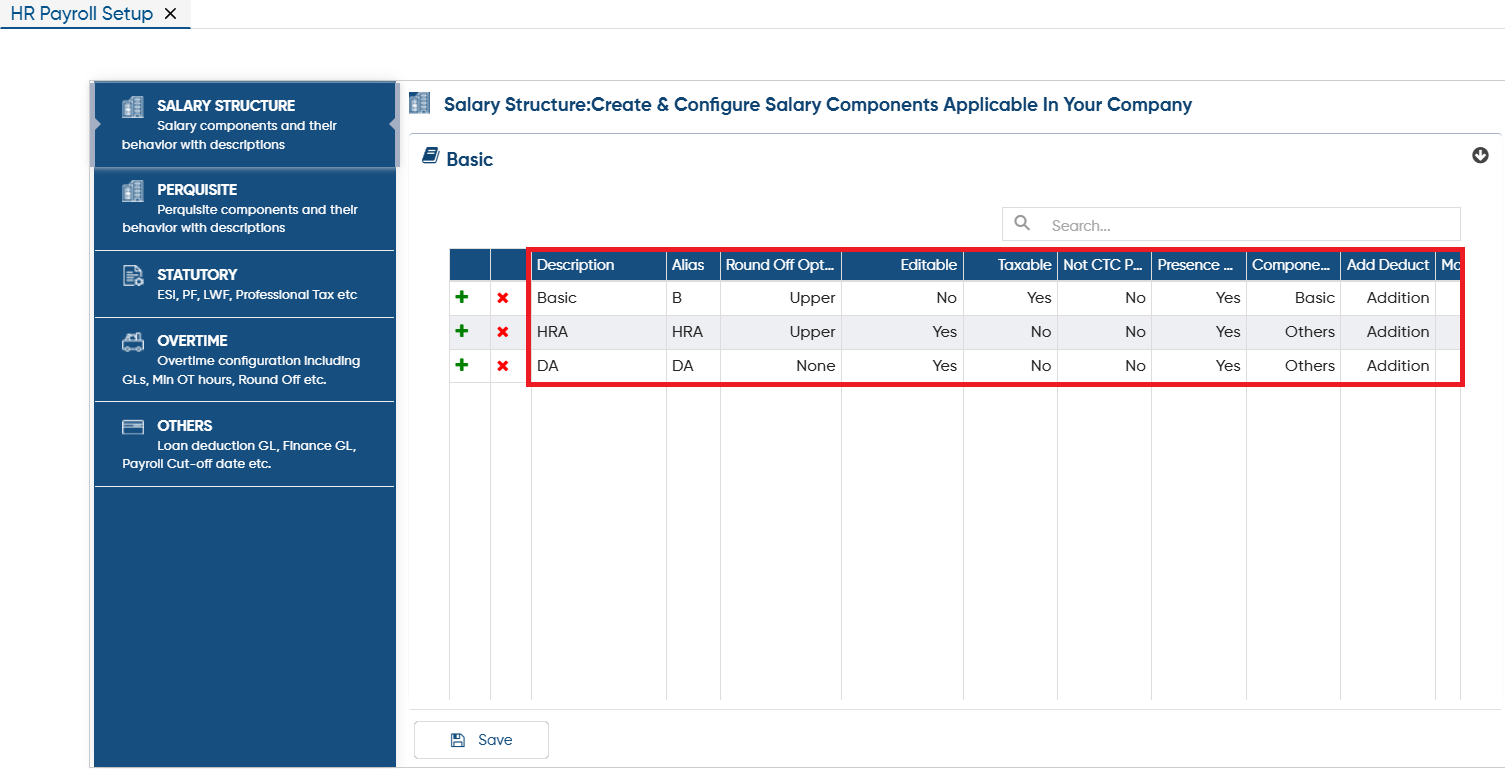
Description: In the given field mention the Component Name which will be displayed in the Payroll Setup of the Software.
-
Alias: An alias is a short name or abbreviation for a specific component. It is important for statutory calculations and processes because it acts as a simple, standard way to refer to the component when doing calculations or managing data.
For instance:
-
If the component is 'Provident Fund,' the alias could be 'PF'.
-
For 'Employee State Insurance,' the alias might be 'ESI'.
-
Round Off Option: You can round off the component value to the nearest value as per the requirement.
-
None: Select the option if you don't want to round off the component value.
-
Upper: Select the option, if you want the component value to Round off Down to the nearest value within the desired precision.
-
Lower: Select the option, if you want the component value to Round off Up to the nearest value within the desired precision.
-
Actual: Select this option, to Round Off the value to the nearest that is closed to the given value.
-
Editable: Choose 'Yes' if you want to enter the component value manually while processing the salary. If you choose 'No,' the software will automatically calculate the value based on the employee's working days and the configured settings.
-
Taxable: Choose 'Yes' or 'No' to indicate whether the component is taxable. Some salary components are subject to tax and are included in TDS (Tax Deducted at Source) calculations. If the component needs to be taxed, select 'Yes'; otherwise, select 'No.' This setting ensures accurate tax deductions as per the applicable rules.
-
Presence Dependent: Select this option as 'Yes' if the calculation of this component depends on the employee's days of attendance. For example, components like Basic and HRA are calculated based on the number of days the employee is present in the month, whereas deductions like Mobile Phone charges are not tied to attendance. Otherwise select the option as 'No'.
-
Component Type: In this section, you need to choose the type of component based on what is required for the calculation. Salary components can fall into different categories such as Basic Salary, House Rent Allowance (HRA), Dearness Allowance (DA), and more. Selecting the correct component type is essential because each type may have different rules for calculation, tax implications, and deductions.
-
Add Deduct: Now, you need to decide whether the component should be added to the salary or deducted from the salary.
-
Add to Salary: If you select this option, the component will be included as a part of the employee’s total earnings. For example, allowances like HRA (House Rent Allowance) or Bonus are usually added to the salary.
-
Deduct from Salary: If you select this option, the component will be subtracted from the employee's total earnings. This could apply to deductions such as Provident Fund (PF), Tax Deductions at Source (TDS), or Loan Repayments.
-
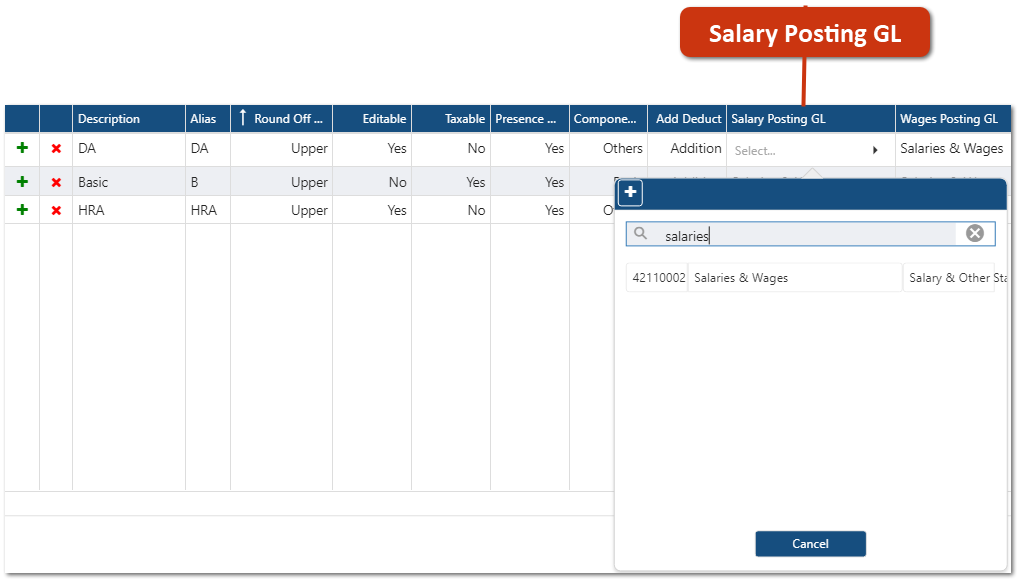
Salary Posting PL: You need to select the ledger where the component value will be recorded. AlignBooks provides a default ledger for your convenience, but you also have the option to create a new ledger if necessary, based on your specific needs.
-
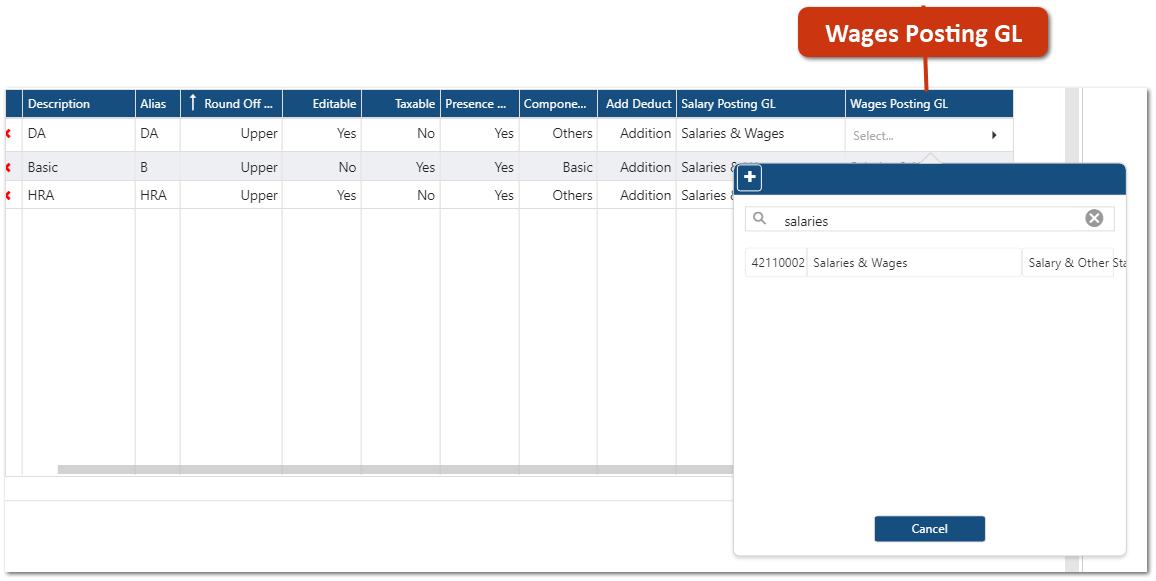
Wages Posting GL: Choose the Expense Ledger where you want to record the employee's wages. This ledger is used to track the company's expenditure on employee compensation. By selecting the correct ledger, you ensure that the wages are properly accounted for in the company’s financial records.
-
After adding all the component of the salary click on 'Save' button.
STATUTORY:
-
It refers to obligations mandated by law that employers must adhere to when managing payroll and employee benefits. These are regulations imposed by government authorities to ensure employees' welfare, compliance with tax laws, and social security systems.
-
Here, you need to mention the ESI/PF calculations, you can mention TDS/LWF details as per the requirement.

ESI:
ESI stands for Employee State Insurance. It is a self-financed social security and health insurance scheme in India, managed by the Employees' State Insurance Corporation (ESIC) under the Ministry of Labour and Employment.
-
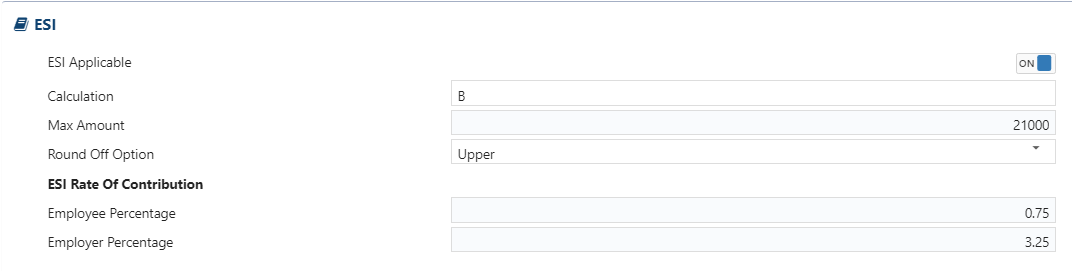
ESI Applicable: If your company is registered under Employees’ State Insurance Corporation then turn 'ON' this option. This ensures that the necessary provisions and compliance requirements related to ESI are activated for your organization, facilitating seamless management of employee benefits under the ESI scheme.
-
Calculation: Specify the aliases of the components to be included in calculating the Gross Amount of an employee's salary. For example, the salary components (aliases) configured by your company could include:
-
Basic (B)
-
HRA (H)
-
Conveyance (C)
-
Special Allowance (S)
-
Mobile Phone Deduction (M) (Deduction Type)
In this case, the ESI calculation would be: B + H + C + S + M.
Deduction-type components are also considered, as the system automatically treats deductions as negative values, which reduces the total salary amount accordingly.
|
-
Max Amount: As per the Norms of ESIC, you need to mention the Maximum Amount for employee applicable for ESIC.
-
Round Off Option: Select the option if you need the value to be Rounded Off.
-
ESI Rate Of Contribution: Here you need to mention the Current Percentage of Employee and Employer share to contribution to ESIC.
-
Employee Percentage: Mention the Current percentage of Employee Share to Contribution to ESIC, as per the norms of ESIC.
-
Employer Percentage: Mention the Current percentage of Employer Share to Contribution to ESIC, as per the norms of ESIC.
Provident Fund:
Provident Fund (PF) is a government-managed savings scheme primarily designed to provide financial security and retirement benefits to employees. It is a contributory fund where both the employer and employee contribute a fixed percentage of the employee's salary every month.
-
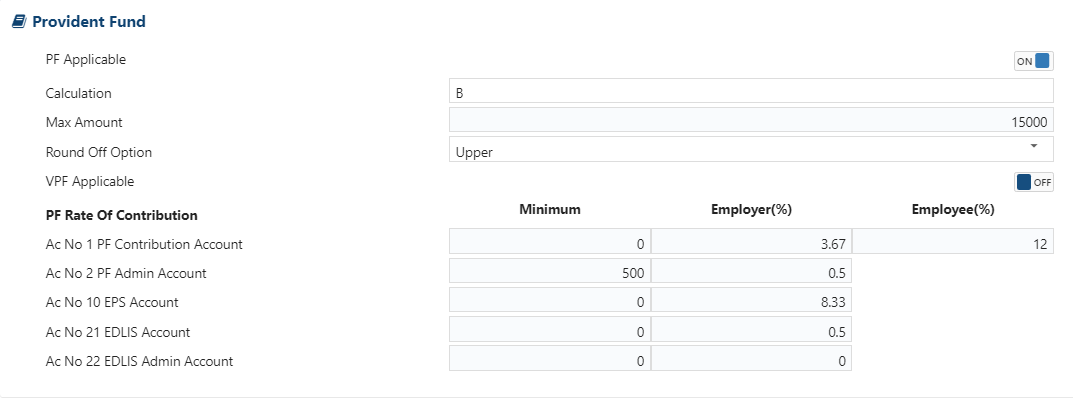
PF Applicable: If your company is registered under Employees' Provident Fund Organization then turn 'ON' this option.
-
Calculation: Specify the aliases of the components to be considered when calculating the Basic Amount of an employee's salary.
For example, if a company's salary components (aliases) include Basic (B) and Dearness Allowance (DA), the Provident Fund calculation would be B + DA.
-
Max Amount: Mention the Maximum Amount for employee applicable for EPFO as per the company norms.
-
Round Off Option: Select the option if you need the value to be Rounded Off.
-
VPF Applicable: VPF refers to Voluntary Provident Fund. It's an extension of the Employees' Provident Fund (EPF) in India, where employees can contribute voluntarily beyond the statutory limit to their provident fund account. Turn 'ON' this option if you want to apply the VPF.
-
PF Rate Of Contribution: The PF Rate of Contribution is already fixed as per the government norms (It's not editable).
Labour Welfare Fund:
The Labour Welfare Fund (LWF) is a statutory contribution managed by individual state governments in India to promote the welfare of workers. It is aimed at improving the working conditions, providing social security, and enhancing the quality of life for employees in certain industries.
-
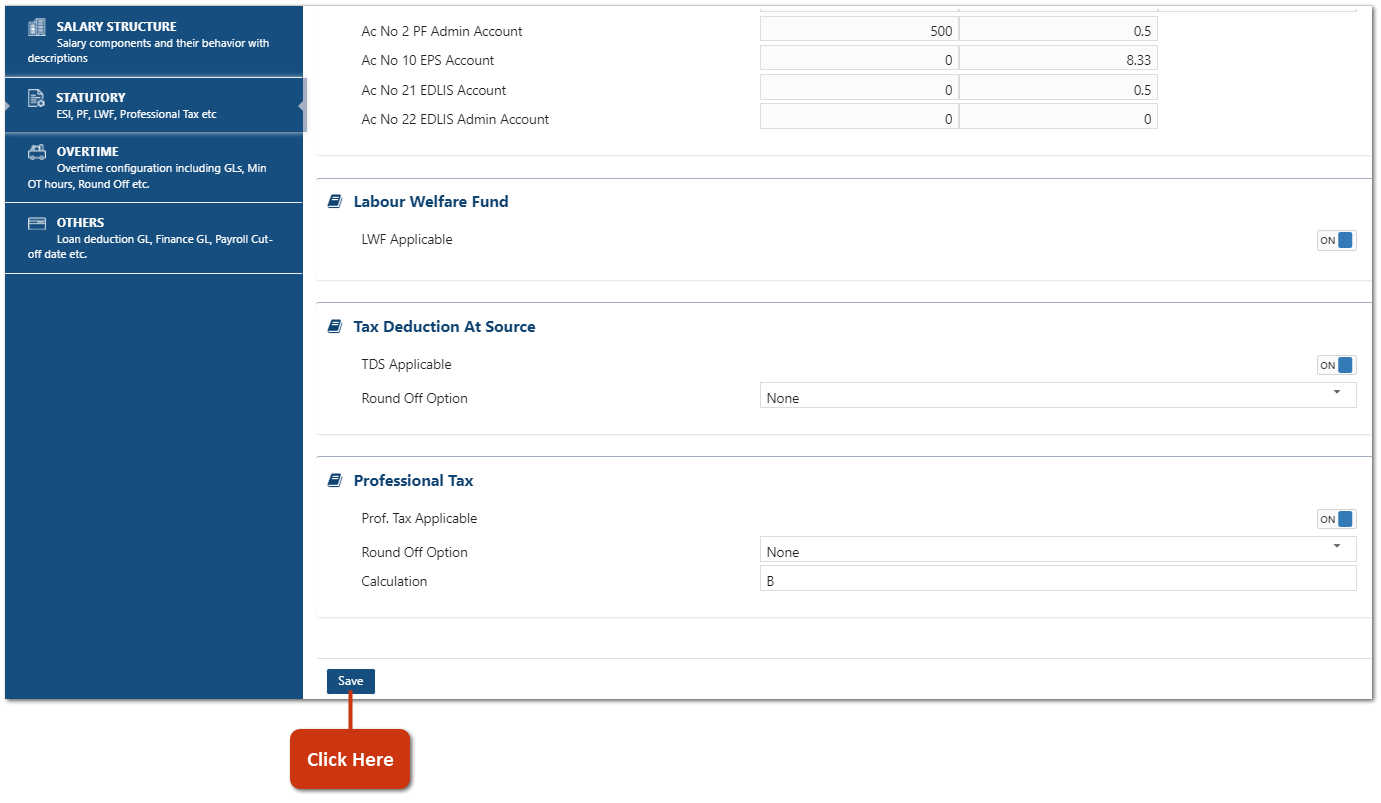
LWF Applicable: Turn 'ON' this option if your company location state is applicable for Labour Welfare Fund.

Tax Deduction At Source:
Tax Deduction at Source (TDS) refers to the process of deducting a certain percentage of tax from an individual's or entity's income at the time the payment is made. The person or organization making the payment (the deductor) is responsible for deducting the tax and remitting it to the government on behalf of the recipient (the deductee).
-
TDS Applicable: Turn 'ON' this option if your company deducts the TDS on Employee Salary.
-
Round Off Option: Select the option if you need the value to be Rounded Off.

Professional Tax:
Professional Tax is a state-level tax levied on individuals engaged in various professions, trades, or employments. It is typically deducted by employers from employees' salaries or paid directly by professionals like doctors, lawyers, or business owners. The amount of professional tax varies depending on the income level and the state in which the individual resides, as each state in India has its own rules and rates for this tax.
-
Prof. Tax Applicable: Turn 'ON' this option if your company location state is applicable for Professional Tax.
-
Round Off Option: Select the option if you need the value to be Rounded Off.
-
Calculation: Here, you need to mention the Aliases for calculating the Prof. Tax.
The Deduction type component will also be added as the system take the deduction as Negative so the Amount will automatically get reduced for Total Salary.
|

-
Now click on 'Save' button to save the changes.
OverTime
Overtime refers to the additional hours worked by an employee beyond their standard work schedule, as defined by labor laws or company policy. It is compensated separately to recognize the extra effort put in by the employee. The rules for overtime eligibility and payment vary depending on regulations and organizational practices.
Here, you have the flexibility to customize and define the rules for Overtime calculation and its associated details according to your specific requirements. This includes setting up parameters, policies, and any additional conditions needed to ensure accurate and compliant overtime management.

-
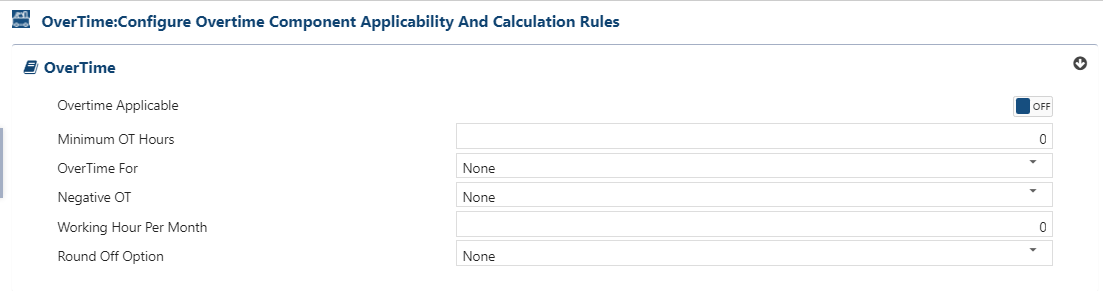
OverTime Applicable: Turn 'ON' this option to enable the overtime for your employees.
-
Minimum OT Hours: Minimum Overtime Hours is the required number of extra hours an employee must work beyond their regular schedule for those hours to count as overtime. If this threshold isn’t reached, the extra hours won’t qualify for overtime pay or benefits.
For example: If the Minimum Overtime Hours is set to 2, an employee must work at least 2 additional hours after their normal shift for overtime rules to apply. Any extra time worked below 2 hours (e.g., 1.5 hours) would not be considered overtime.
-
OverTime For: Select the type of overtime eligibility based on when extra hours are worked in relation to regular working hours.
-
EarlyIn: Overtime worked before regular working hours.
-
LateOut: Overtime worked after regular working hours.
-
Both: Overtime worked both before and after regular working hours.
-
None: No overtime is eligible.
-
Negative OT: Here, you need to whether you want to deduct time from an employee's overtime if they arrive late or leave early from the office.
-
EarlyOut: Select this option if you want Deduction in Over time if employee left early before working hours.
-
LateIn: Select this option if you want Deduction in Over time if arrived late after working hours.
-
Both: Select this option if you want Deduction in Over time if arrived late after or left early before working hours.
-
None: Select this option if Negative Overtime if not applicable.
-
Working Hour Per Month: Mention the Total working hours in a month for overtime calculation.
-
Round Off Option: Select the option if you need the value to be Rounded Off.
-
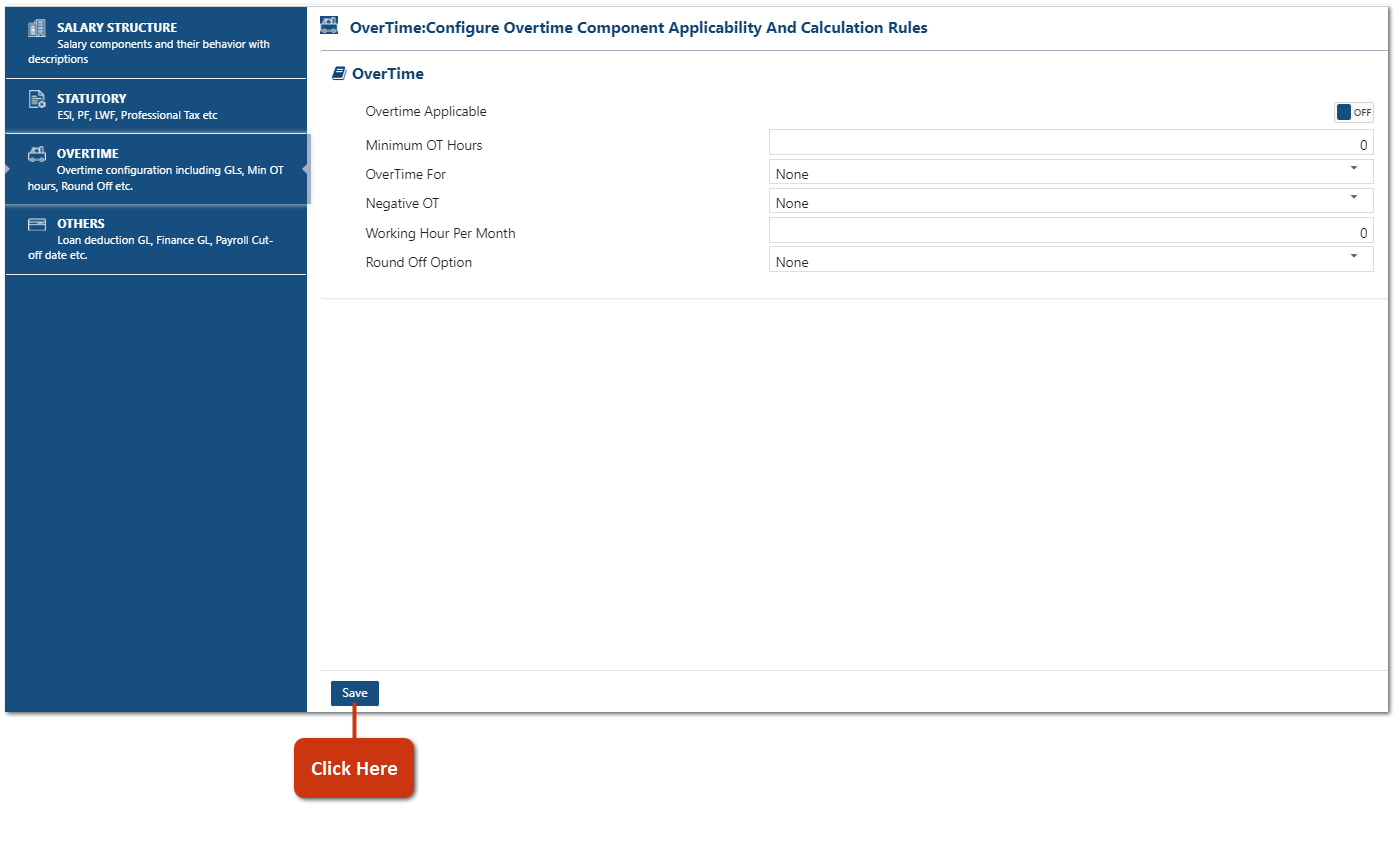
Now click on 'Save' button to save the changes.
Others
Here, you can mention the other details related to Payroll. You can set the preferences and requirement related to the Attendance or Leaves.

-
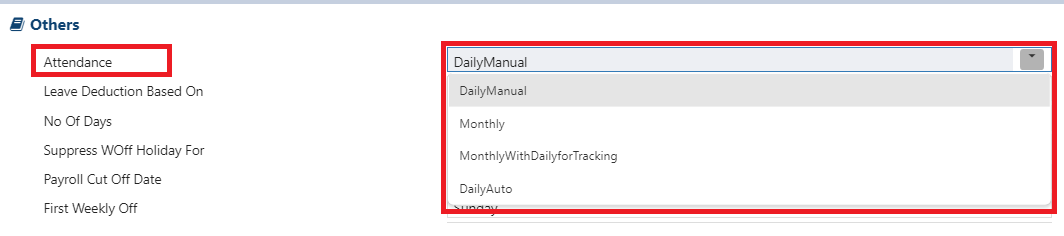
Attendance: Select the Mode of maintaining the Employee Attendance.
-
DailyManual: Select this option to manage attendance on a daily basis. With this option, you can record the employee's daily In and Out times.
-
Monthly: Select this option to manage attendance on a monthly basis. The software will automatically calculate the paid days for the month, and you simply need to input the employee's leave days. The software will then deduct the leave days from the total paid days.
-
MonthlywithDailyForTracking: Select this option to have the software calculate paid days on a monthly basis while also allowing you to manage attendance for individual days if needed.
-
DailyAuto: Through this option, the employee's daily In and Out times will be recorded via the Mobile App.
-
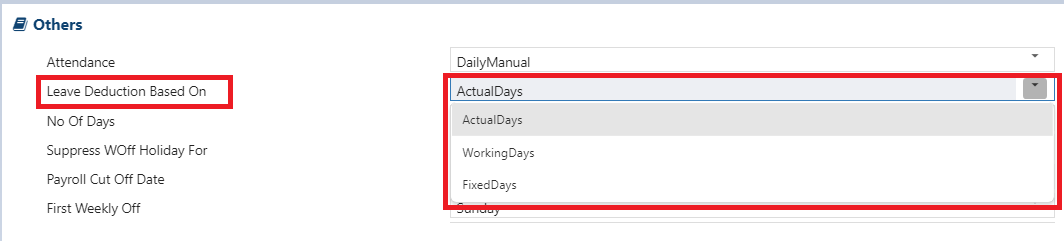
Leave Deduction Based On: Select if you want to calculate salaries based on the days in a month. Alignbooks allows you to customize the Paid Days configuration for salary processing according to your company policies.
-
Actual Days: Select this option to calculate Paid Days in the salary based on the total number of days in the month.
-
Working Days: Select this option to calculate Paid Days in the salary based on the working days of the month, excluding holidays and weekly offs.
-
Fixed Days: Select this option to calculate Paid Days in the salary based on a predefined fixed number of days.
-
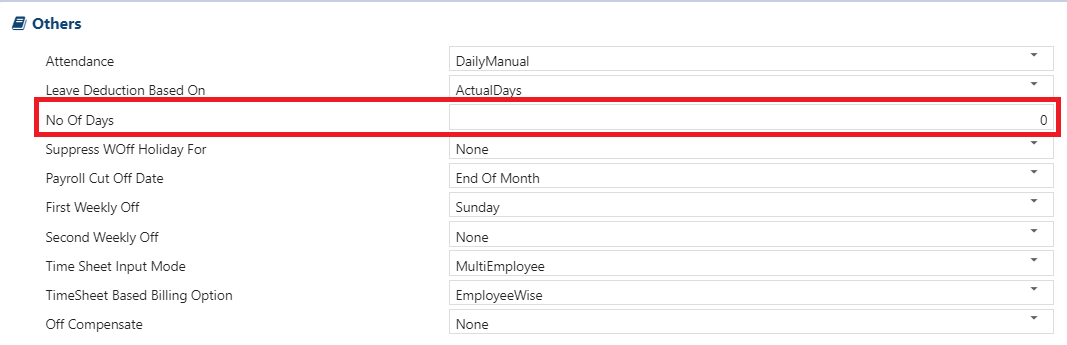
No Of Days: If 'Fixed Days' option has been selected in the above option then mention the days here.
-
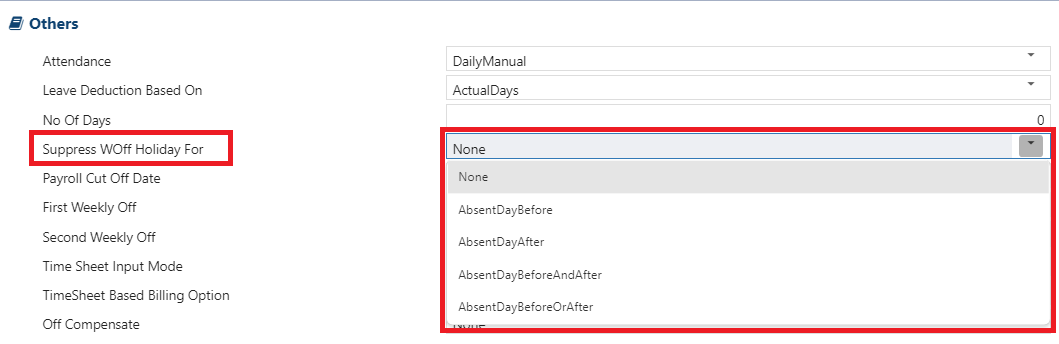
Suppress WOff Holiday For: Select the option if you want to treat a weekly off or holiday as a leave or deduct the salary amount when an employee takes leave immediately before or after the weekly off or holiday.
-
AbsentDayBefore: Select this option to treat a Weekly Off/ Holiday as a leave if the employee takes leave immediately before it.
-
AbsentDayAfter: Select this option to treat a Weekly Off/ Holiday as a leave if the employee takes leave immediately after it.
-
AbsentDayBeforeAndAfter: Select this option to treat a Weekly Off/ Holiday as a leave if the employee takes leave both before and after it.
-
AbsentDayBeforeOrAfter: Select this option to treat a Weekly Off/ Holiday as a leave if the employee takes leave either before or after it.
-
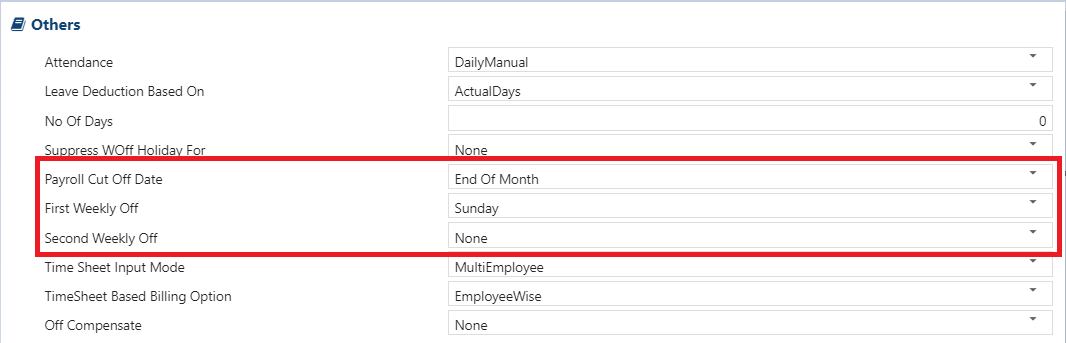
Payroll Cut Off Date: Here, select your payroll date from which the salary processed in your company.
For instance: In some companies follow a payroll period from the 1st to the 31st of the month, while others may use a range like the 11th of one month to the 10th of the next.
-
First Weekly Off: Select the day which you want to consider as First week Off in your company.
-
Second Weekly Off: Select the day which you want to consider as Second week Off in your company.
-
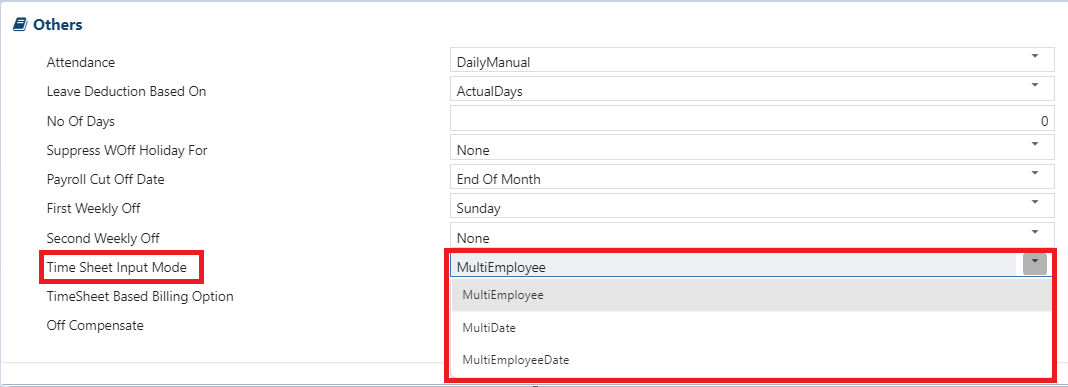
Time Sheet Input Mode: Many companies calculate employee salaries by tracking time spent by the employee. This ensures fair pay distribution. It’s especially effective for roles where time impacts productivity or value creation. Select the mode in which you want to maintain the Time Sheet.
-
Multi Employee: This option allows you to enter a time sheet for multiple employees on a single date in the voucher entry.
-
Multi Date: This option enables you to enter a time sheet for a single employee across multiple dates in the voucher entry.
-
Multi Employee and Date: This option lets you input time sheets for multiple employees across multiple dates in the voucher entry.
-
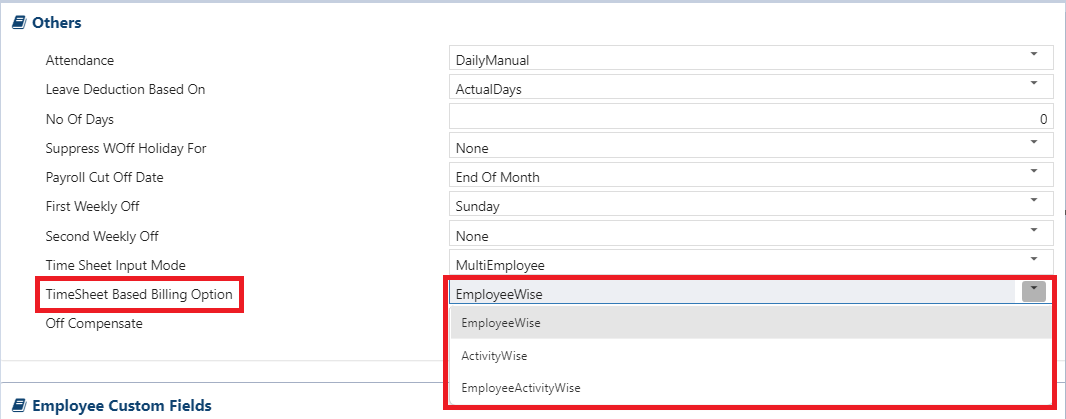
TimeSheet Based Billing Option: This Time sheet based billing feature enables you to track employee working hours while also handling billing or generating invoices. In AlignBooks you can maintain the Time Sheet for Employee on different basis.
-
EmployeeWise: Select this option if you want to manage time sheets for individual employees. This allows you to track and record the working hours each employee has spent separately.
-
ActivityWise: Select this option to maintain Time Sheet based on Activity wise.
-
EmployeeActivityWise: Select this option to manage time sheets by both Employee and Activity. This lets you track the time each employee has spent on specific activities or projects.
-
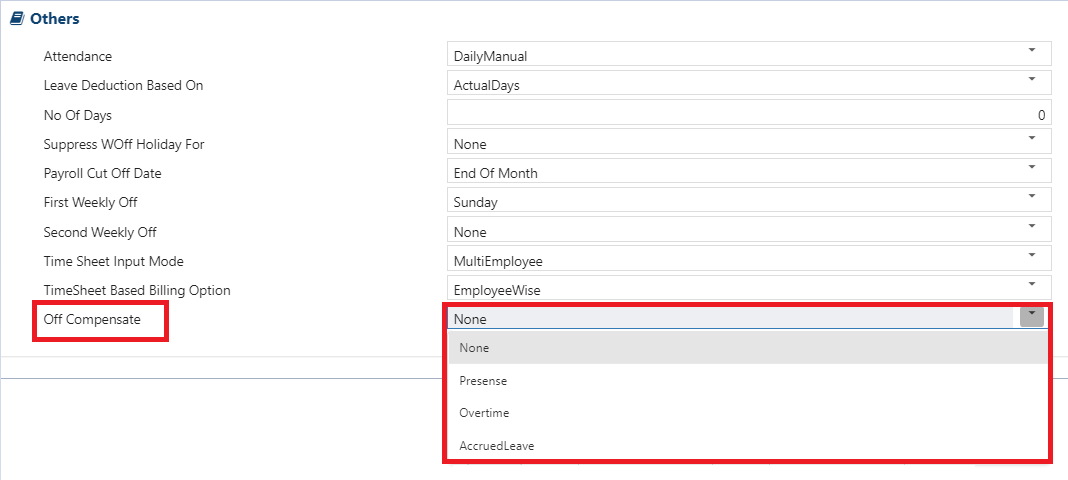
Off Compensate: Select the option, how you want to compensate the employee if they comes at the office on weekly Off/ Holidays.
-
Presence: Select this option if you want to mark the employee as present.
-
OverTime: Select this option if you want to record the employee's overtime.
-
Accrued Leave: Choose this option if you want to grant the employee an extra leave.
-
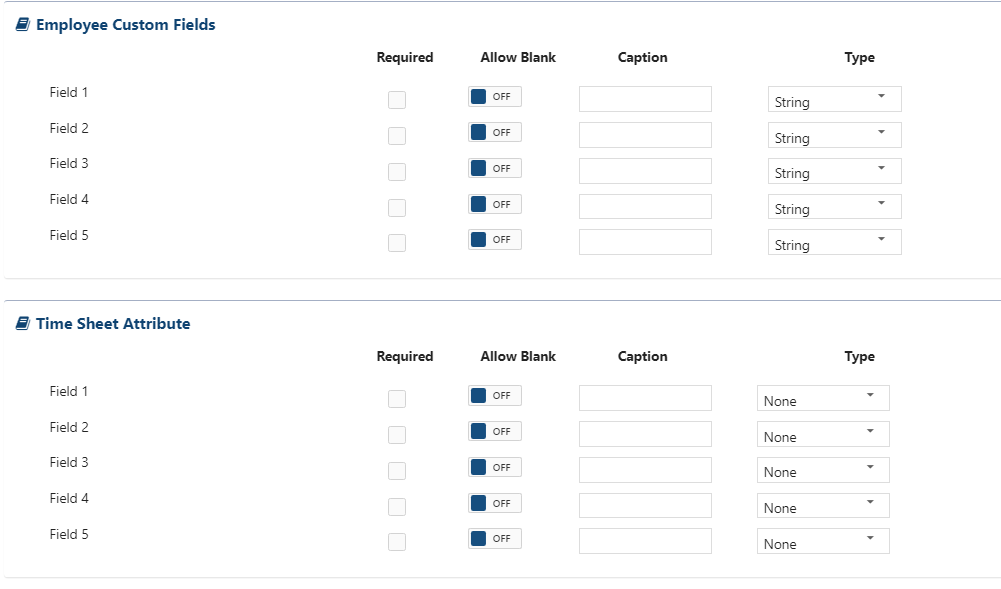
Require: To enable the field tick the checkbox.
-
Allow Blank: Set this option to 'OFF' if you want the additional field to be mandatory for Master and prevent it from being left blank. The software will not allow you to save the Master unless the field is selected. Set this option to 'ON' if you want to allow the field to be left blank.
-
Caption: Specify the field that you want to display in the Master as per the requirement.
-
Type: Select the type of field whether it's required as String/Numeric/Currency/Date. If you want the extra field to be Alpha numeric then select 'String'. To mention only numbers in the extra field select 'Numeric'. Similarly if you are enabling the field for currency, then select 'Currency', or for Date format, select 'Date'. You can enable Maximum of 5 Fields.
-
Time Sheet Attribute: Similarly, you can enable extra fields for Time Sheet.
-
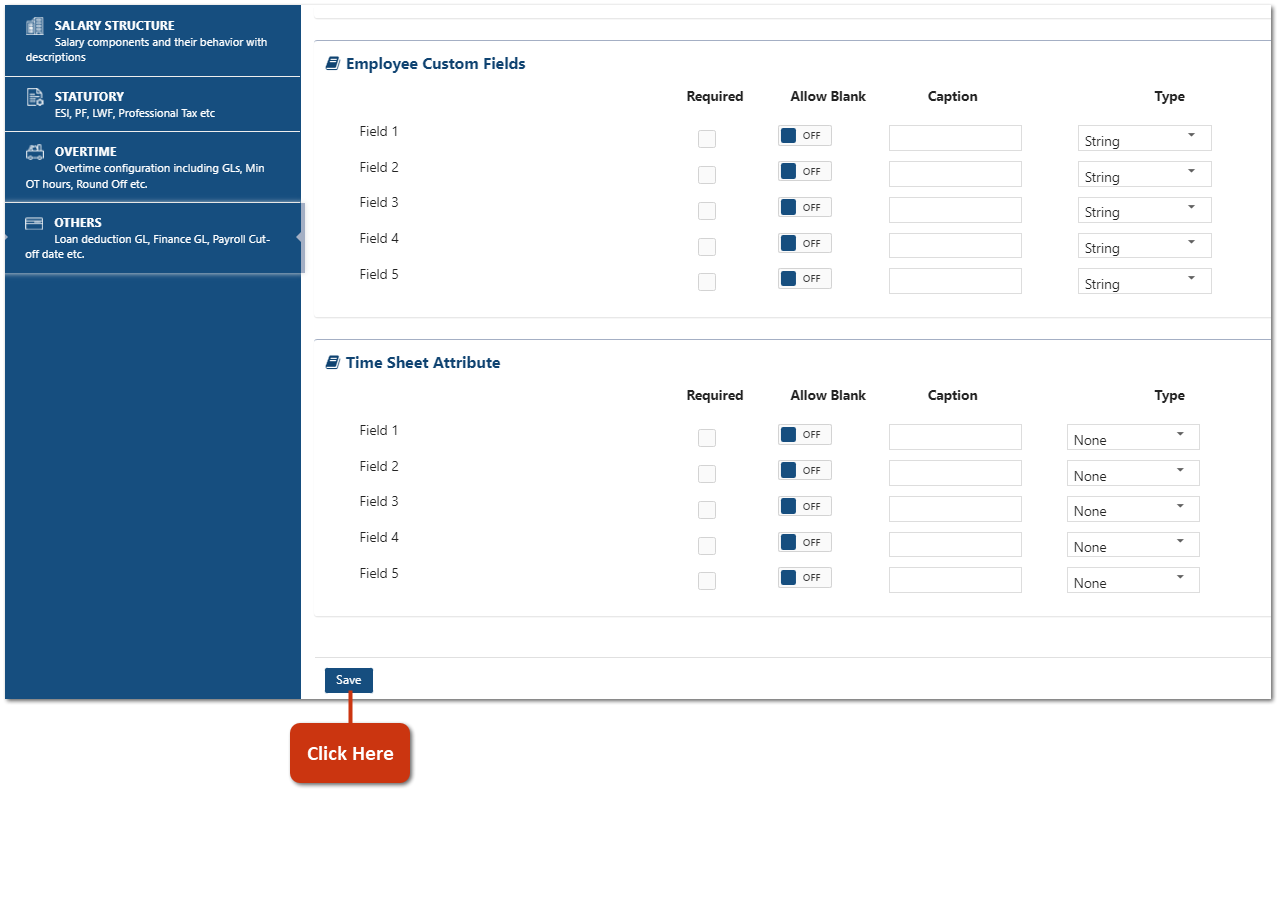
Click on 'Save' button to save the changes.
In this way you can do the HR Payroll Setup in AlignBooks.