
Manage User
-
If more than one person manages your company’s records or creates documents, or if you want someone to help view reports and other data, you can easily add multiple users in AlignBooks. Each user will have their own User ID and password to log in, and multiple users can access the system at the same time.
-
AlignBooks also keeps a detailed activity log for each user, so you can always see who did what. This helps you track performance and hold users accountable.
-
Worried about giving everyone full access to your company’s data? Don’t be. AlignBooks lets you control what each user can see and do. You can assign specific rights, so a user only has access to the sections and tasks they need, keeping your sensitive information safe and ensuring smooth operations.
-
When you first sign up with AlignBooks, you are automatically set up as the Administrator with full rights. From there, you can add more users as required.
-
Your subscription allows you to add a certain number of users, including the Administrator. If you need more than five users, you can purchase an additional subscription to add more.
In Manage User, it's have 3 parts, which are as follow:
-
Create New User
-
Invite User
-
Invite Party to Join CVSS
-
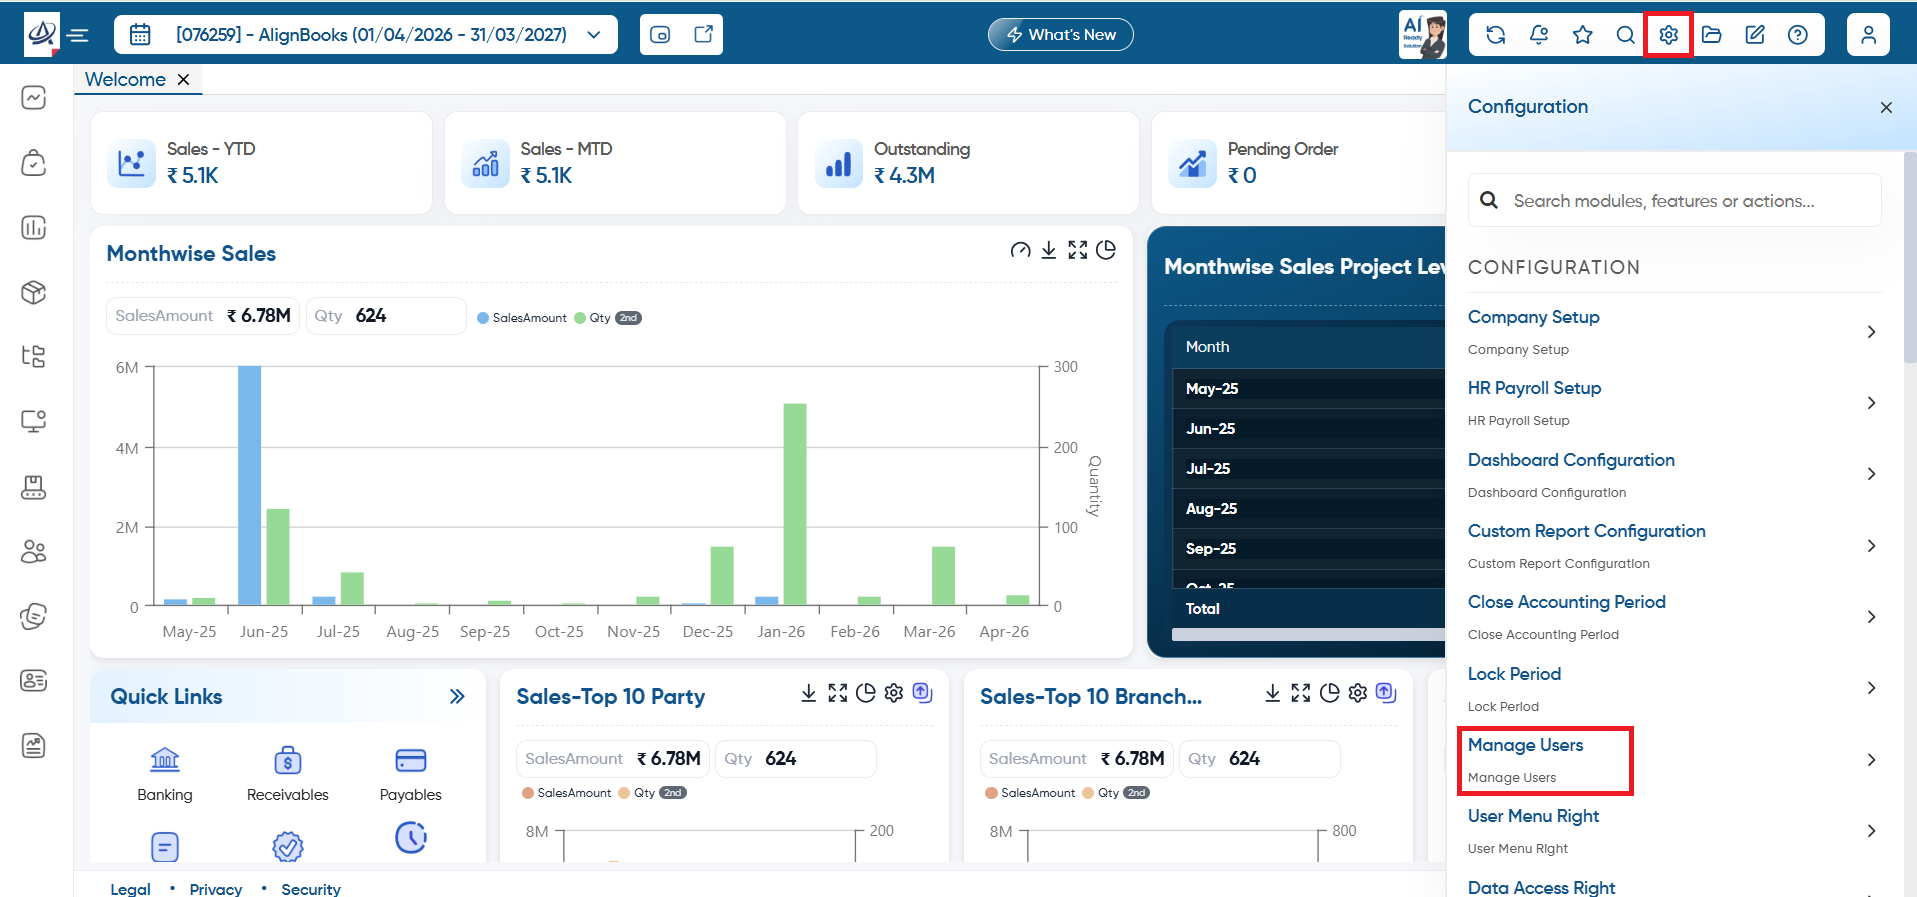
First, click on 'Configuration' icon and select 'Manage Users' option.
-
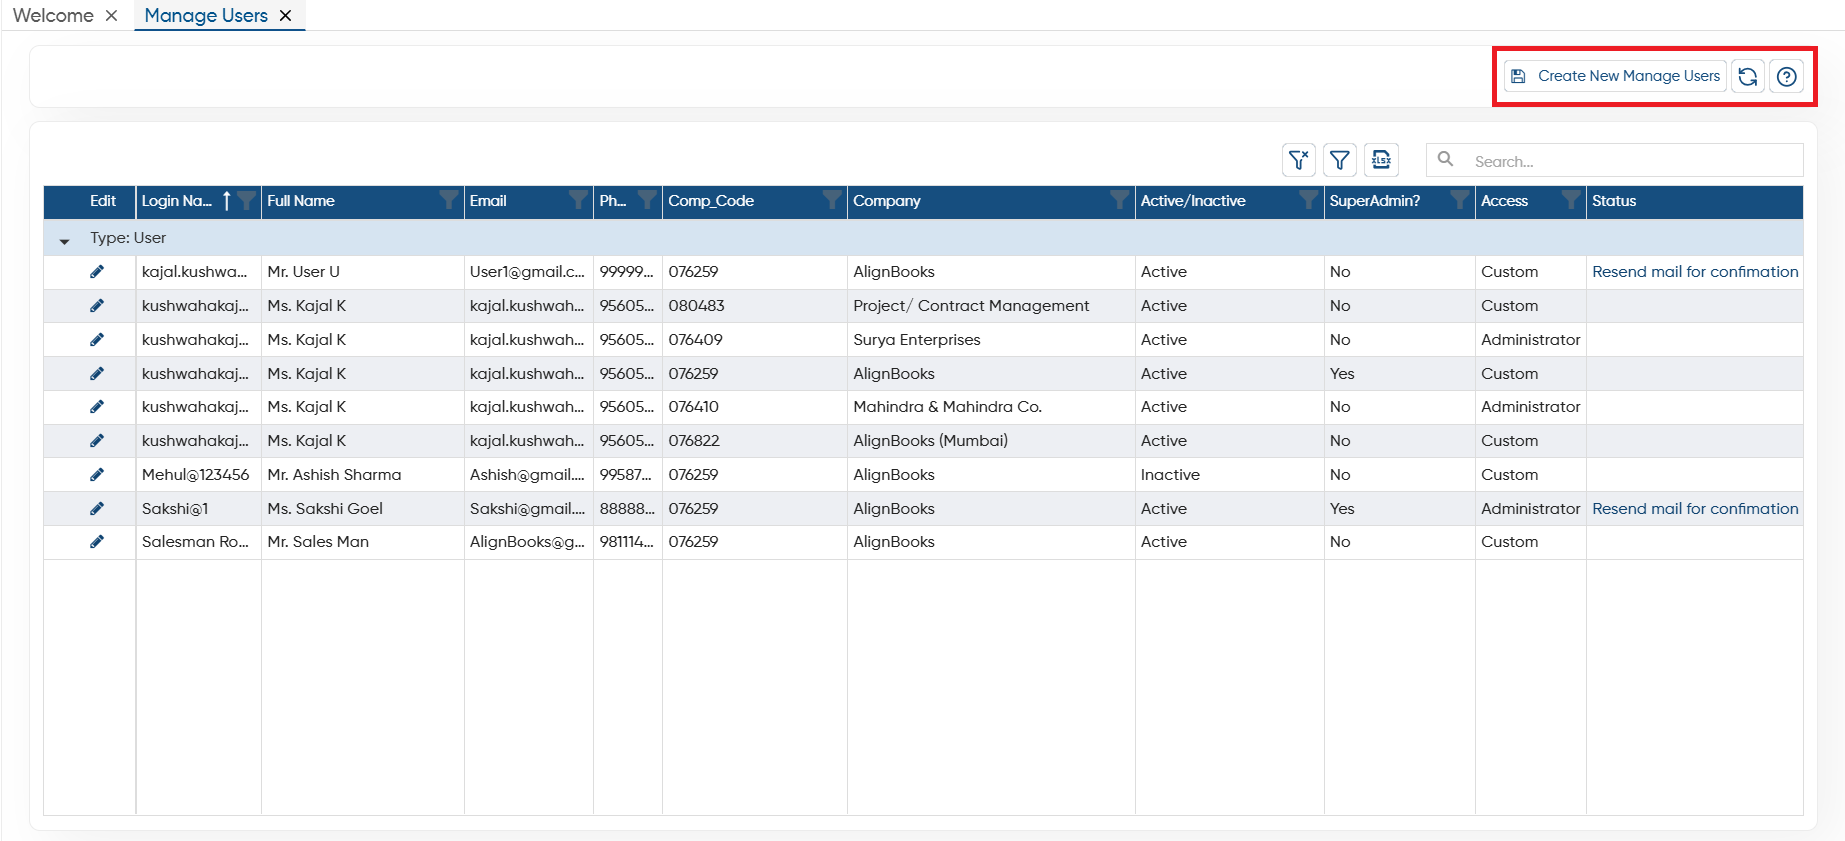
Create New User: Now click on 'Create New User' button to create a user.
-
Refresh: After making changes to the master if changes doesn't appear you can refresh the screen. This will display the latest changes on the screen.
-
Help: Click on the help icon to access the step by step guide of the Process.
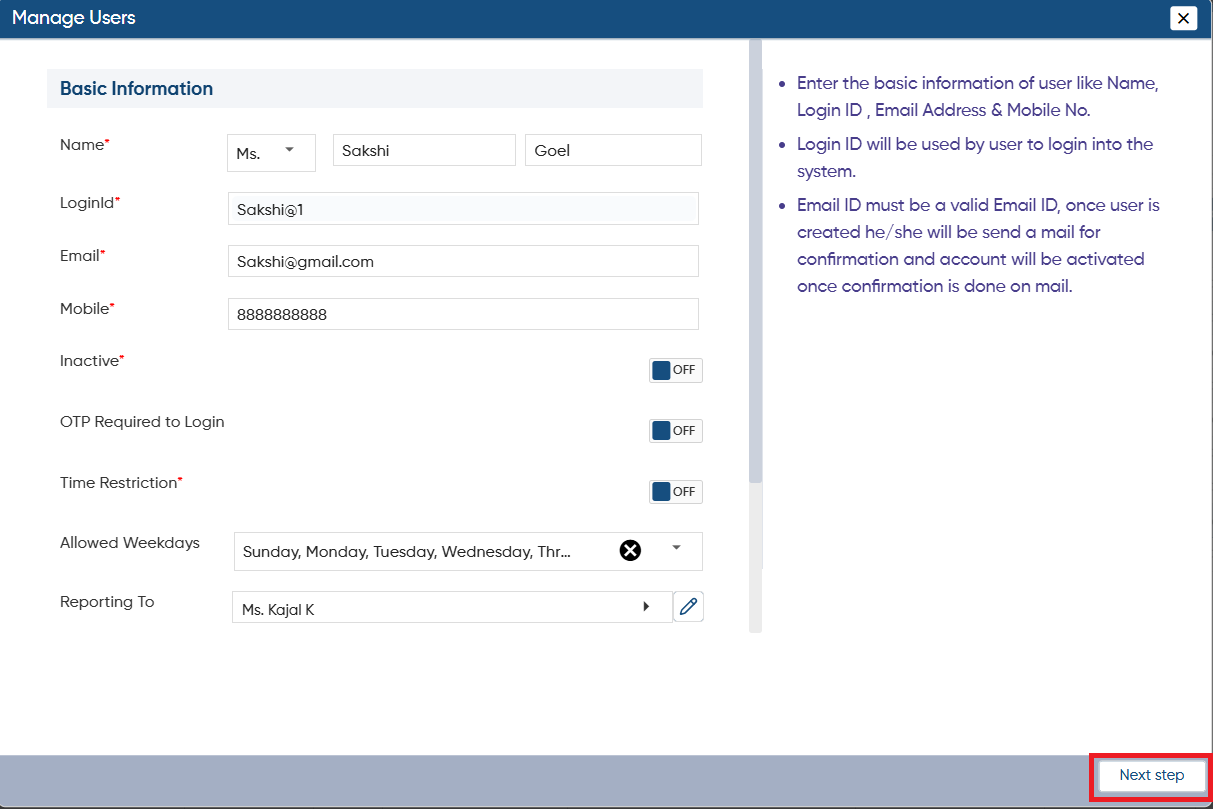
A 'Manage User' window will appear. Here, you have to mention the user details.
-
Name: First select the Gender of the user and mention the first and Last Name of the user.
-
LoginId: Mention the Login-Id for user as needed.
-
Password: Mention the password that needs to be fix for software Login. Make sure the password that you will fix must have 8 Characters which includes 1 in Upper Case, 1 should be Number, and 1 is special Character like @, #, $ as needed.
-
Confirm Password: Again mention the same password to verify.
-
Email: Mention the Valid Email Id of the user.
-
Mobile: Specify the Mobile Number of the user.
It's mandatory to mention all the above fields.
-
OTP Required to Login: Turn it 'ON' if you want an OTP to be required each time you log in to the software.
-
Time Restriction: If you want to set timings for User to Login, then you needs to turn 'ON' the option and set the timings. The user will only be able to Login in the specified time period.
-
Reporting To: You can fix the reporting for the user if required. If in your company user have any senior or manager whom they are reporting to you can maintain it easily.
-
Allowed Company: If you manage multiple companies, you can restrict user access to specific companies. Simply select the companies you want the user to have access to.
-
Default Company: The companies you assign to the user will be displayed here. You can select one as the default company for the user, ensuring it opens automatically when they log in. The user can switch to a different company if needed.
-
Now, click on 'Next Step' button.
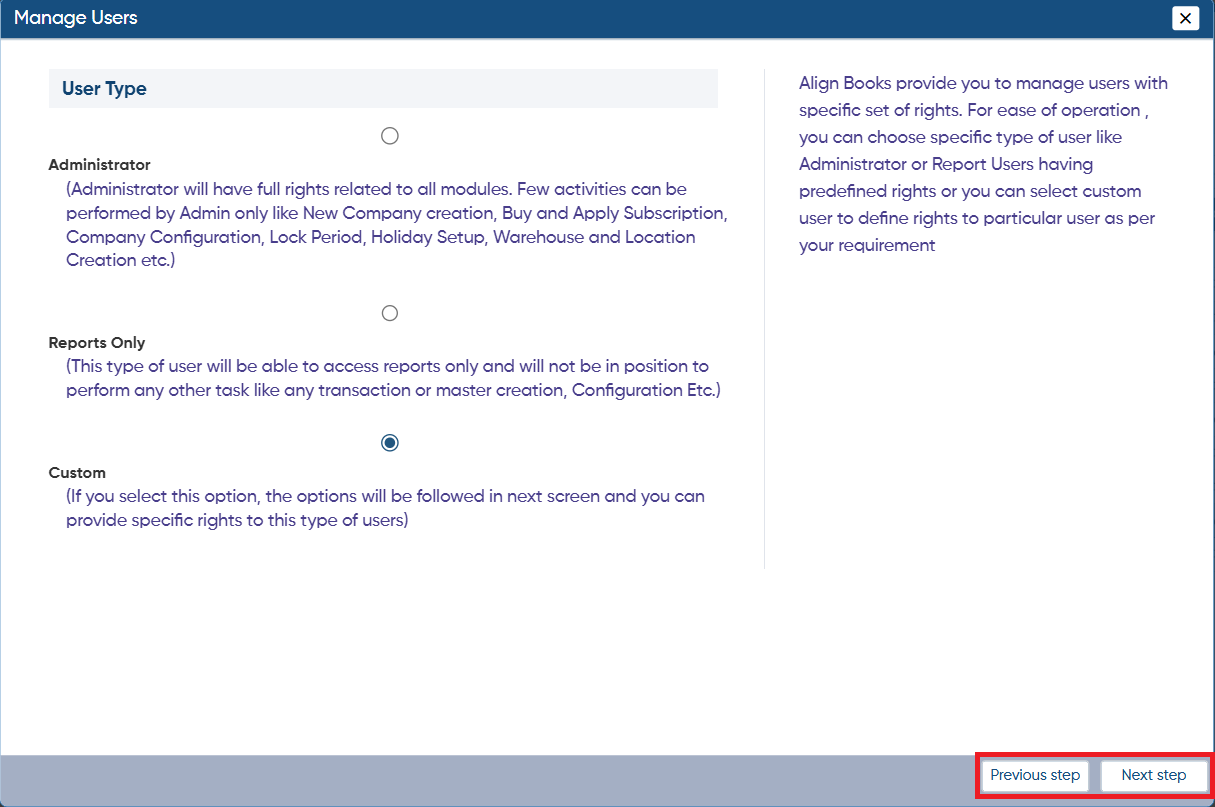
AlignBooks provides 3 types of user rights. You need to select any of the one type for the User.
-
Administrator: The Administrator has full access to all modules. Certain actions, such as creating a new company, purchasing and applying subscriptions, configuring company settings, locking periods, setting up holidays, and creating warehouses or locations, can only be performed by the Administrator.
-
Reports Only: This type of user will have access to view reports only and will not be able to perform any other actions, such as making transactions, creating masters, or modifying configurations.
-
Custom: By selecting this option, the next screen will allow you to assign specific rights to this type of user.
Suppose select 'Custom' option.
Click on 'Next Step' button to proceed further. You can also go back to the previous window by clicking on 'Previous Step'.
-
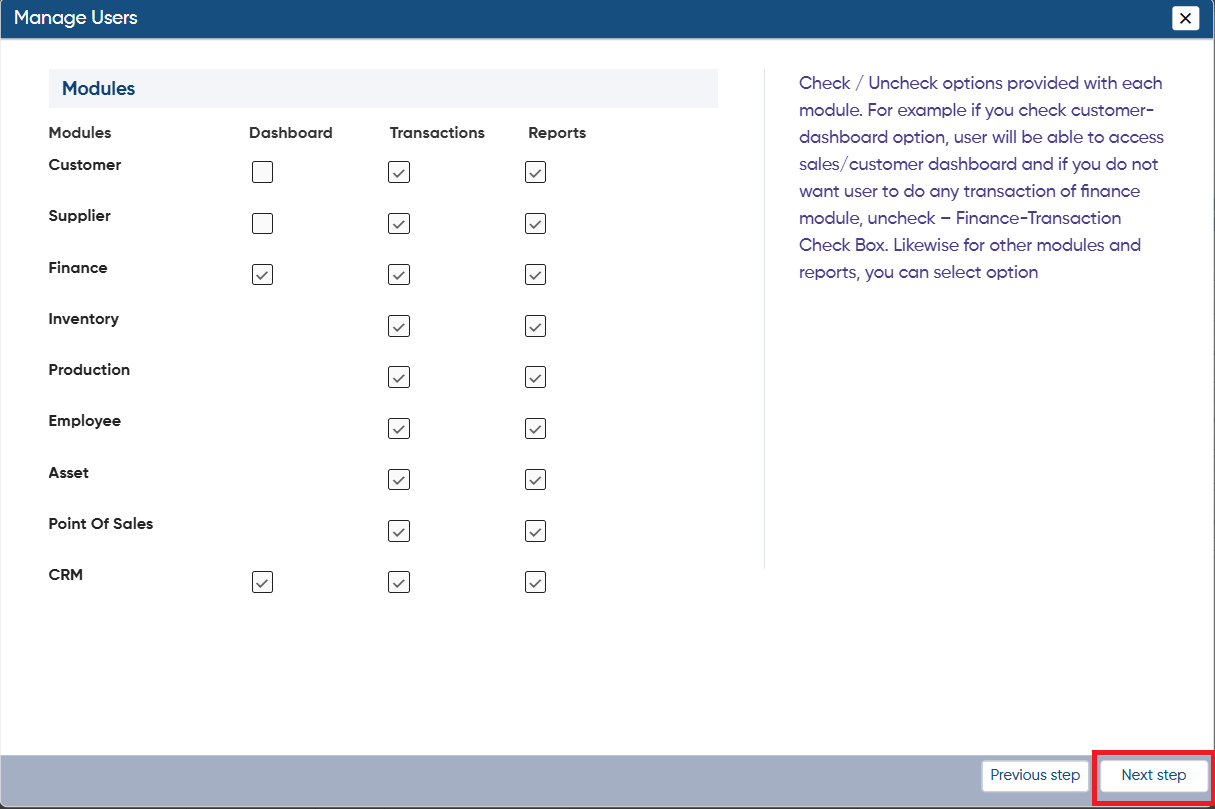
You now need to check the rights you want to assign to the user. For each option, Dashboard, Transactions, and Reports, you can specify whether access to that module is allowed for dashboard data, transactions, or reporting.
-
Click on 'Next Step' button.
-
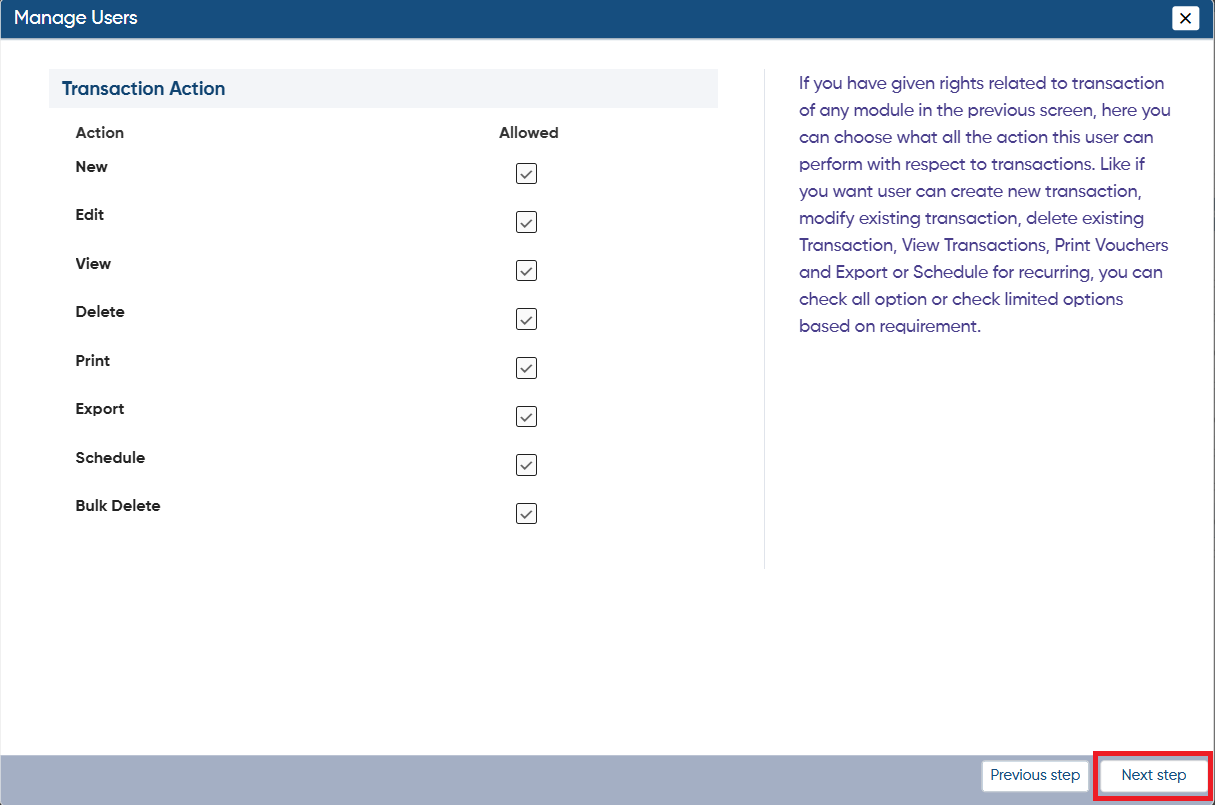
You can now grant your user permission to perform transaction actions, such as creating, editing, viewing, or deleting transactions.
-
Now again click on 'Next Step' button.
-
Now, you can set the Report related rights for the user. Whether you want to allow the user to view report, Print report, Export Report, or Configurations of reports as per the requirement.
-
Click on 'Next Step' button.

-
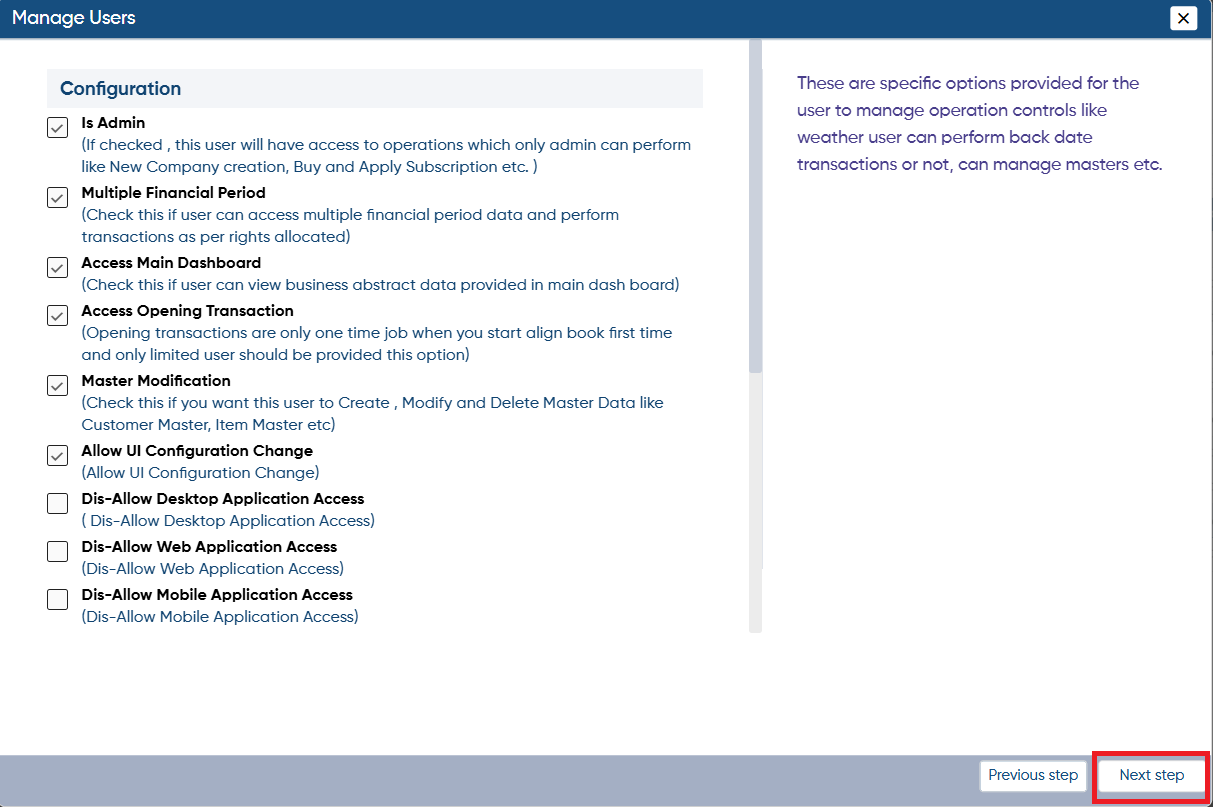
Here, you can allow some special rights to the users like New Company Creation, Back Date Entries, Mobile Dashboard rights etc.
-
Click on 'Next Step' button.
-
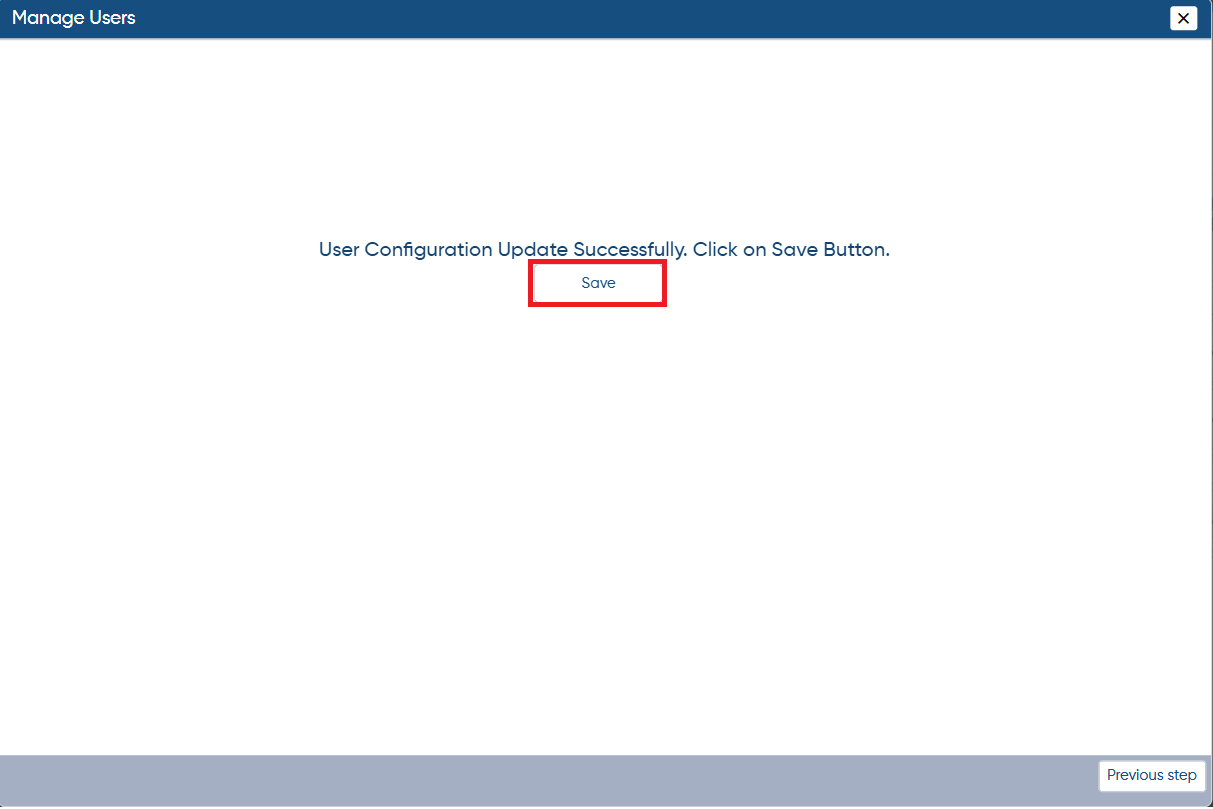
A 'Congratulations' message will appear of creating New User, Click on 'Save' button.
-
From this window, you can go on the previous window by clicking 'Previous Step' button, if still need to change any rights before saving it otherwise click on 'Save' button.
-
A 'Save Successfully' alert will appear. Thereafter, the New User will get added.
-
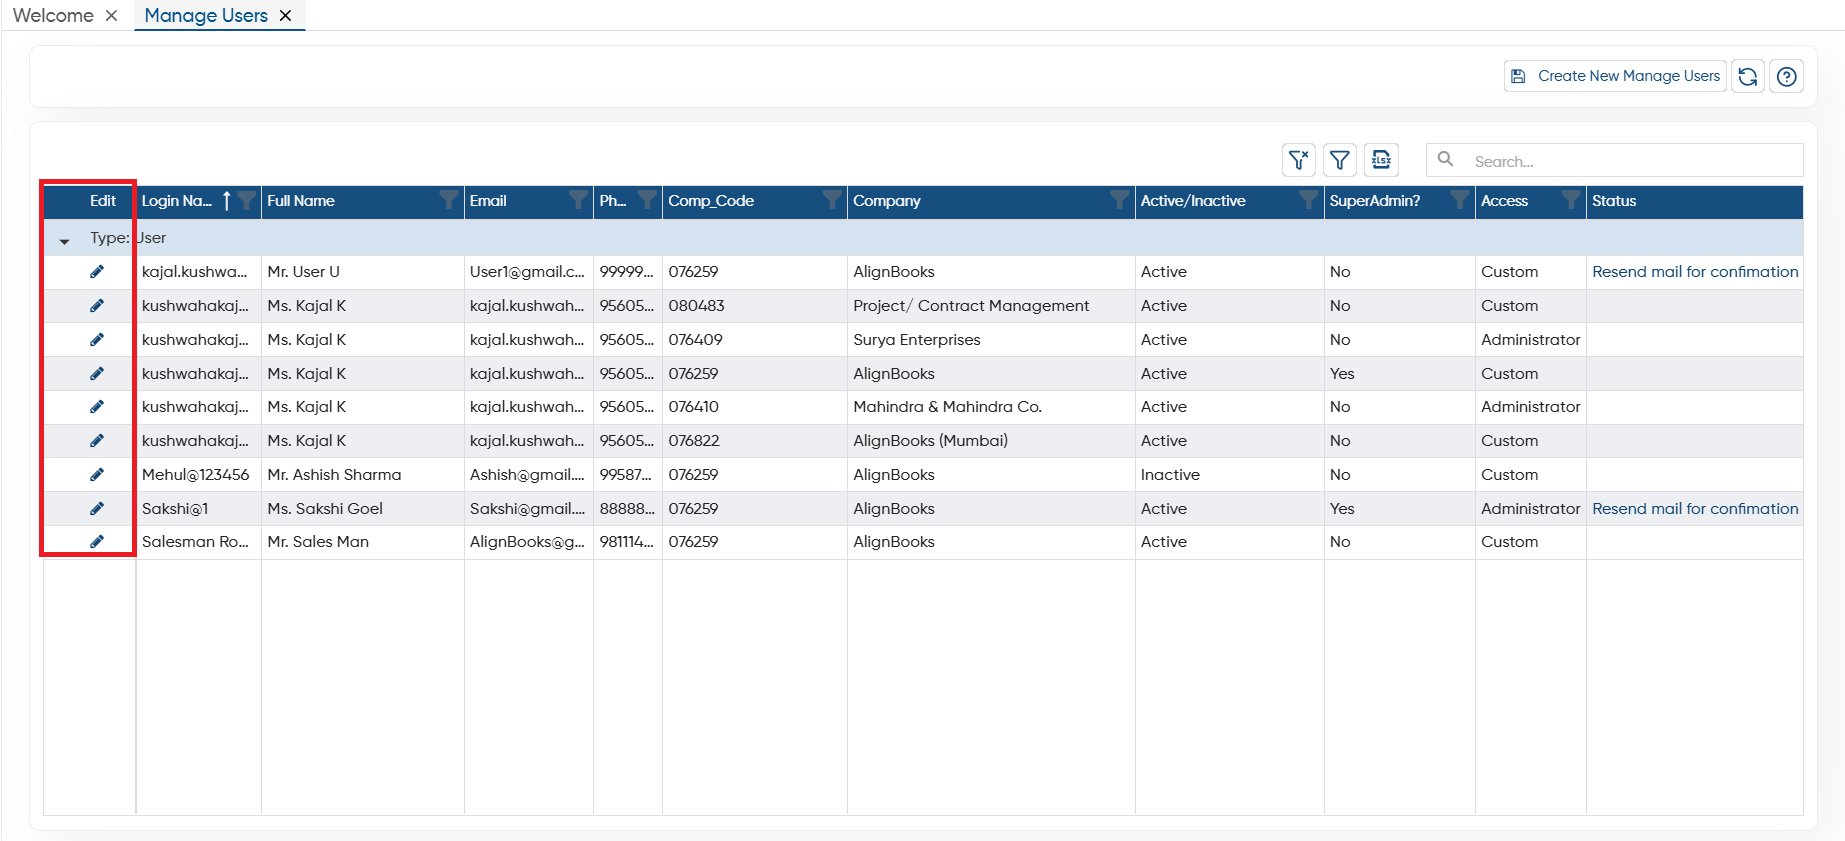
After the User Creation if you need to Edit or Modify the User rights, then click on 'Edit' icon.
-
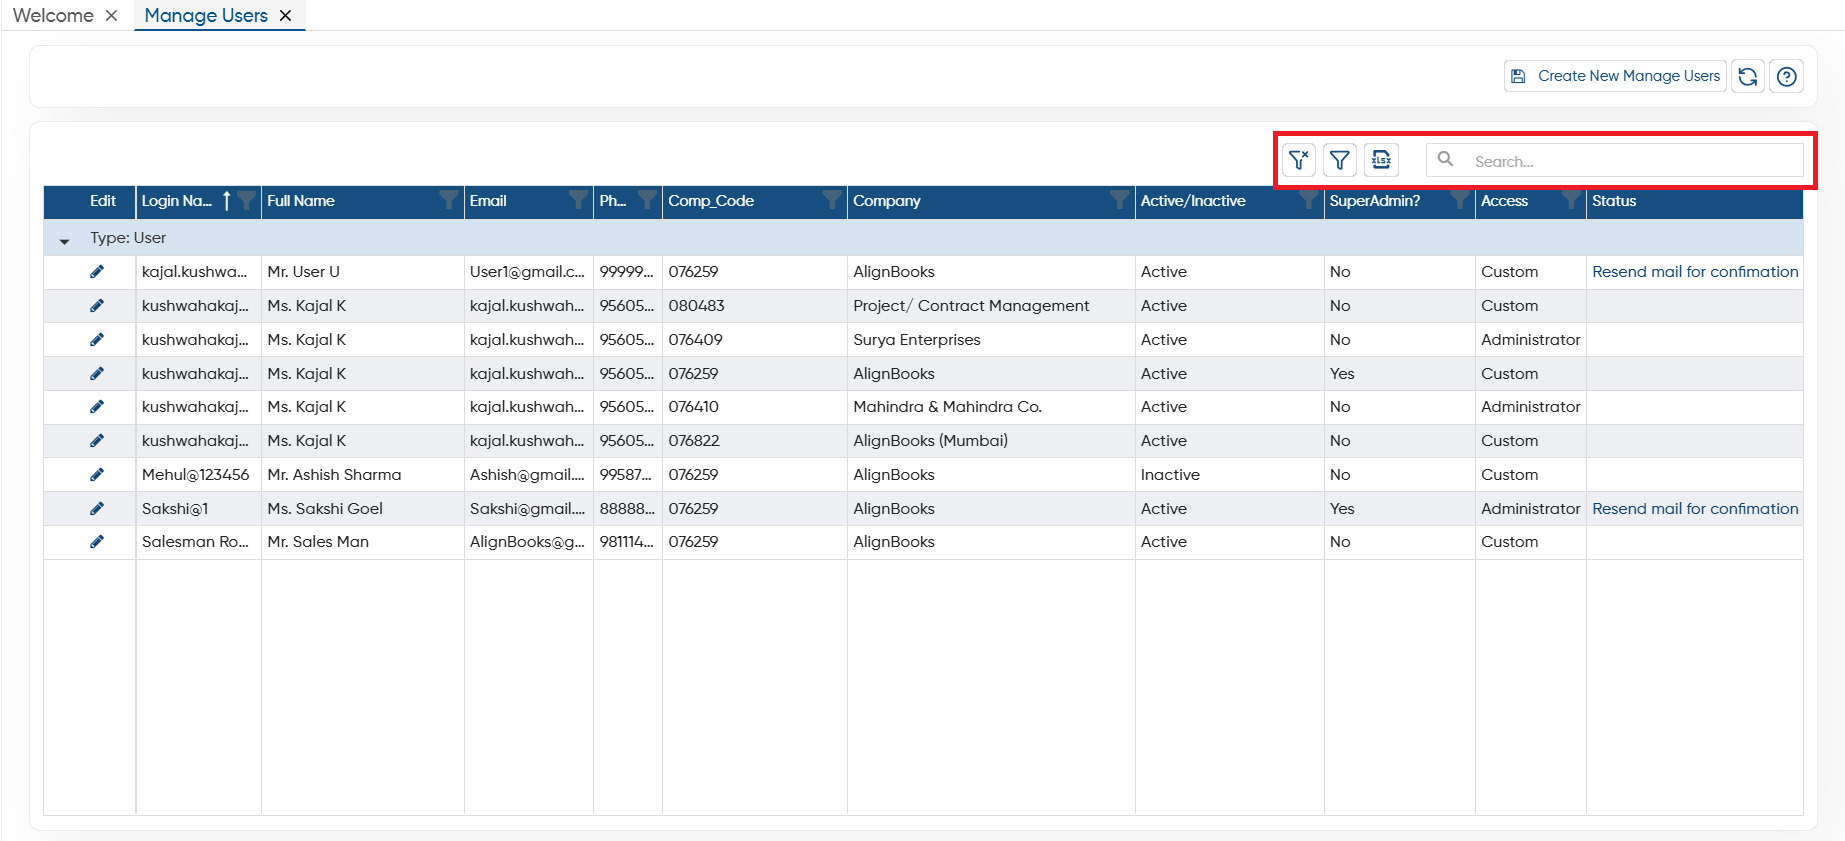
Clear Filter: Click on the Clear Filter icon, to remove all the filters you have applied on the list.
-
Show Filter: Through the ‘Show Filter’ icon, you can enable column-wise filtering. Once activated, a search icon will appear at the top of each column, allowing you to filter the list easily.
-
Excel: You can export the all data in excel file also, to export the data click on excel icon.
-
Search: To search any record in the list you can type the details in search box, software will display the result on the screen.
In this way, you can Manage User Rights easily in AlignBooks Software.