
Approval Workflow Matrix
The Approval Workflow feature in AlignBooks helps businesses make sure invoices are checked and approved by the right people before they are finalized. It’s like setting up a chain of command based on the invoice amount and who needs to approve it.
Approval workflow includes different levels:
-
Name and Value Range: You can create different workflows depending on the invoice amount. For example, a small invoice might need one approval, but a large invoice might need two or three level approvals.
-
Workflow-Level and User Matrix: You choose who will approve the invoices at each level. You can also assign backup approvers (alternates) in case someone is unavailable.
-
User and Scope Matrix: Decide where each user can approve – for example, which branches, Document Category, brands etc. they are allowed to handle.
-
Get Notified: You can turn on alerts via Email, SMS, or WhatsApp, so approvers get notified when a new invoice needs their attention.
Once everything is set, the workflow makes sure every invoice goes through the right approval steps automatically.
-
Open any document for which you want to create the approval Matrix.
-
Then, click on the ‘Configuration' icon.

-
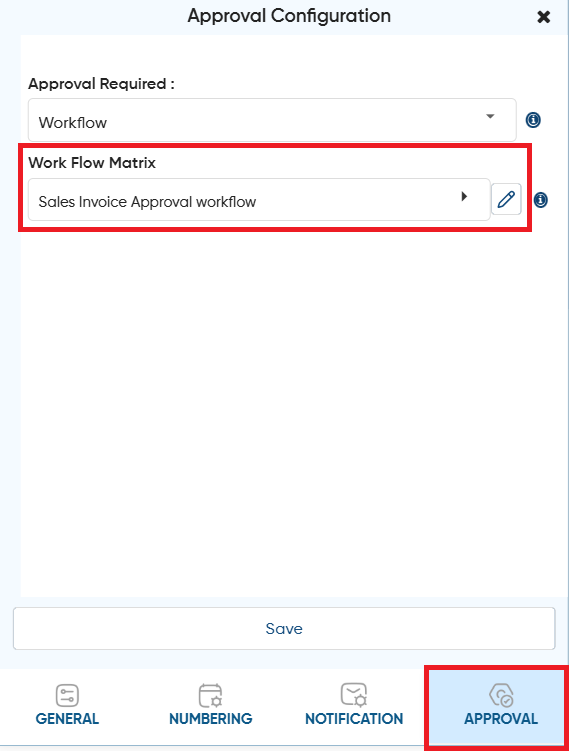
Under 'Approval' tab, in 'Approval Required' option, select 'Workflow'.

-
A 'Work Flow Matrix' option will be displayed, where you can create your own matrix. That means the hierarchy for the Invoice approval.
-
Click on the ‘+' icon to add a new matrix.

-
Here, you can create and fix the type of workflow based on different invoice amount ranges as required.
-
In the ‘Name' field, mention the name of the Workflow for your identification. As you can create different types of workflows or hierarchy for approval.
-
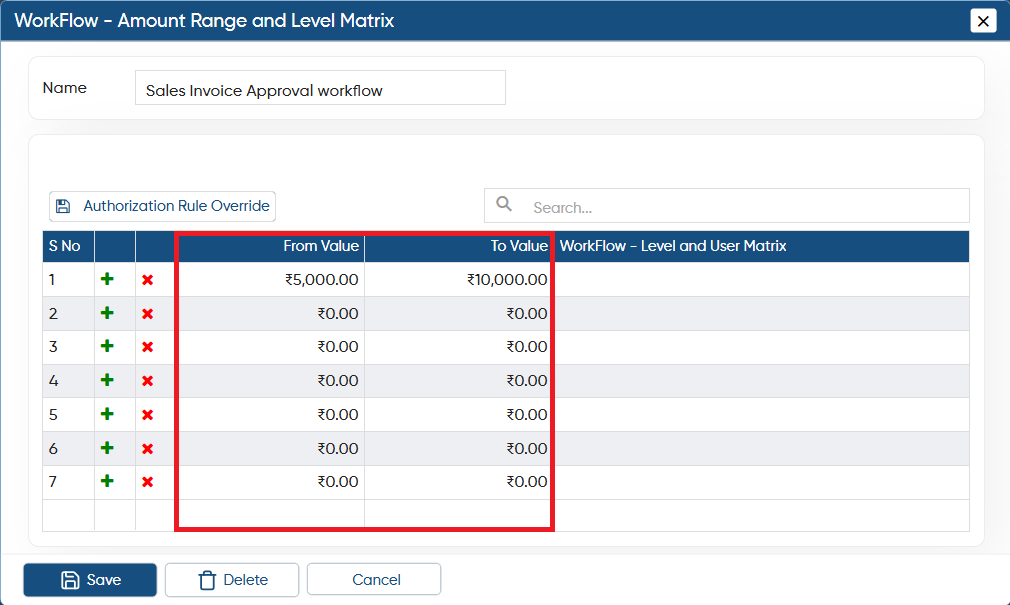
In 'From Value' and 'To Value', specify the amount range for which you want the approval procedure.
 Click on the icon to add more rows. Click on the icon to add more rows. Click on the icon to remove or delete the row permanently. Click on the icon to remove or delete the row permanently. |

Note: This option is used to temporarily replace a user in the approval workflow during a specific period due to unavailability, leave, or other reasons, and applies only to the selected workflow.
|

-
Define the invoice value range for which an approval is required. For example, if you want invoices with values between 5,000 and 10,000 to require approval, you can specify that range here.
-
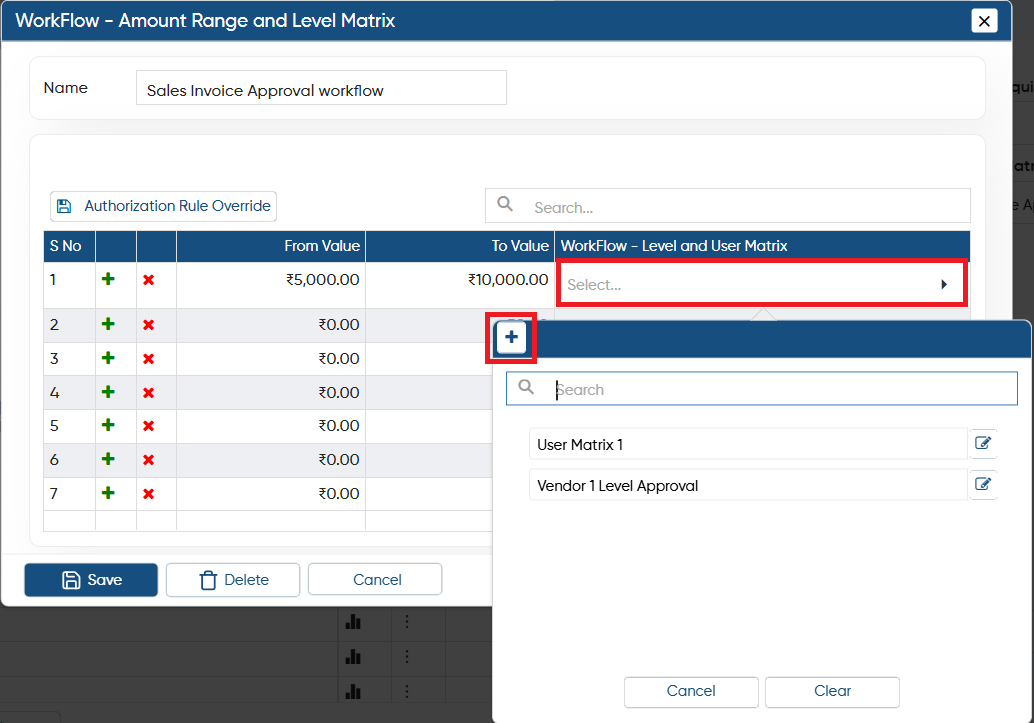
Now, click on the 'Workflow-Level and User Matrix' column, then click the 'Add' icon to create a user matrix that defines which users are authorized to approve invoices at different levels.
-
Mention the name of the user matrix for your identification.

-
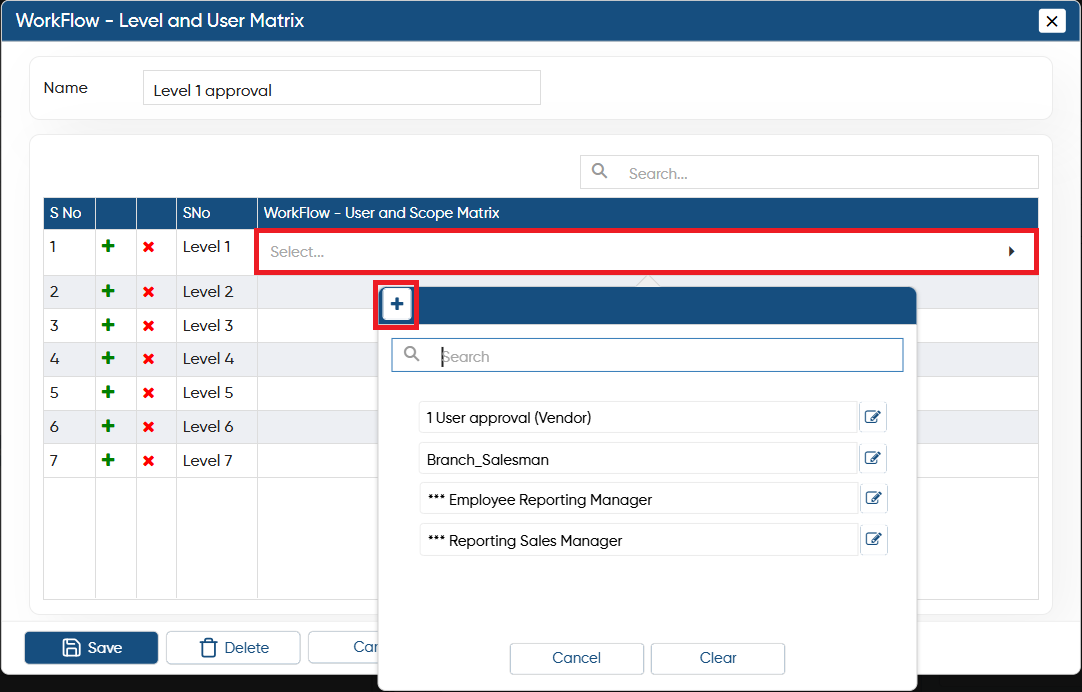
Next, click on the ‘Workflow - User and Scope Matrix' column, then click on 'Add' icon to enter the user details for the first level of voucher approval.
-
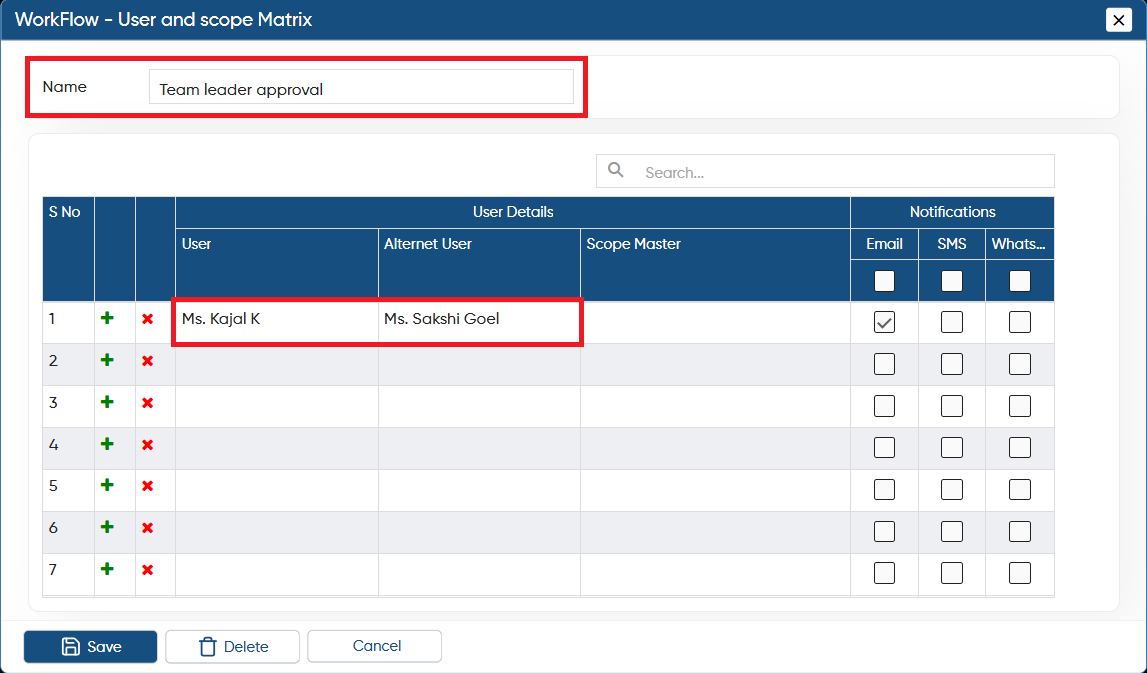
Mention the name for identification of users-scope matrix as required.
-
In 'User' column, select the person’s name who will first approve the invoices.
-
In the ‘Alternate User' column, select the person’s name who will be authorized to approve the invoices, in case the main user is unavailable.
-
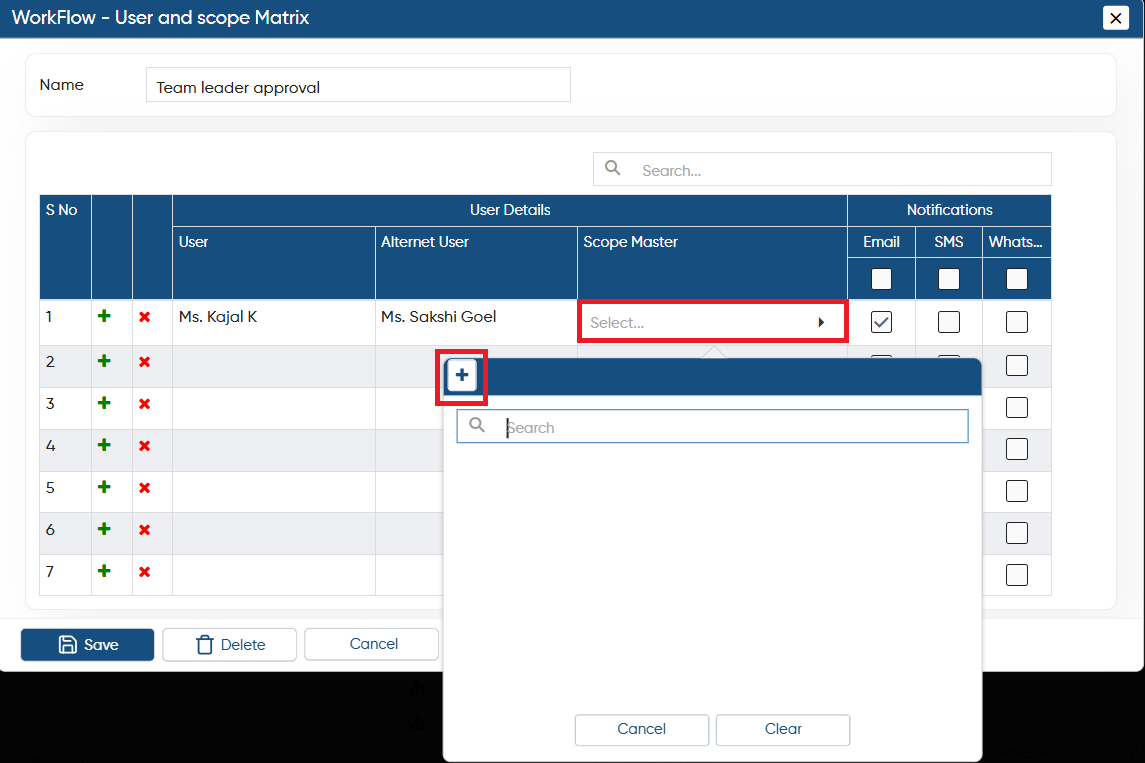
In Scope Master, you can define which branch, party, or salesman's invoices a user is allowed to approve.
-
Click on the ‘Add' icon to create the scope master.
-
Here, you can assign a name to the Scope Master and choose specific modules or select 'All' based on your business needs. This means you can either restrict the user to approve invoices for specific Branches, Document Categories, Parties, Brands, etc., or allow them to approve all types of invoices.
-
Click on 'Save' button.

-
Select the created Scope Master and tick the check box of Email, SMS, WhatsApp to send the invoice approval notification to the selected user.
-
Click on 'Save' button.
You can create custom notification messages with personalized content and delivery modes. It also supports attachments, digital signatures, and triggers for specific events like approval or creation.
|

-
Select the created User Matrix on Level 1.
-
Similarly, you can select and create the different User Matrix to specify which users are authorized to approve invoices at various levels.
-
Click on 'Save' button.

-
Now select the matrix based on the invoice amount and click on the ‘Save' button.

-
In 'Work Flow Matrix' option, select the created workflow you require for the specific document.
-
Click on ‘Save’ button.
-
In this way, you can create and manage Approval Workflow for a specific document as required.
-
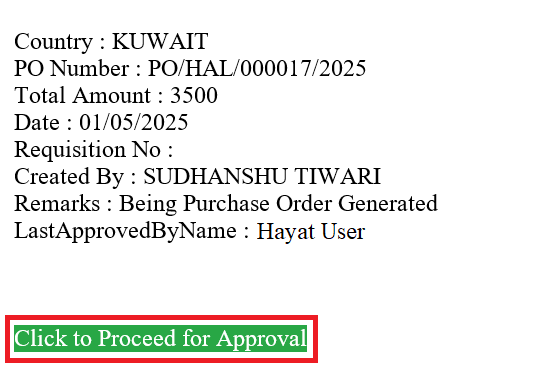
That’s how the user will get the message for Invoice Approval.
-
Click on the ‘Click to Proceed for Approval’ button to approve the invoice.
-
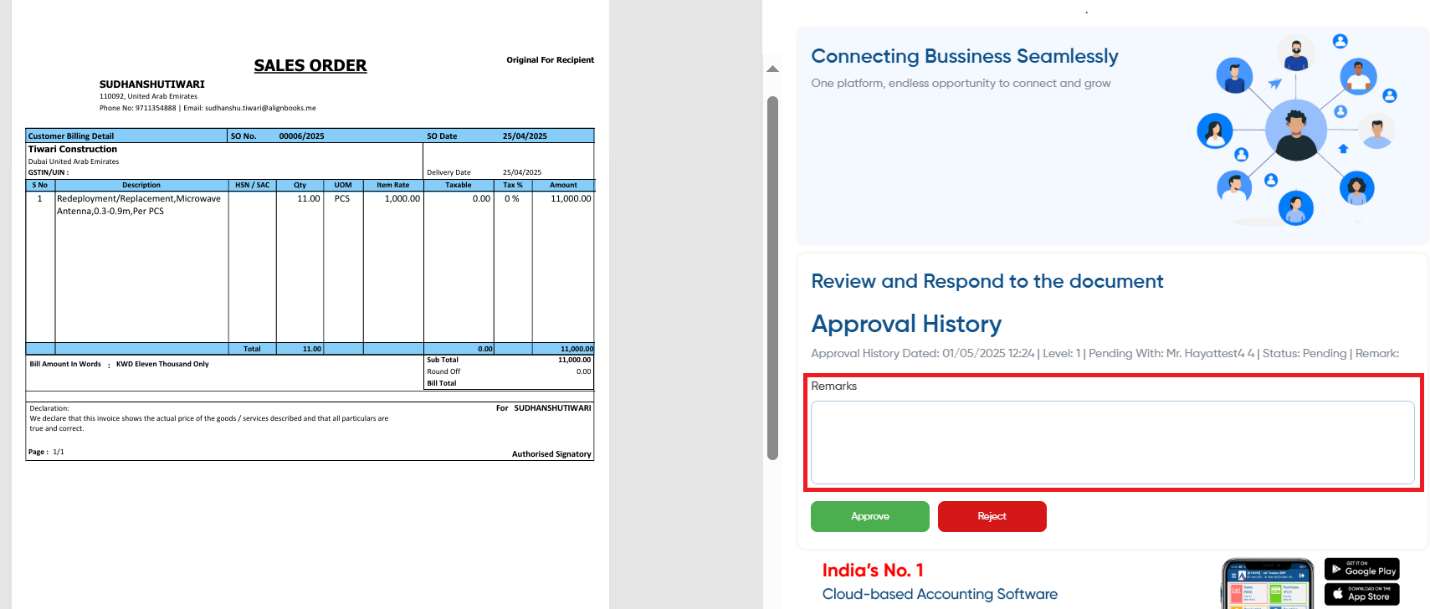
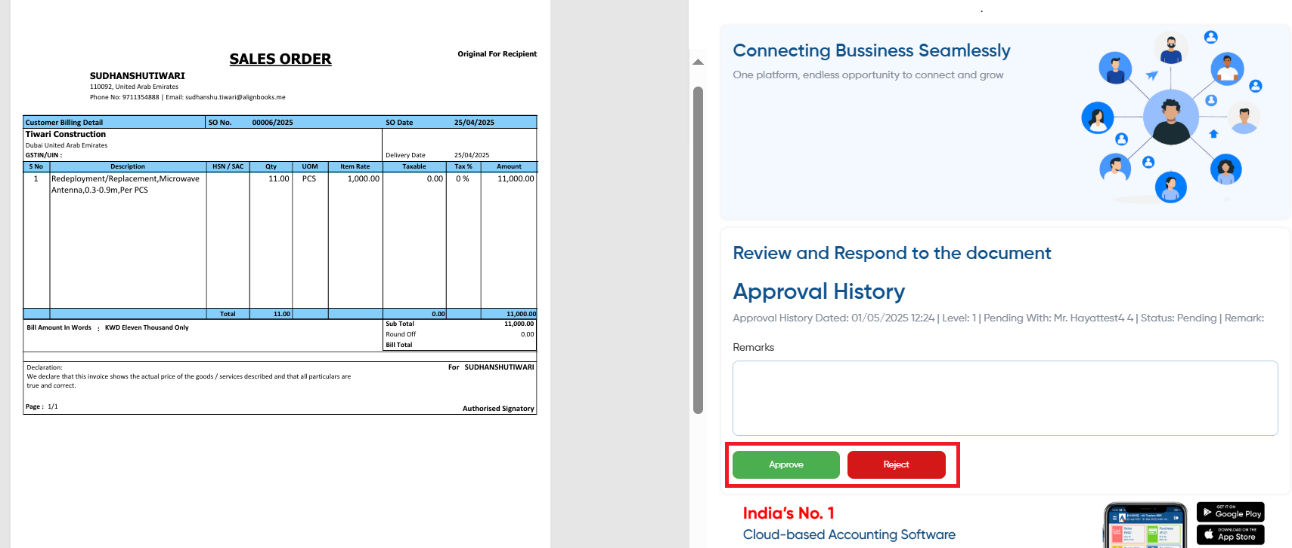
Thereafter, this link will be opened to approve the invoice.

-
In ‘Approval History’ you can view last approval date, status etc.

-
Before approving, you can enter any remarks in the Remarks box.
-
Click on the ‘Approve’ or ‘Reject’ button to proceed as required.
In this way you can create Approval Workflow easily in AlignBooks.