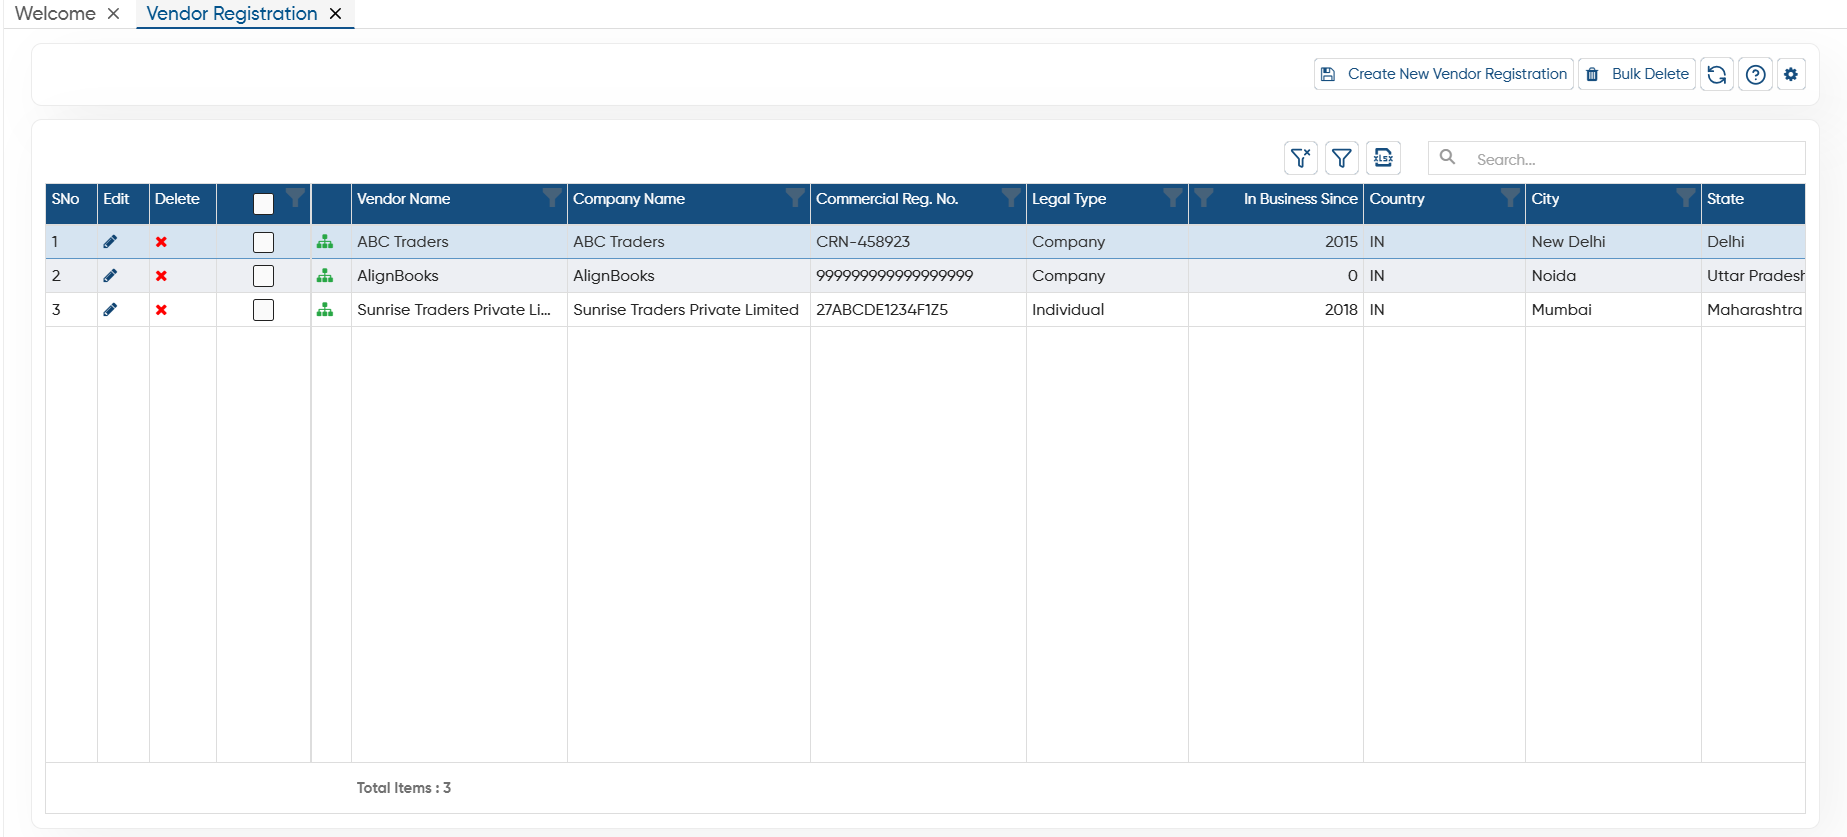
Vendor Registration
Vendor Registration is a simple process where a company collects important details from a supplier before starting any business with them. The vendor provides their information like company name, GST number, bank details, and the products or services they offer.
In AlignBooks, you can easily generate a Vendor Registration Form link and share it with your vendor. The vendor can fill in all required details by themselves, which saves time and avoids manual data entry.
Once the vendor submits the form, AlignBooks allows you to:
-
Set Approvals before the vendor becomes active
-
Send automatic Notifications and Emails, like:
-
A Thank You message after form submission
-
Login details for VMS Portal
-
Emails to update or correct any information
-
Track the status and verify documents digitally
After final approval, the vendor gets added to your system and you can smoothly create purchase orders, receive goods/services, and make payments.
Before you share the vendor registration form link, you must set up the approval workflow. This means deciding who will check and approve the vendor details at each level.
Once the vendor submits their information, it will automatically move through the approval steps you have created, such as Level 1 approver, Level 2 approver, and so on, based on your business requirements.
-
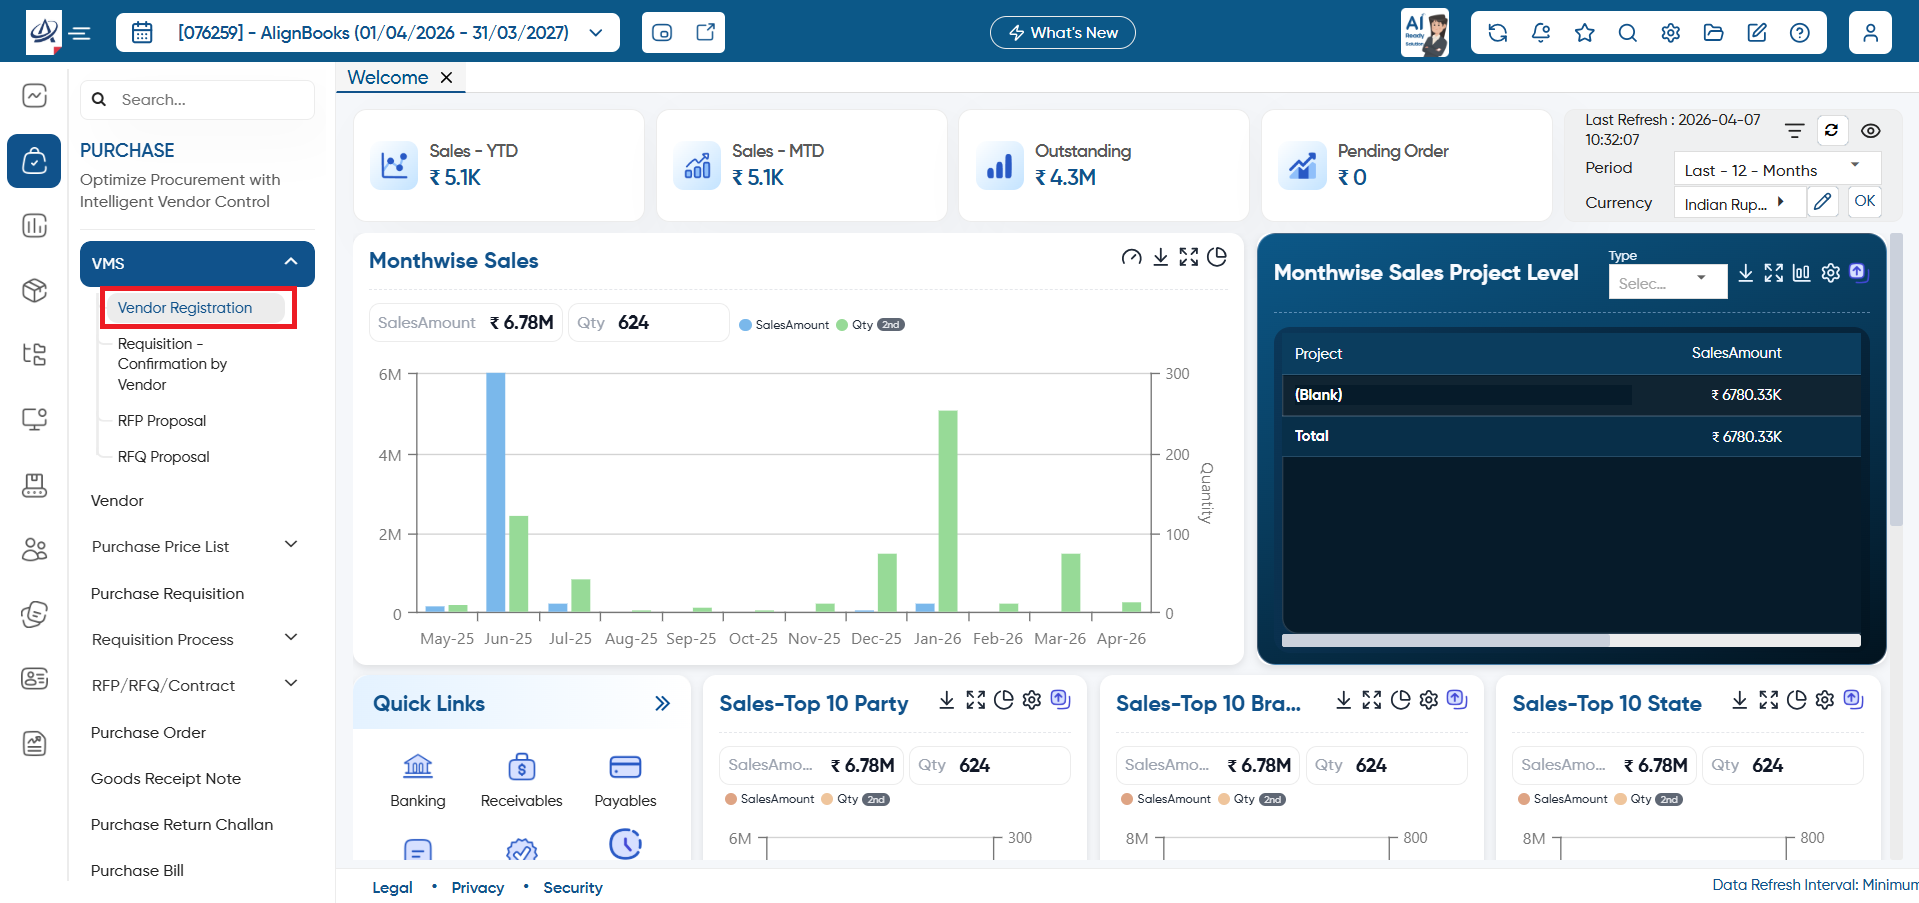
To create the approval workflow, go to Purchase > Vendor Registration.
-
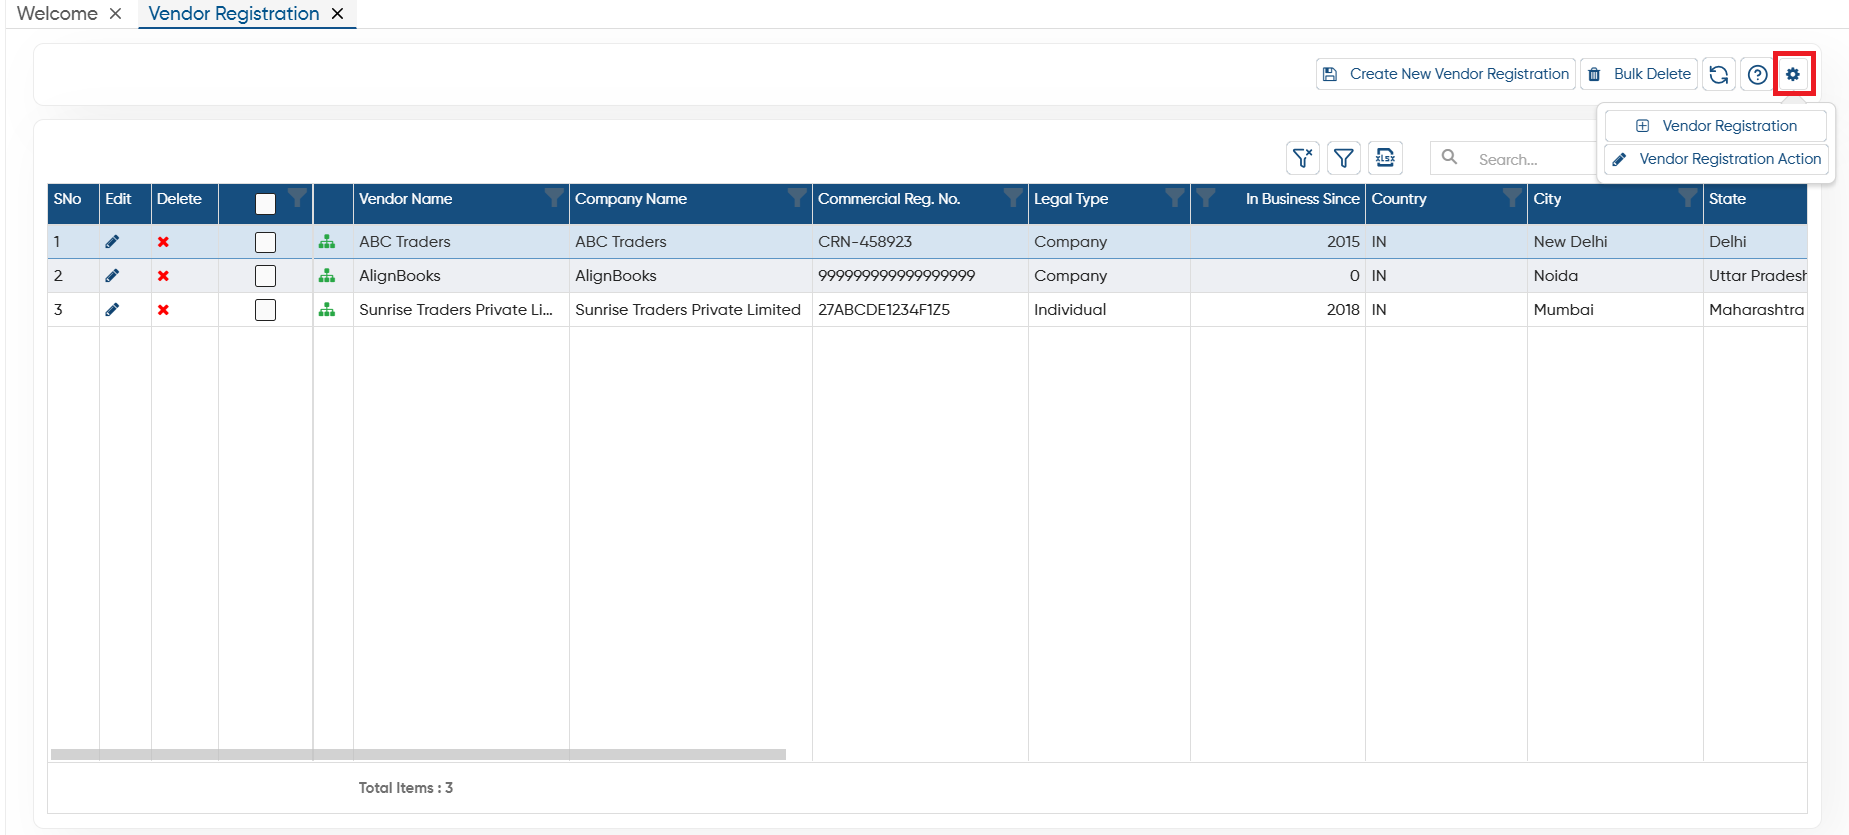
Click on the ‘Settings’ icon, then select ‘Vendor Registration’ option.
-
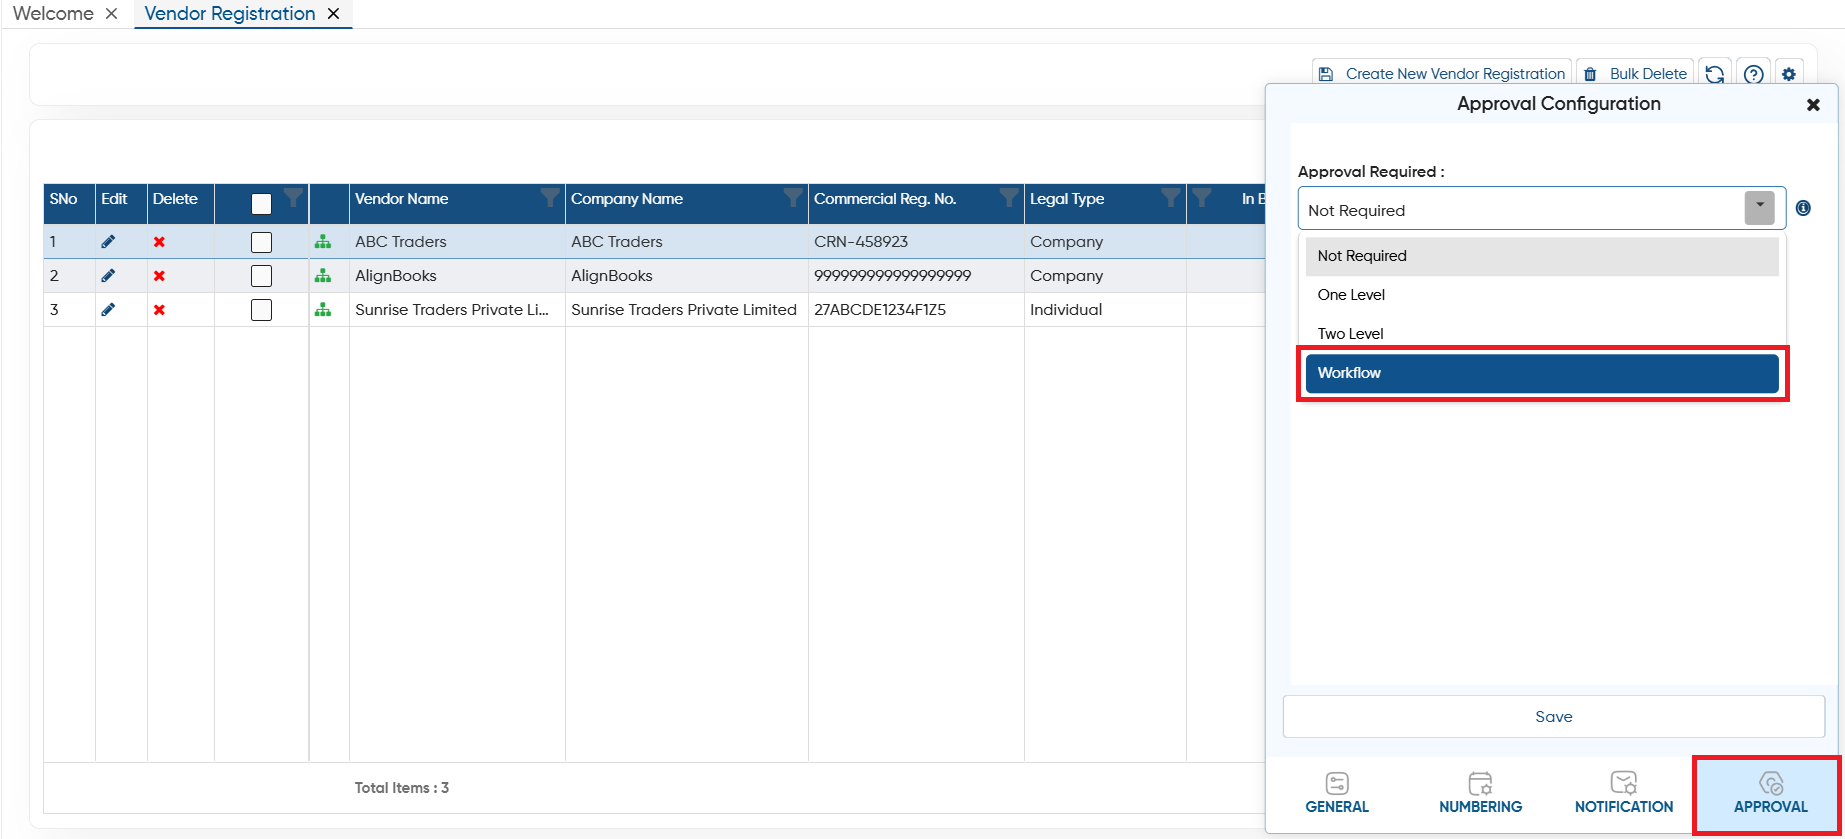
Open the ‘Approval’ tab, in ‘Approval Required’ option, select ‘Workflow’ to create your own workflow for the approval.
-
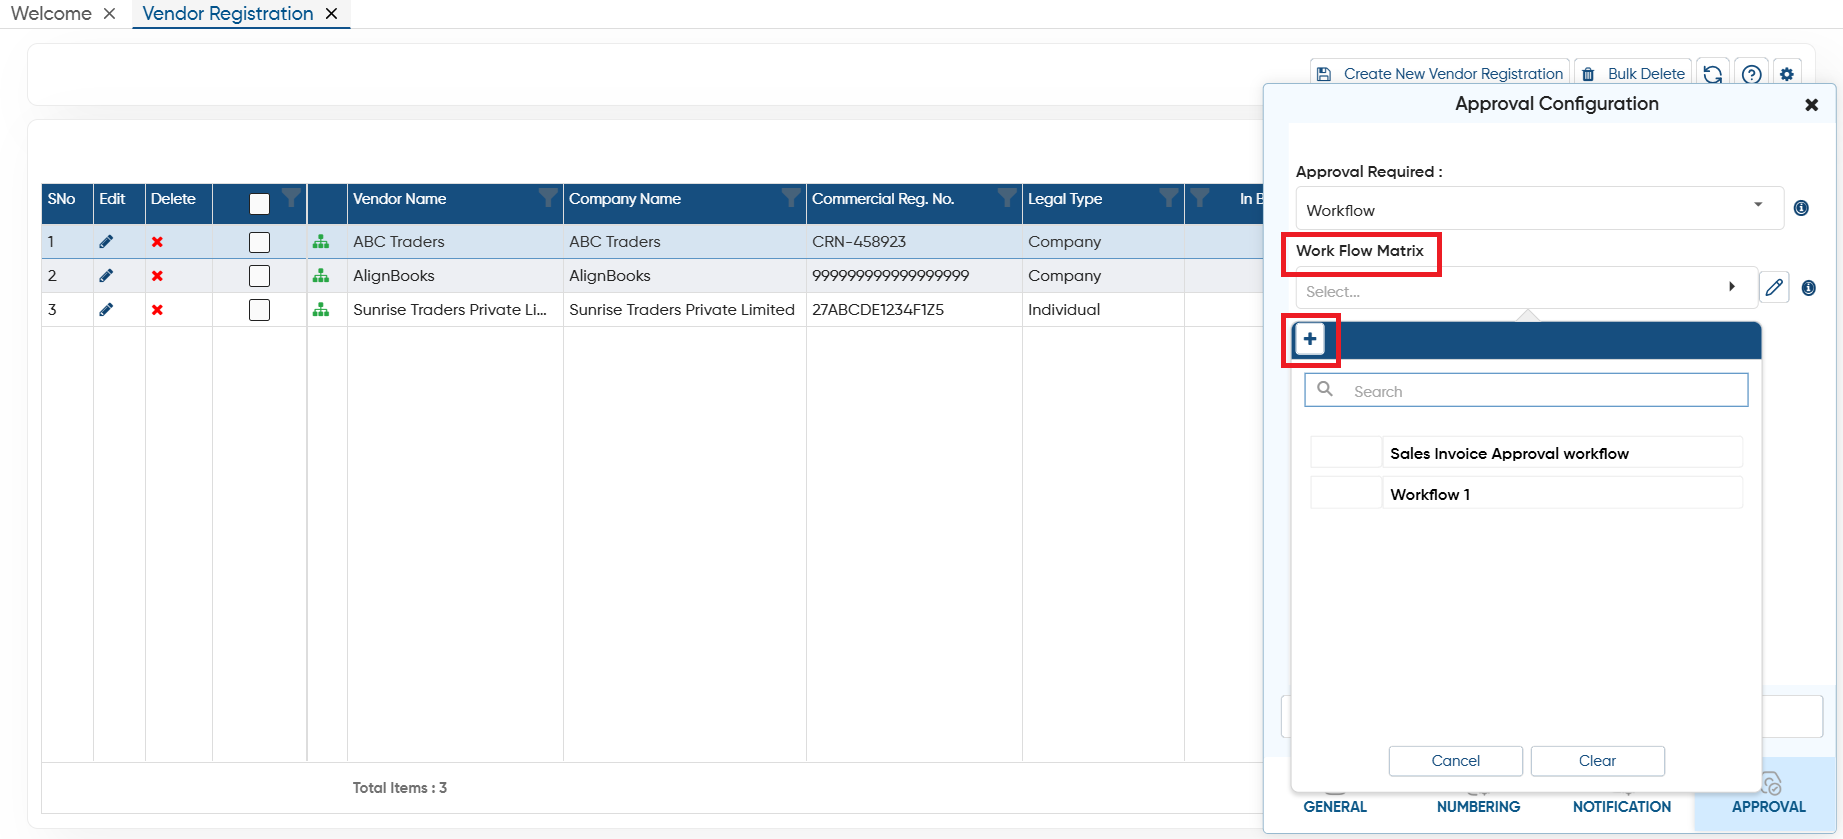
In 'Work Flow Matrix' option, click on the ‘Add’ button to add the new workflow.
-
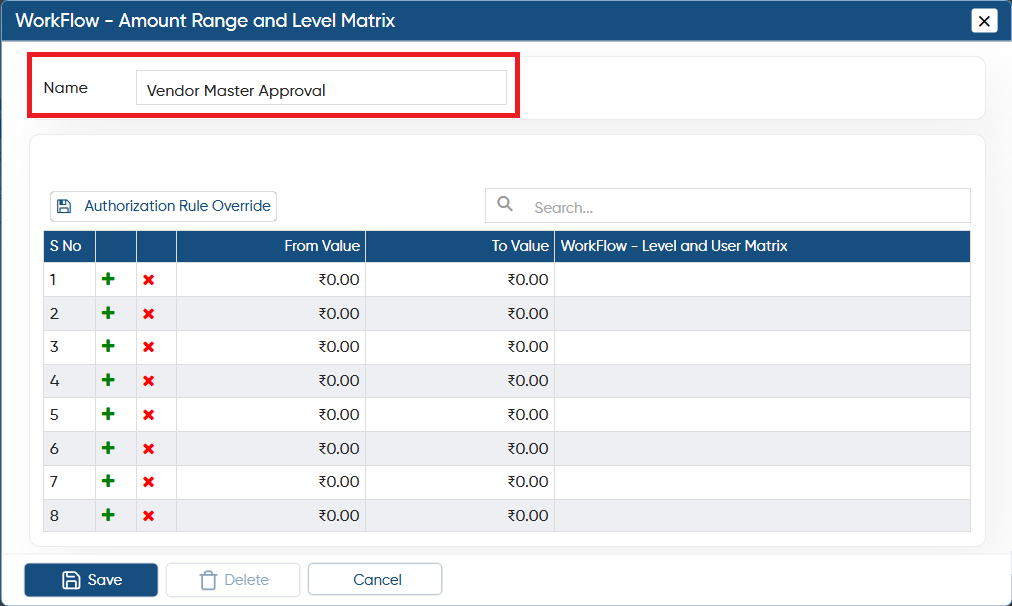
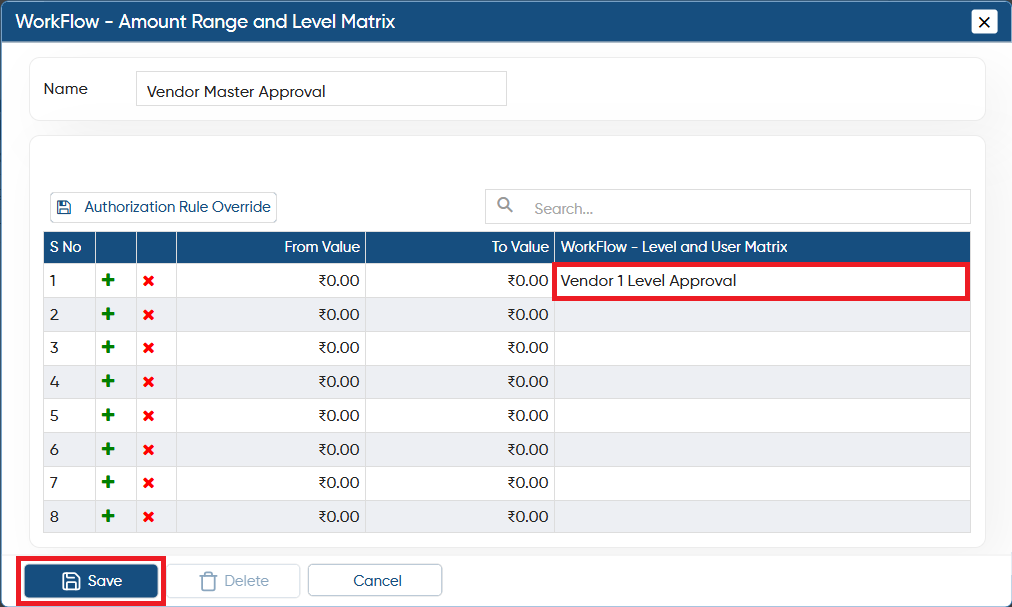
In the ‘Name' field, mention the name of the Workflow for your identification. As you can create different types of workflows or hierarchy for approval.
-
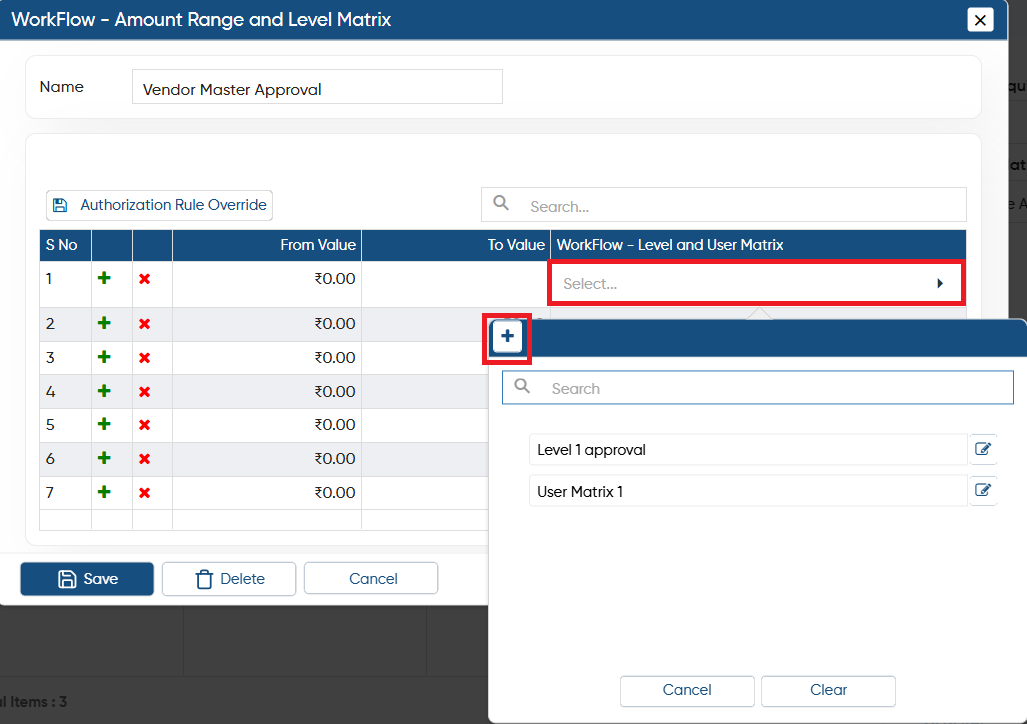
Now, click on the 'Workflow-Level and User Matrix' column, then click the 'Add' icon to create a different level and user matrix that defines which users are authorized to approve vendor registration at different levels.
-
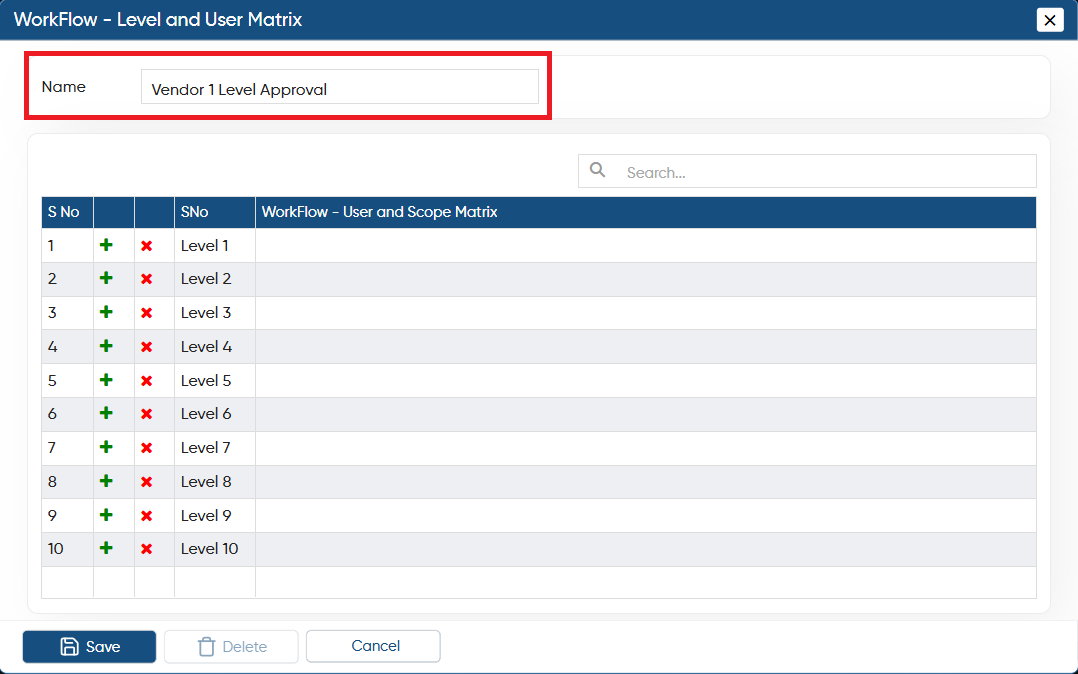
Now, mention the name of the Level and User matrix for your identification.
-
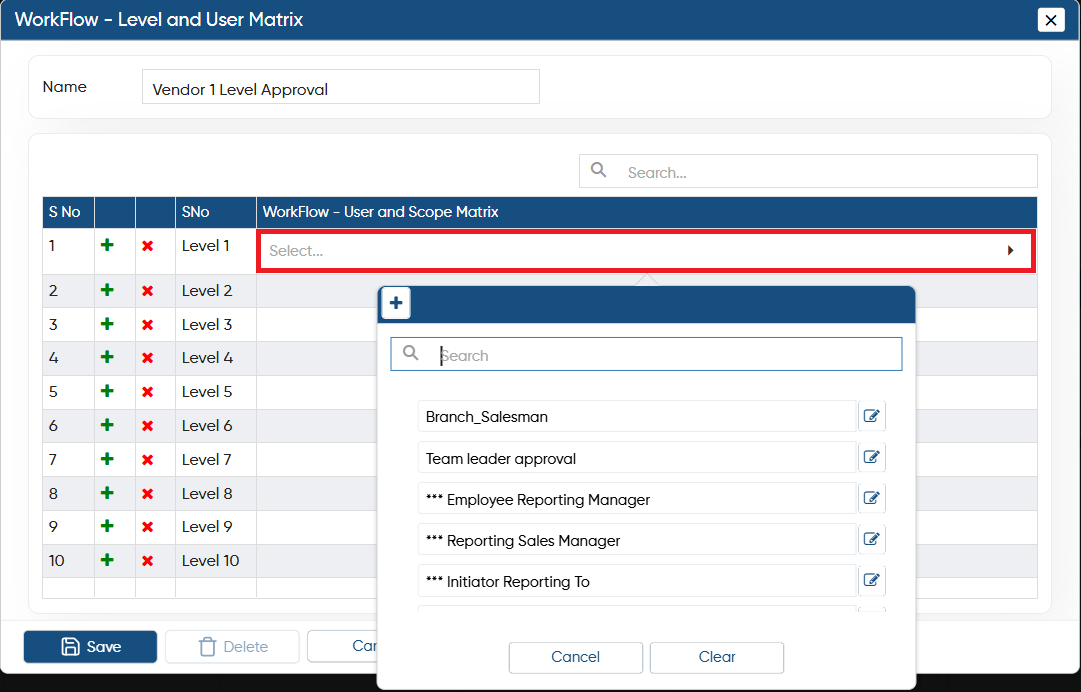
Click on the ‘Workflow - User and Scope Matrix' column, then click on 'Add' icon to enter the user details for the first level of registration approval.
-
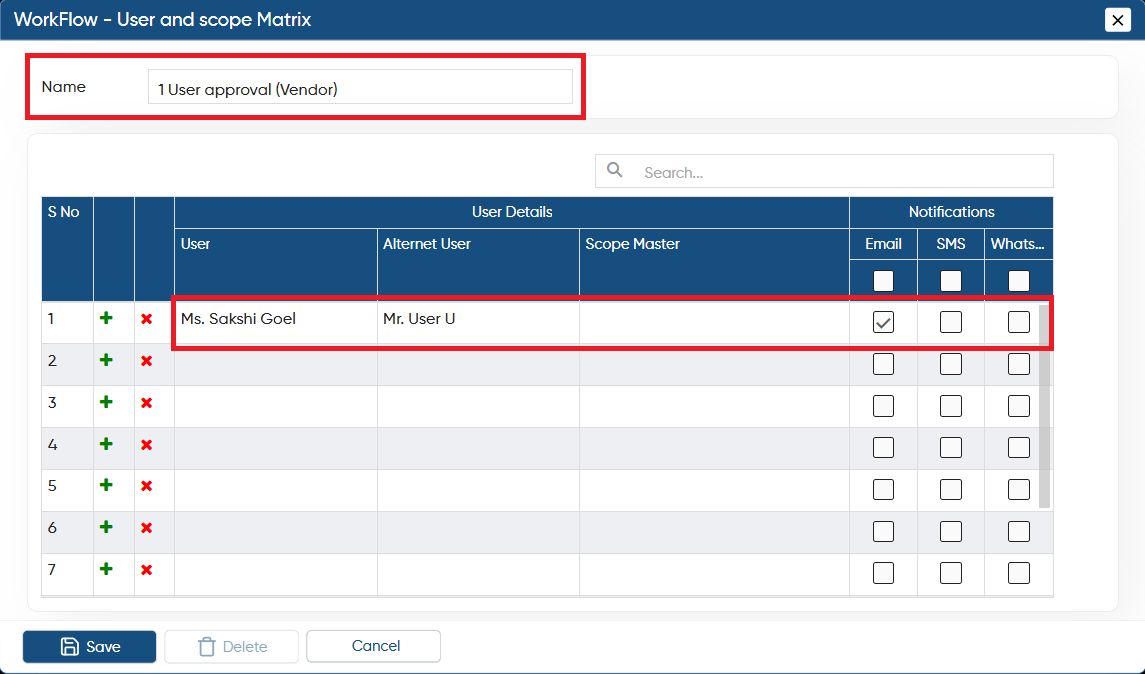
Mention the name for identification of users-scope matrix as required.
-
In 'User' column, select the person’s name who will first approve the vendor registration.
-
Tick the check box of Email, WhatsApp, SMS on which you want to share the approval notification to the selected user and click on the ‘Save’ button.
-
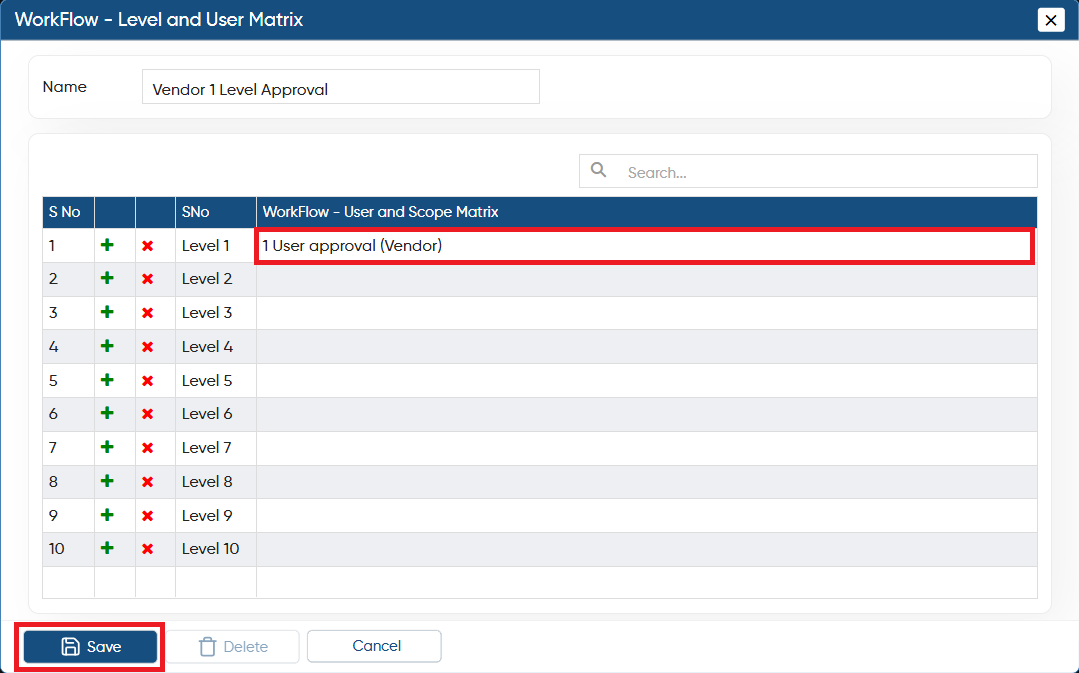
Now one by one the screen goes back and you have to select the level, user matrix that you have created. You can set approval for level 1, 2, 3…and so on and click on the ‘Save’ button.
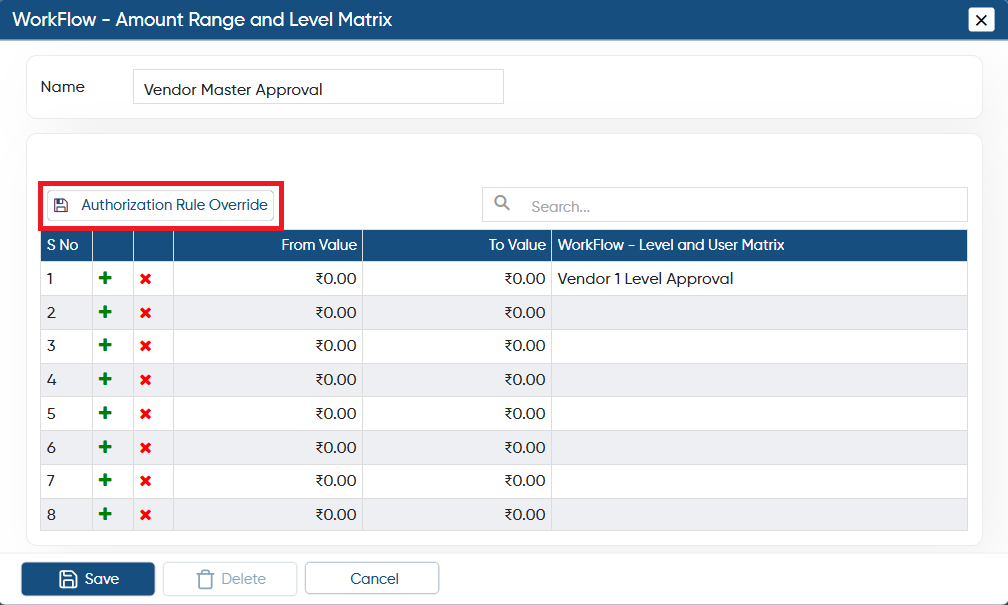
Authorisation Rule Override is a feature that lets you temporarily change the normal approval process without changing the permanent approval settings. It allows you to assign a different approver for invoices during a specific time period.
-
This feature (Authorisation Rule Override) within the workflow allows you to override rules specifically for that workflow.
-
You can also override rules across all workflows created in any document or master within AlignBooks by using the Authorisation Rule Override option available in Configurations.
The process for changing the rule is the same in both cases. To learn the complete process, click here.
|
-
Select the level matrix that you created and click on the ‘Save’ button to save the workflow.
-
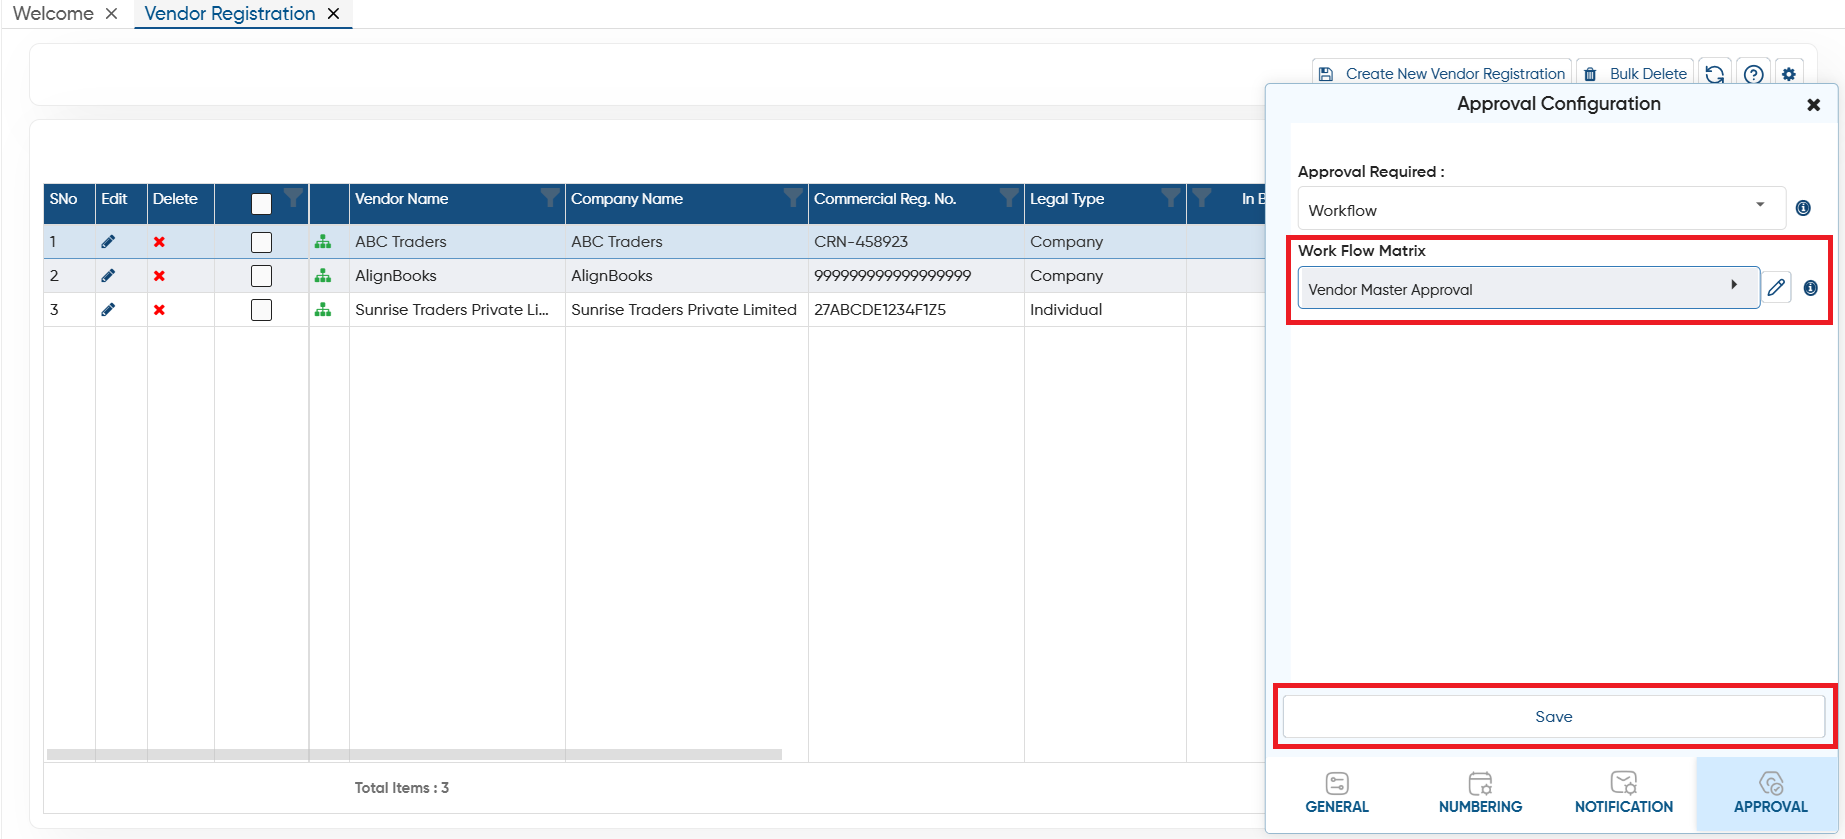
In 'Work Flow Matrix' option, select the created workflow you require for the vendor registration.
-
Click on ‘Save’ button.
This is how you can set up a multi-level workflow, where designated users at each level are responsible for approving the vendor registration.
After setting up the approval workflow, you will create notification templates that are sent to vendors and approvers. For example, you can send a 'Thank You message' when a vendor submits their details and send an approval notification to the concerned team when the vendor registration is forwarded for approval.
Open the ‘Purchase’ Module then select ‘Vendor Registration’ option and click on the ‘Settings’ icon.
-
Vendor Registration: The Vendor Registration option is used to create notification templates for internal approval communication, vendor submission acknowledgment, and final approval confirmation with VMS portal access.
-
Vendor Registration Action: This option is used when the internal team raises a query or requests additional/ missing information during the approval process. The template created here is used for the vendor’s response to those queries.
-
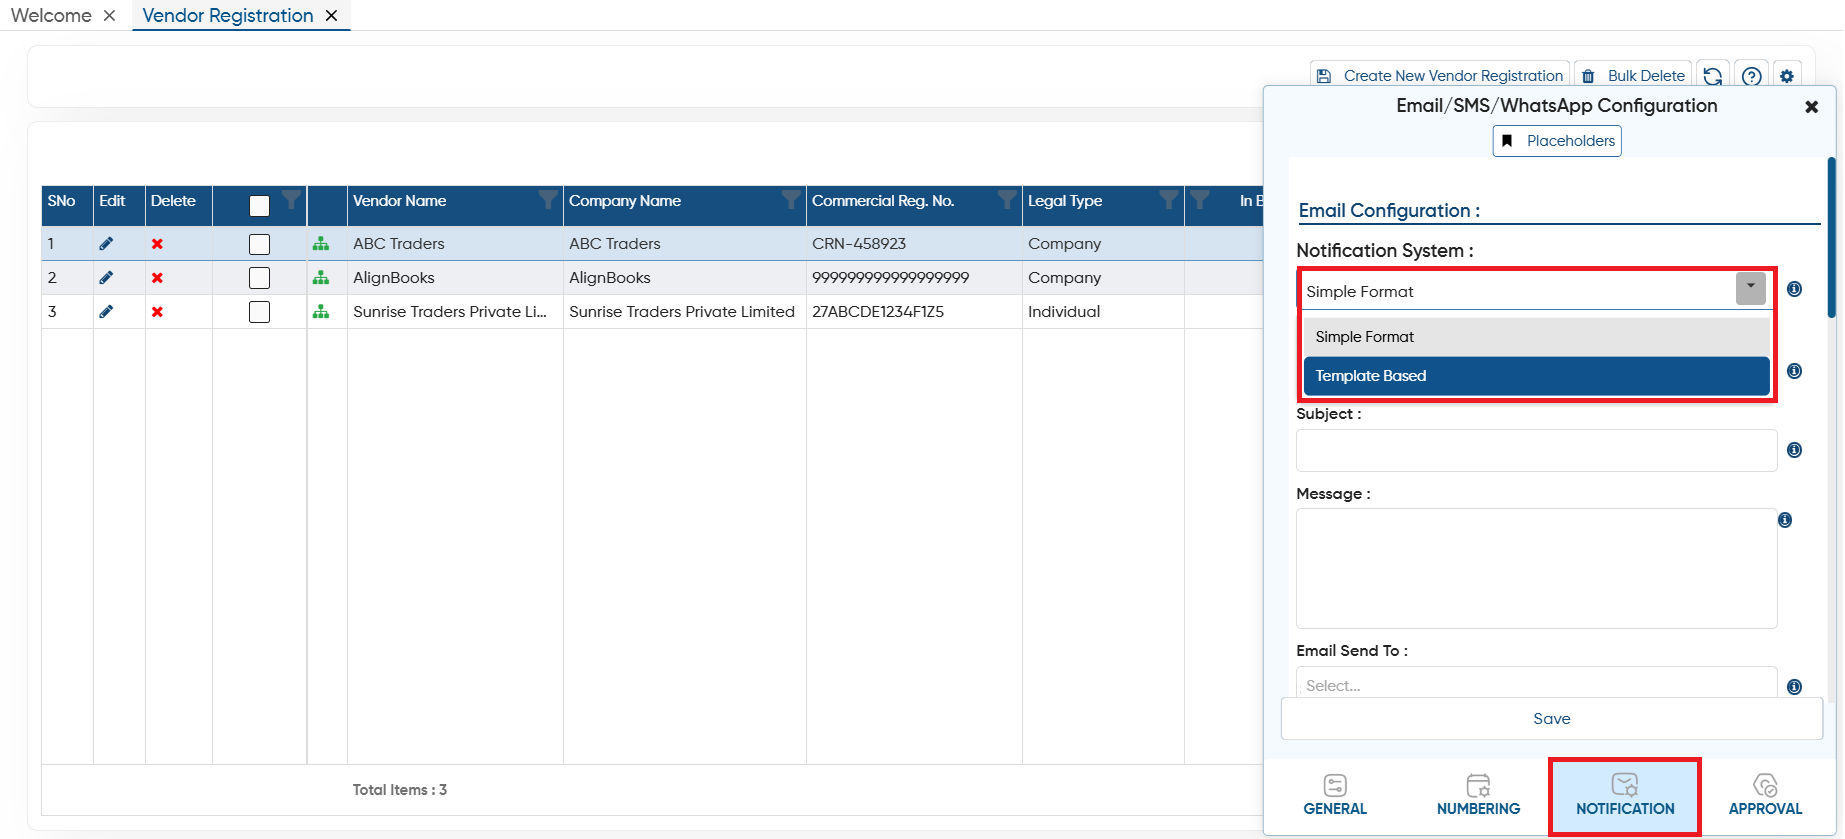
Select the 'Notification' tab.
-
In the ‘Notification System' option, select 'Template Based'.
-
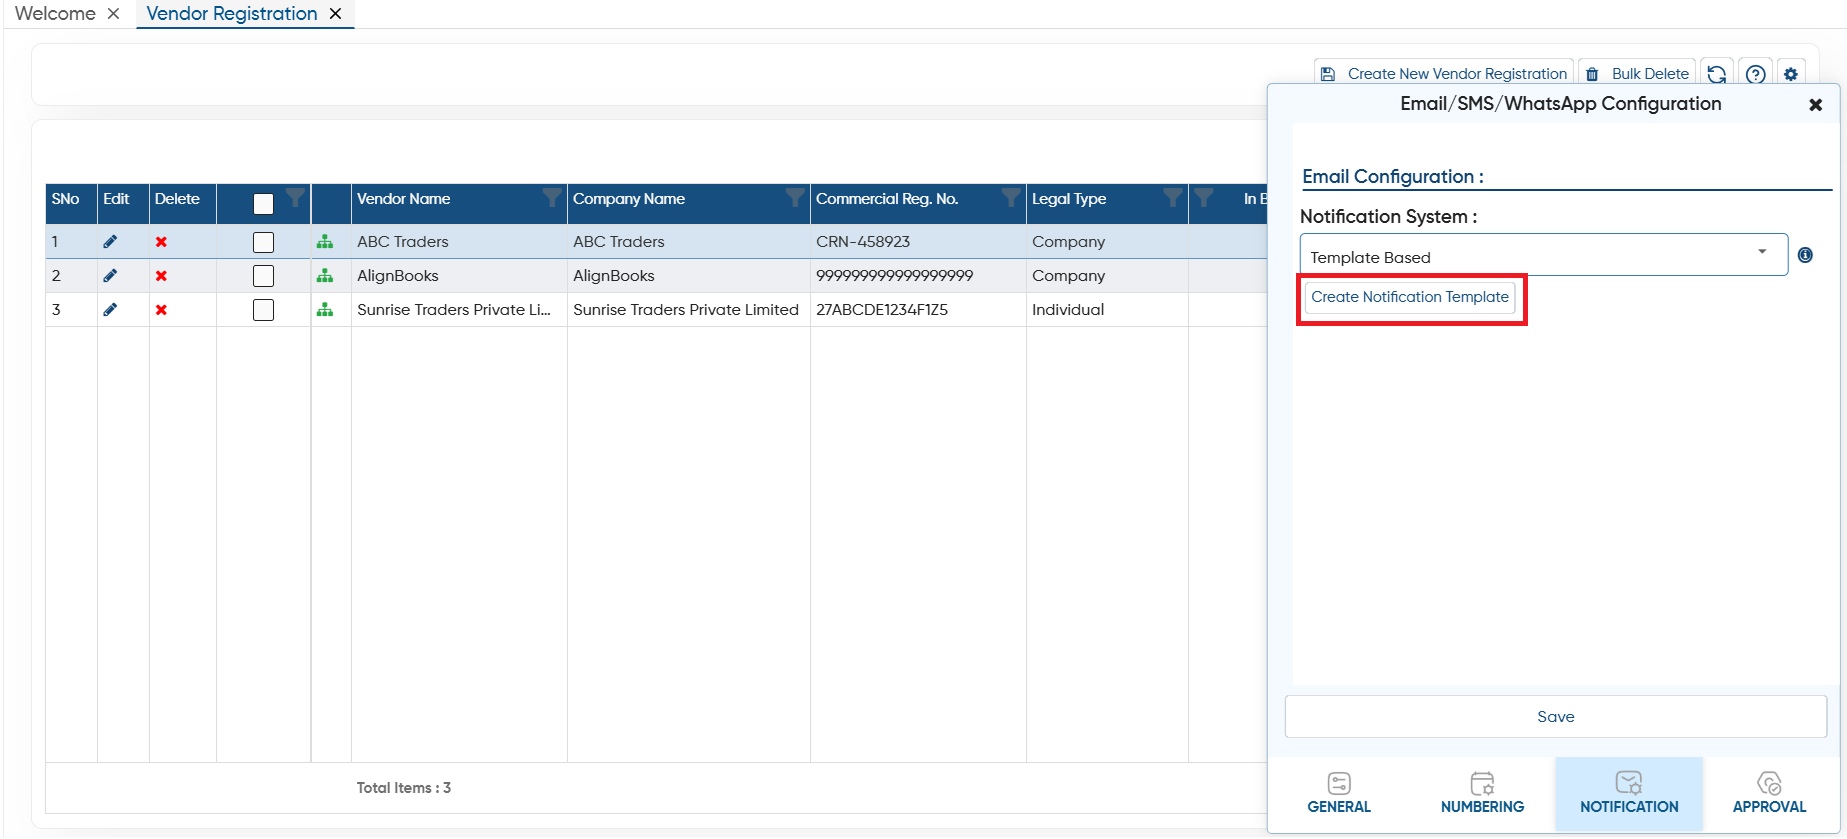
Click on the ‘Create Notification Template’ button.
-
Click on the ‘Create New Con_NotificationTemplate’ button.
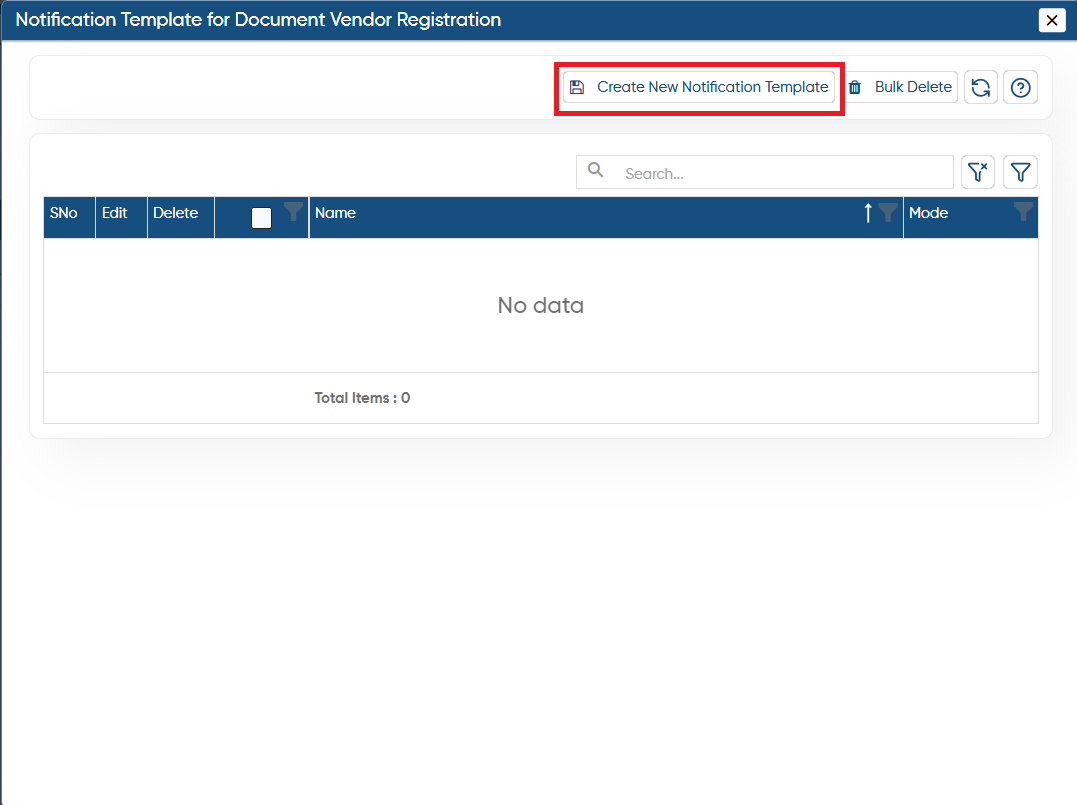
-
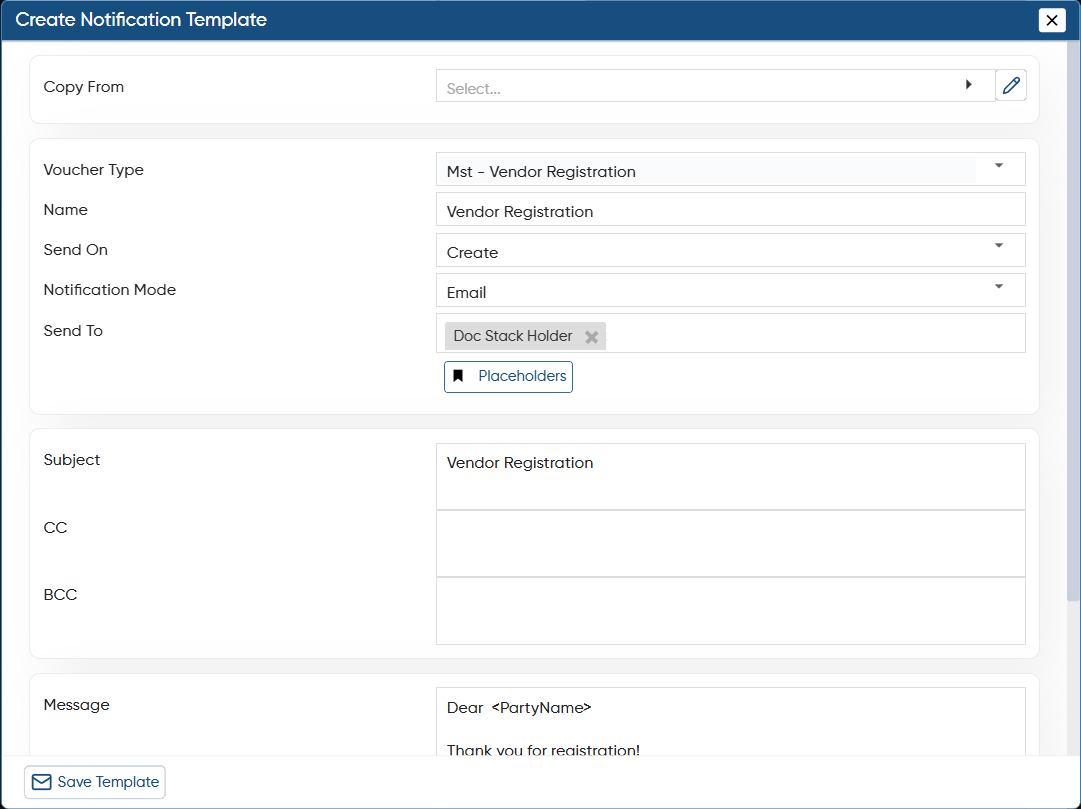
Voucher Type: The type of the voucher will be auto picked by the software.
-
Name: Enter the Template name for your identification.
-
Send On: Select when this template should be triggered, such as on approval, invite employee, etc.
-
Notification Mode: Select the mode through which the notification will be sent – Email, SMS, or WhatsApp.
-
Send To: Choose the person to whom the notification should be sent, using the specified template format.
-
Subject: Mention the subject of the template. Here, you can type the command in '<>'.
-
Message: Type the message as per your requirement.
-
CC: If you want to add the person in CC, mention their mail ID's.
-
BCC: To add person in BCC, mention their mail ID's.
-
Document Print Attachment: This option is used to share the 'Attachment/ Link’ of the document print.
-
Send Voucher Attachments: If you want to attach any other document as well with the message, turn 'On' the option.
-
Print Attachments Format: This option is used to select the format of the document when you are creating the template for document approval.
Click on the ‘Save Template' button.
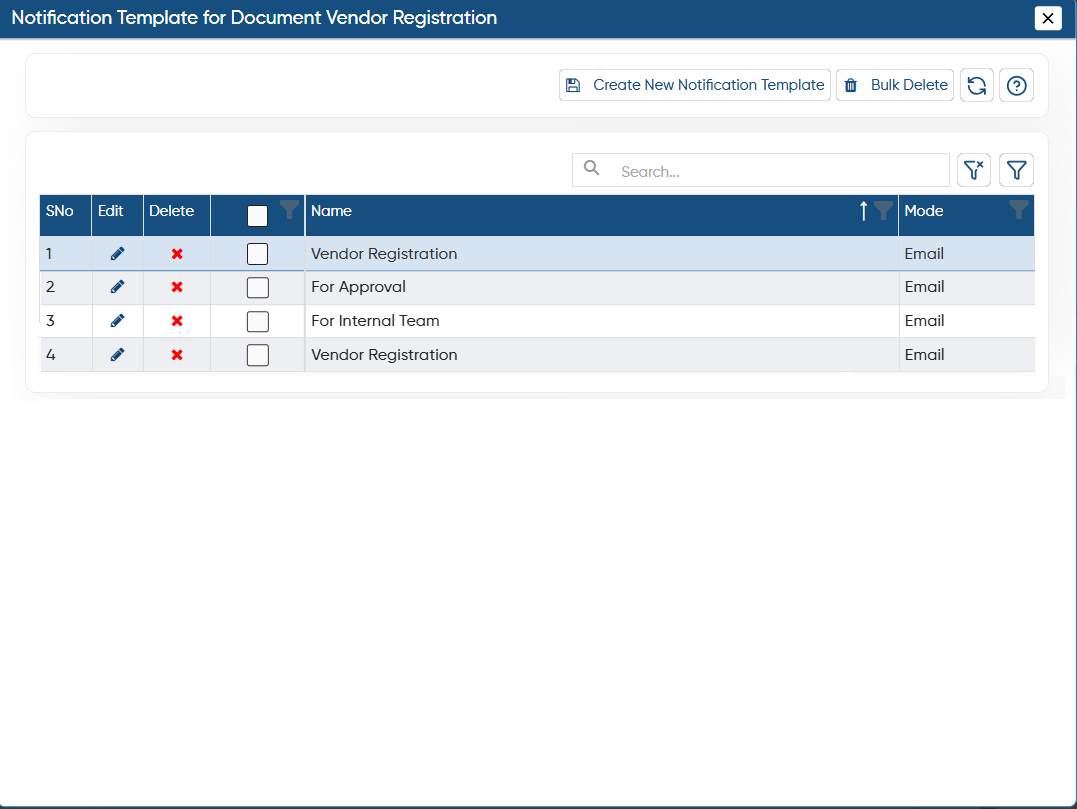
Similarly, you can create different templates based on your requirements. For example, we have created the following templates:
-
For Approval – Used internally and shared with the concerned team for vendor registration approval.
-
Vendor Registration – Sent to the vendor after they successfully submit their registration details.
-
Approved – Sent to the vendor once their registration is approved, along with an invitation to access the VMS portal where they can view purchase requests, outstanding amounts, reports, and more.
And many more as per your workflow needs.
-
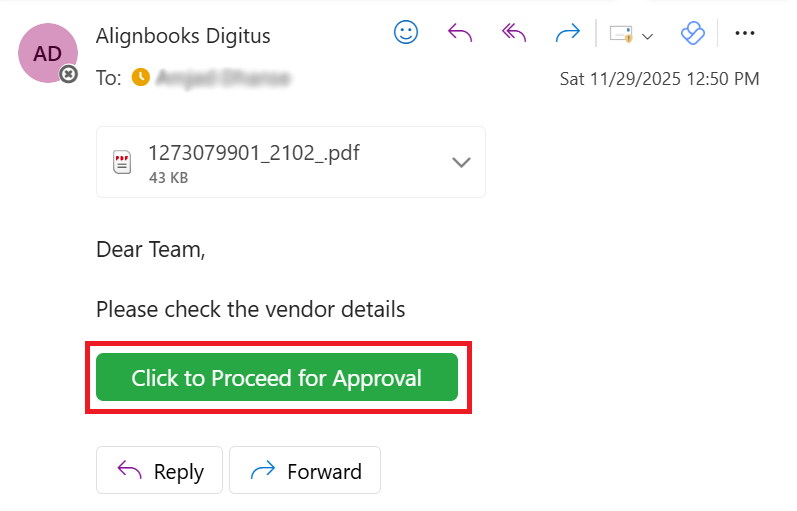
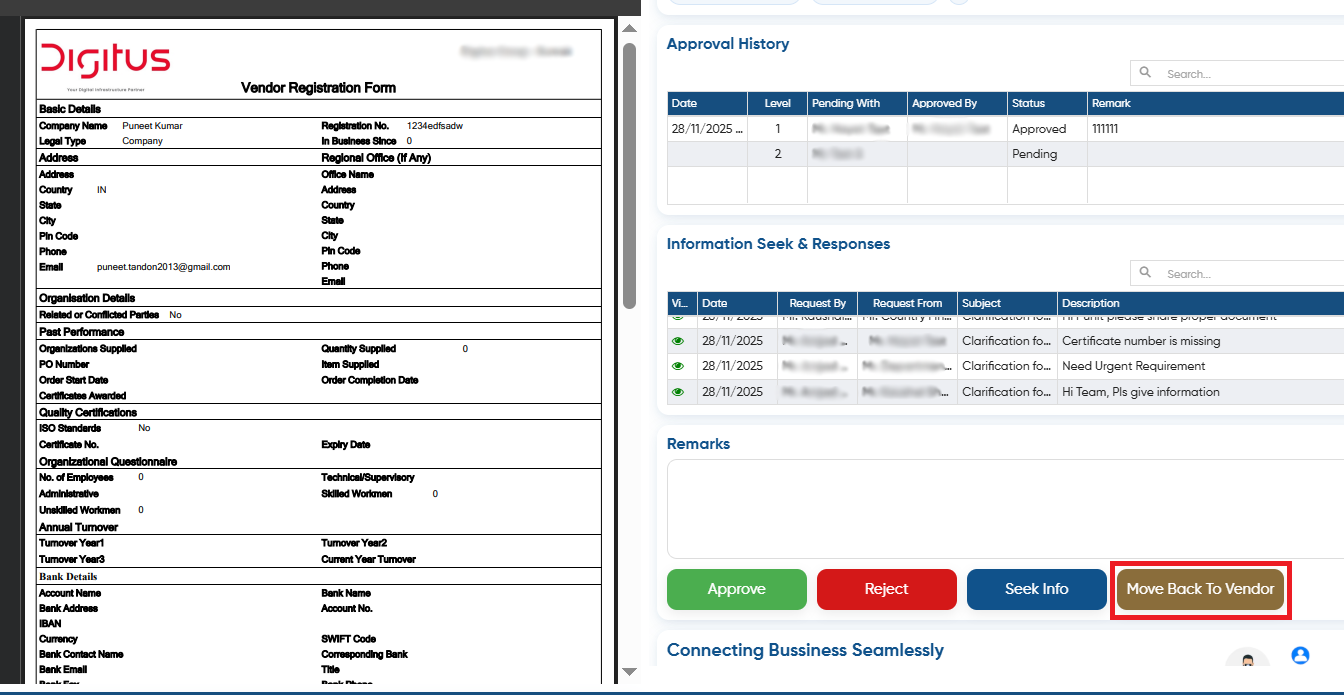
The internal team will receive an approval email. By clicking the ‘Click to Proceed for Approval’ button in the email, they can review and approve the vendor’s registration.
-
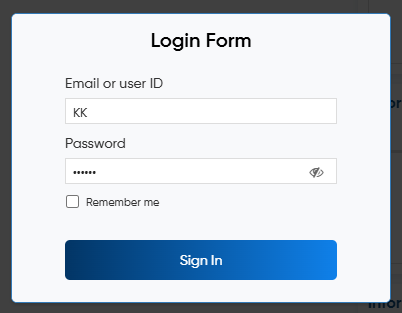
The user needs to Log in with their User Id and password.
-
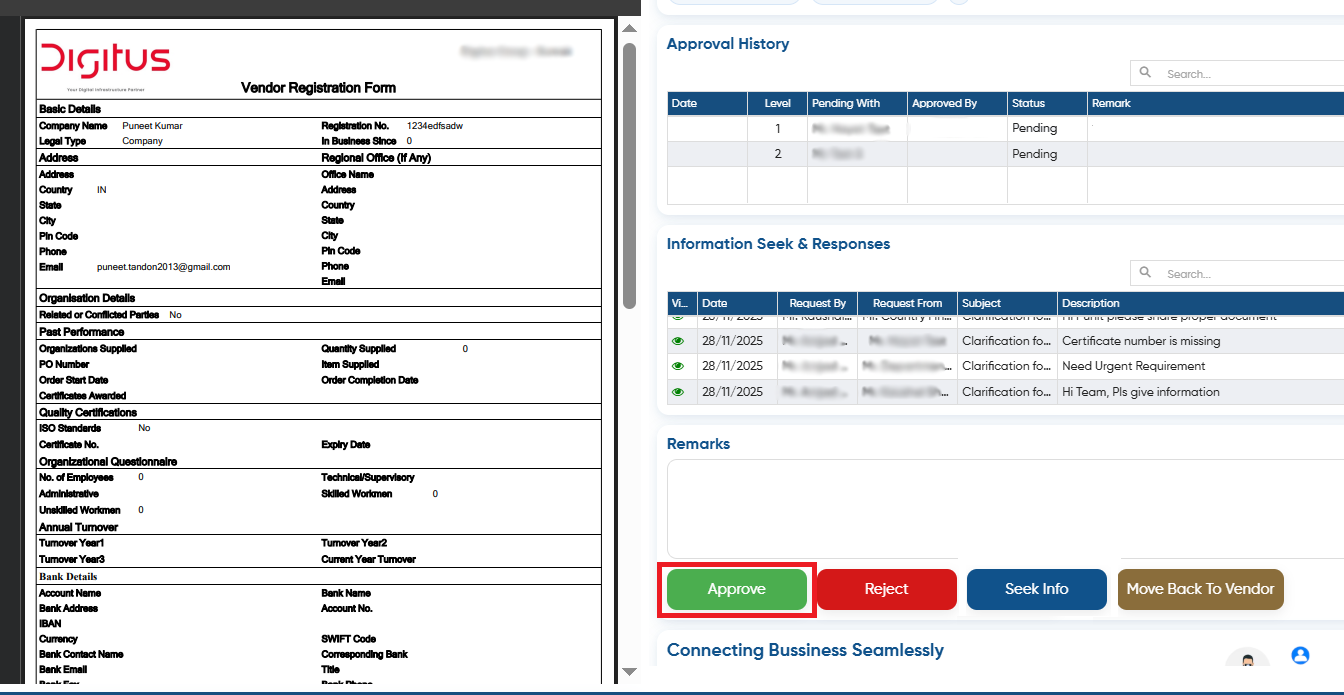
Approve: The user can mention any remark in the given box and click on the ‘Approve’ button to approve the details.
-
Reject: Click on the button to reject the vendor details.
-
Seek Info: In case the user needs to ask any query to the internal team they are required to click on ‘Seek Info’ button and the template for it will be created though (CRM > Activity Management > New Task – Process described below in the document)
-
Move Back To Vendor: This option is used when the team needs additional information from the vendor, such as missing details, incorrect data, or clarification on a query.
During the approval process, internal team members may need to ask queries or request clarifications within the team. For these scenarios, you can create a message template. When a query is raised, the notification sent to the internal team will use this template.
-
Go to CRM > Activity Management.
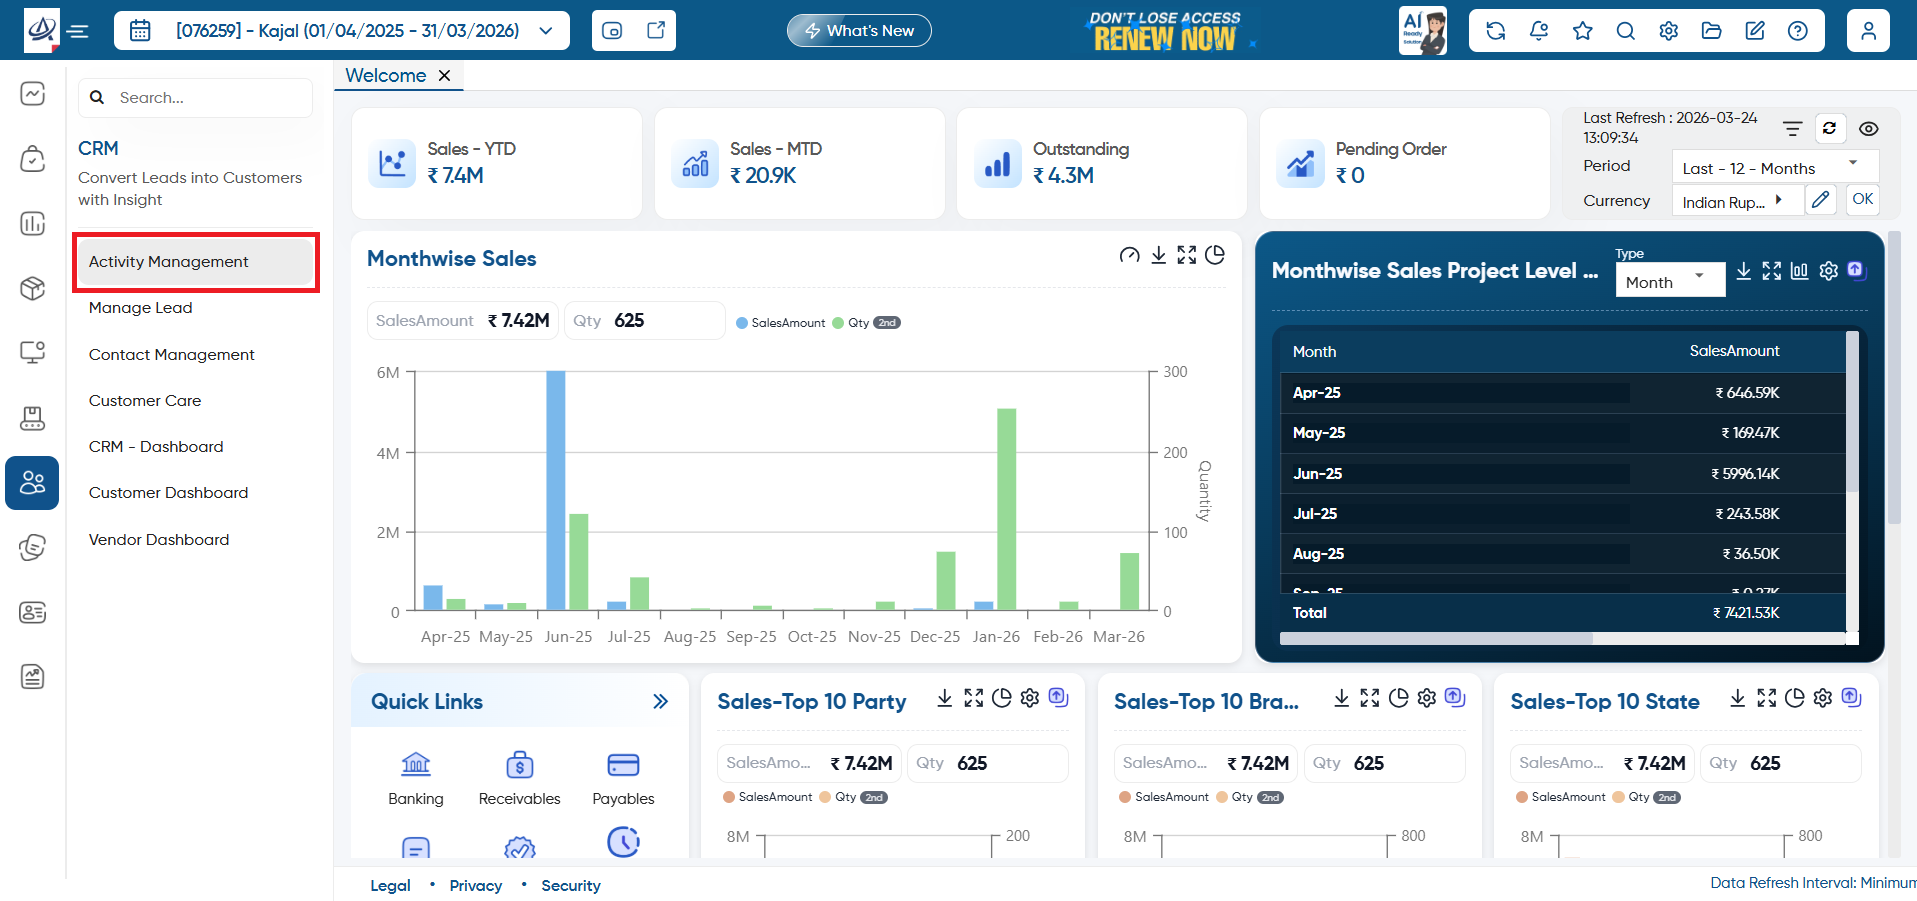
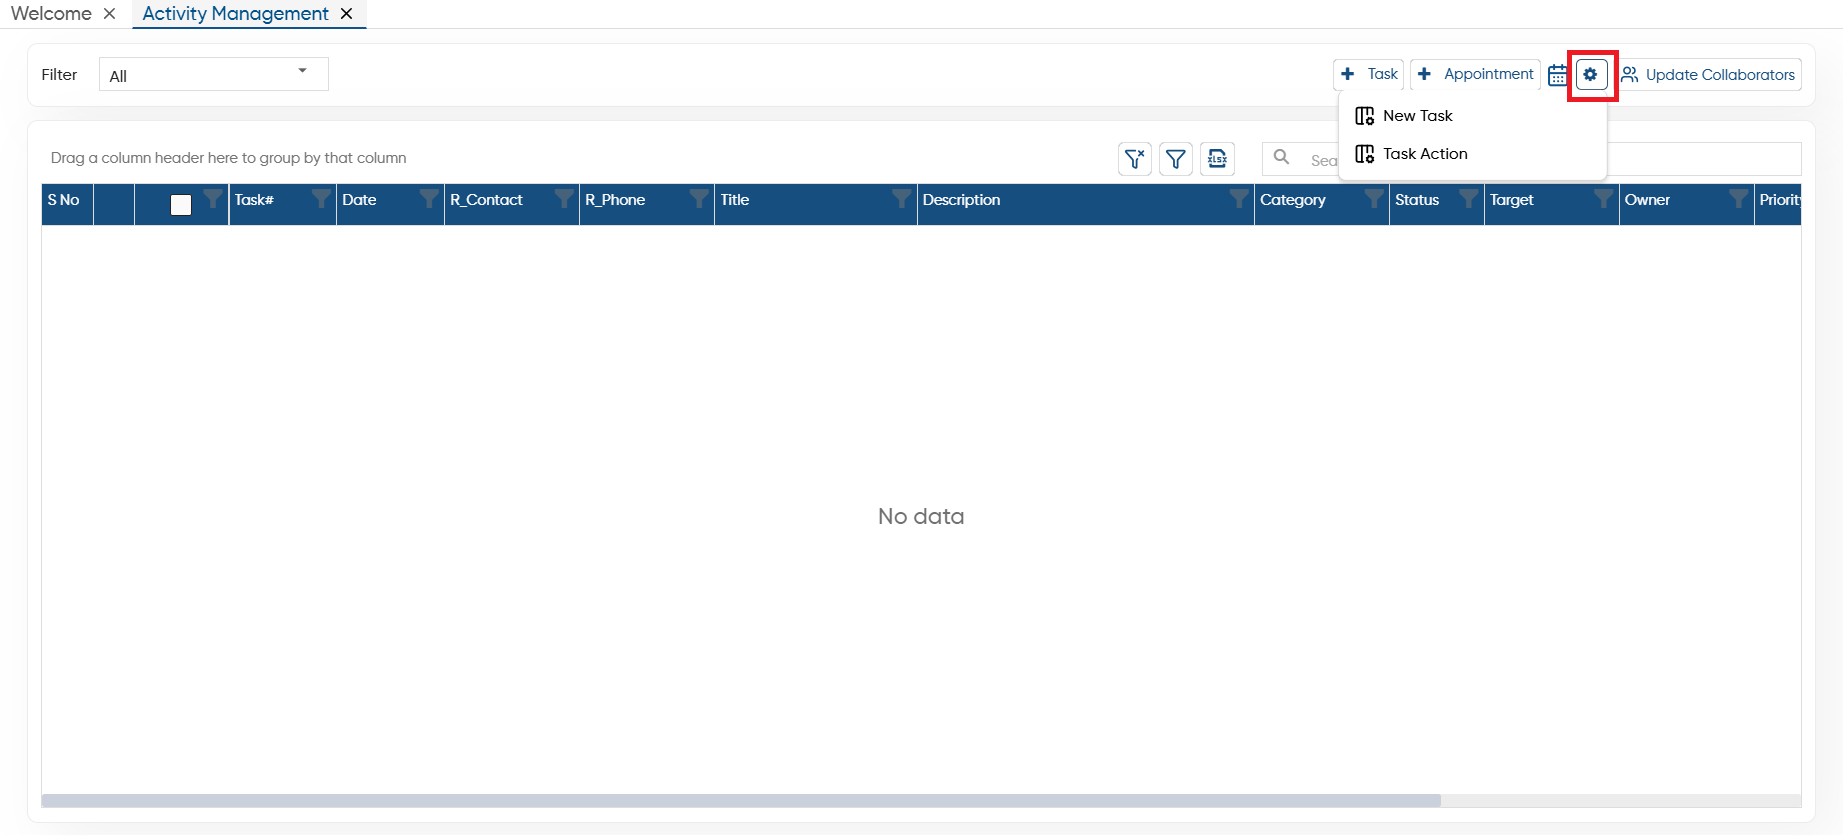
Click on the ‘Settings’ icon.
-
New Task: You can create a template for situations where an internal team member needs additional information while the vendor registration approval is still in progress. When they receive the approval notification, they can click the "Seek Info" button to submit their query using this template.
-
Task Action: Use this template when you need to reply to a query raised during the approval process.
The steps to create this notification remain the same as described earlier in the document.
-
The team can enter their query in the remark box and then click the ‘Seek Info’ button.
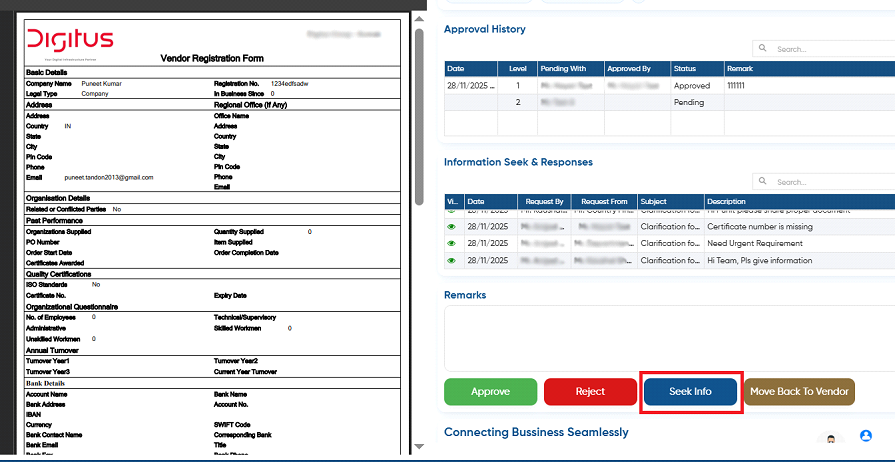
Task Action
-
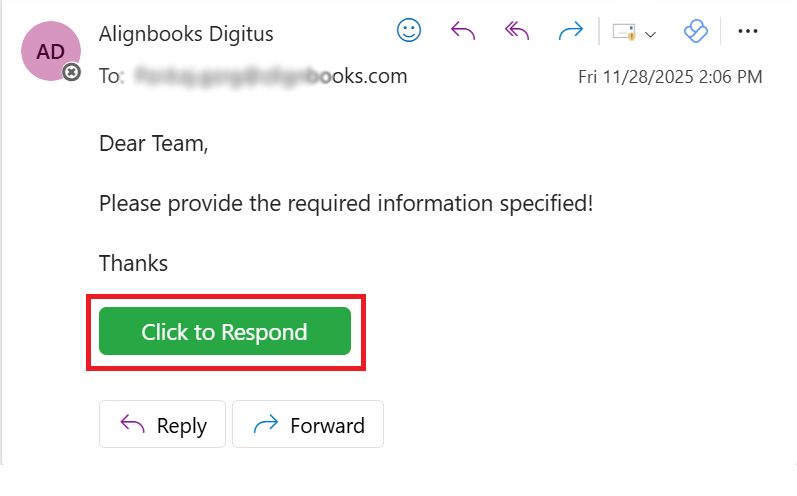
Once the internal team clicks the ‘Seek Info’ button, the query message will appear in the same template created under ‘Task Action’.
-
To reply to the query, the user simply needs to click the ‘Click to Respond’ button.
-
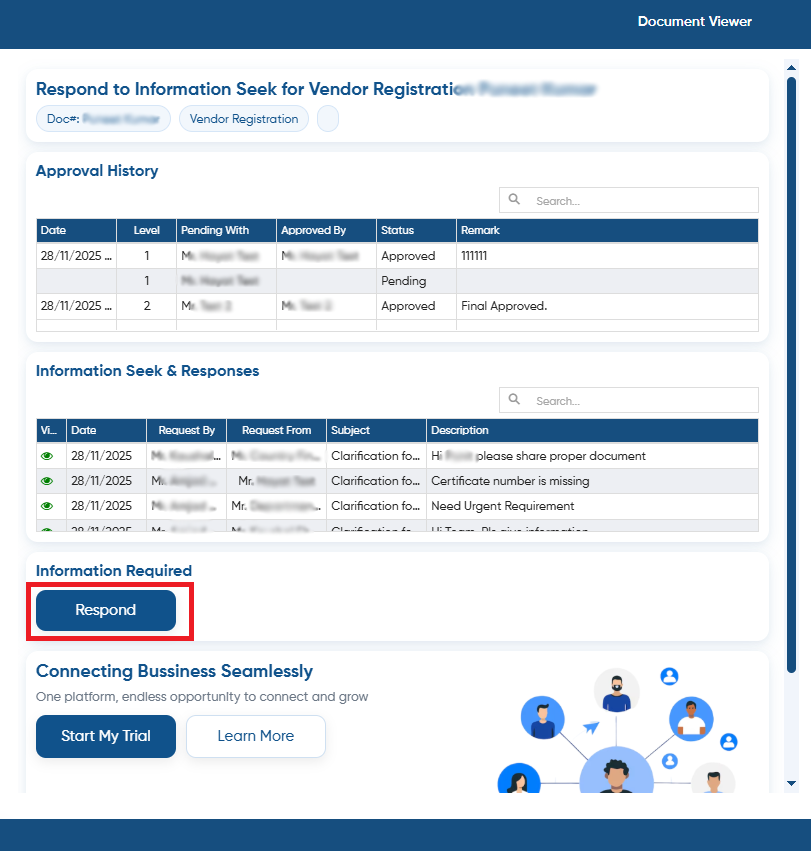
The user will mention the user Id and password to log in.
-
Thereafter, the user will click on the ‘Respond’ button.
-
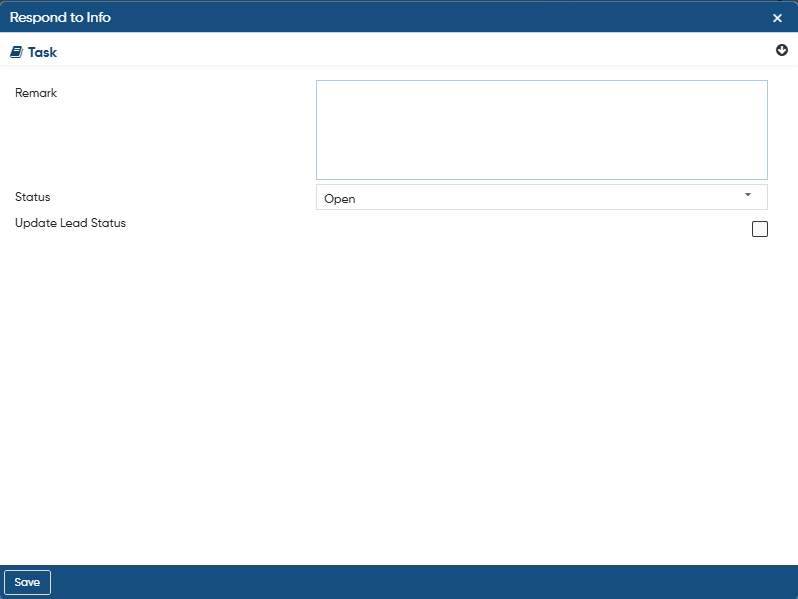
Next, the user will provide the response by mentioning in remark and update the status.
-
Move Back To Vendor: This option is used when the team needs additional information from the vendor, such as missing details, incorrect data, or clarification on a query.
You will now create a message template that will be sent to vendors once their registration is approved. This message will include the login details for the VMS Portal. The Vendor Portal is specifically designed for vendors and suppliers, allowing them to view their own information such as purchase requests, outstanding amounts, reports, and more.
-
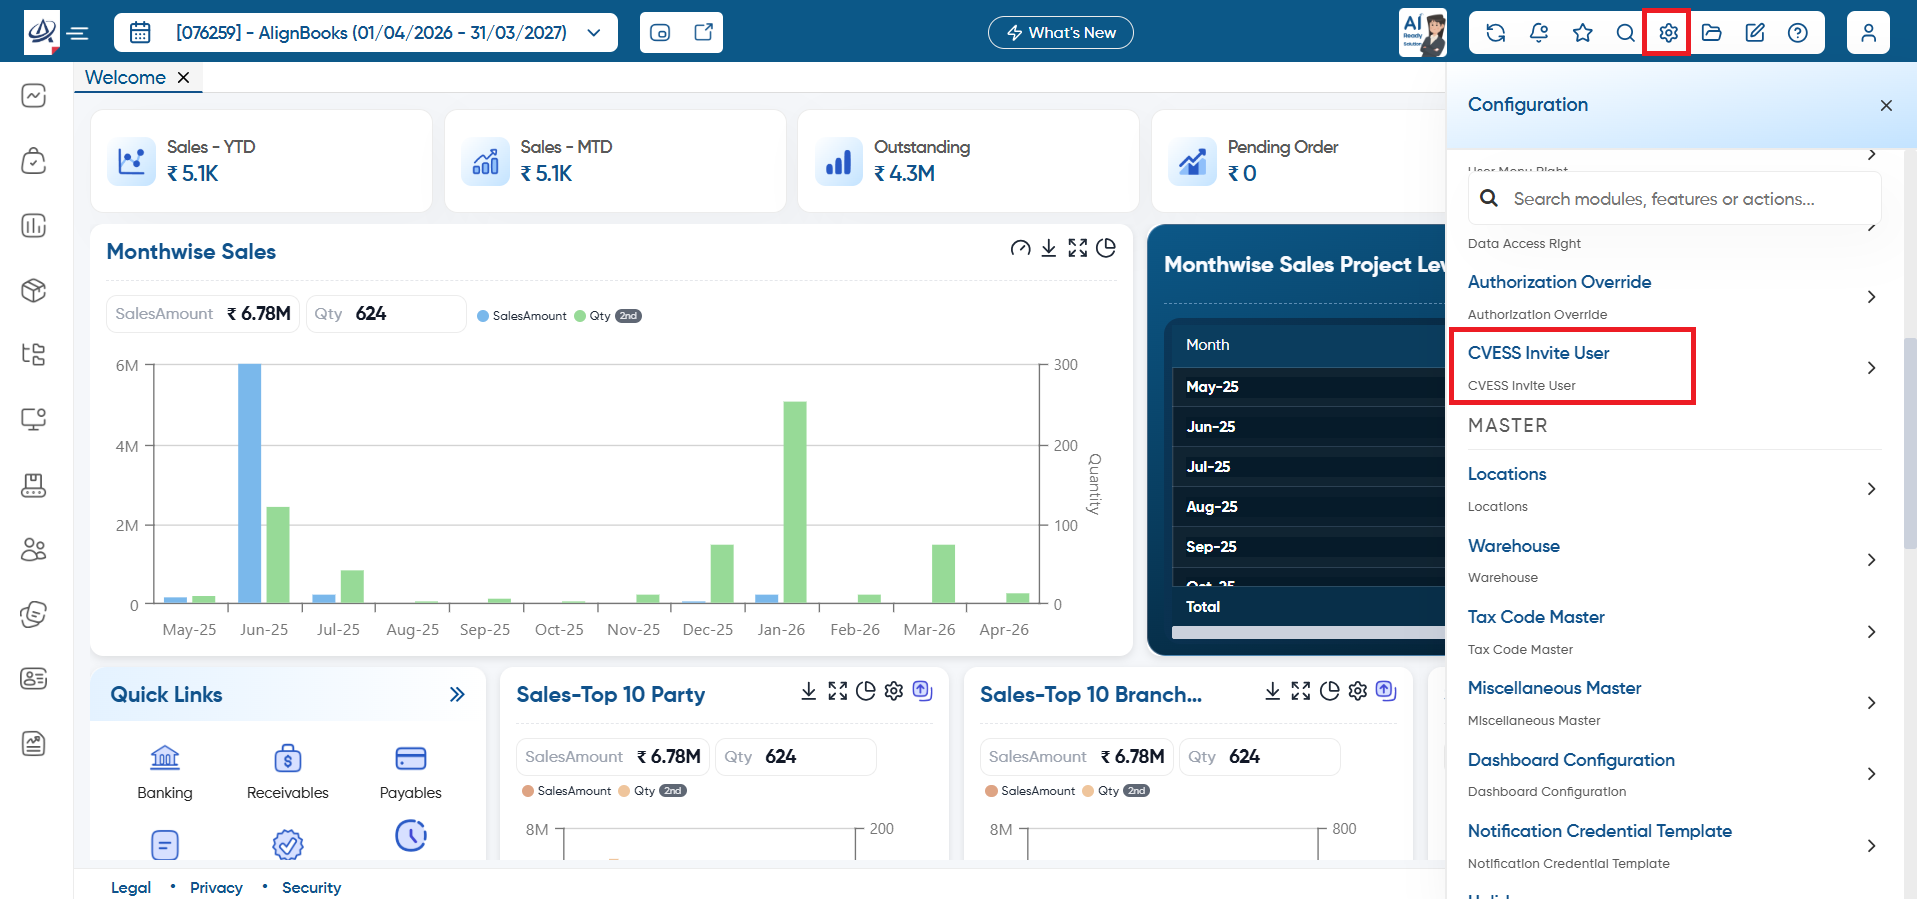
Click on the ‘Configuration’ icon, then select ‘CVESS Invite User’ option.
-
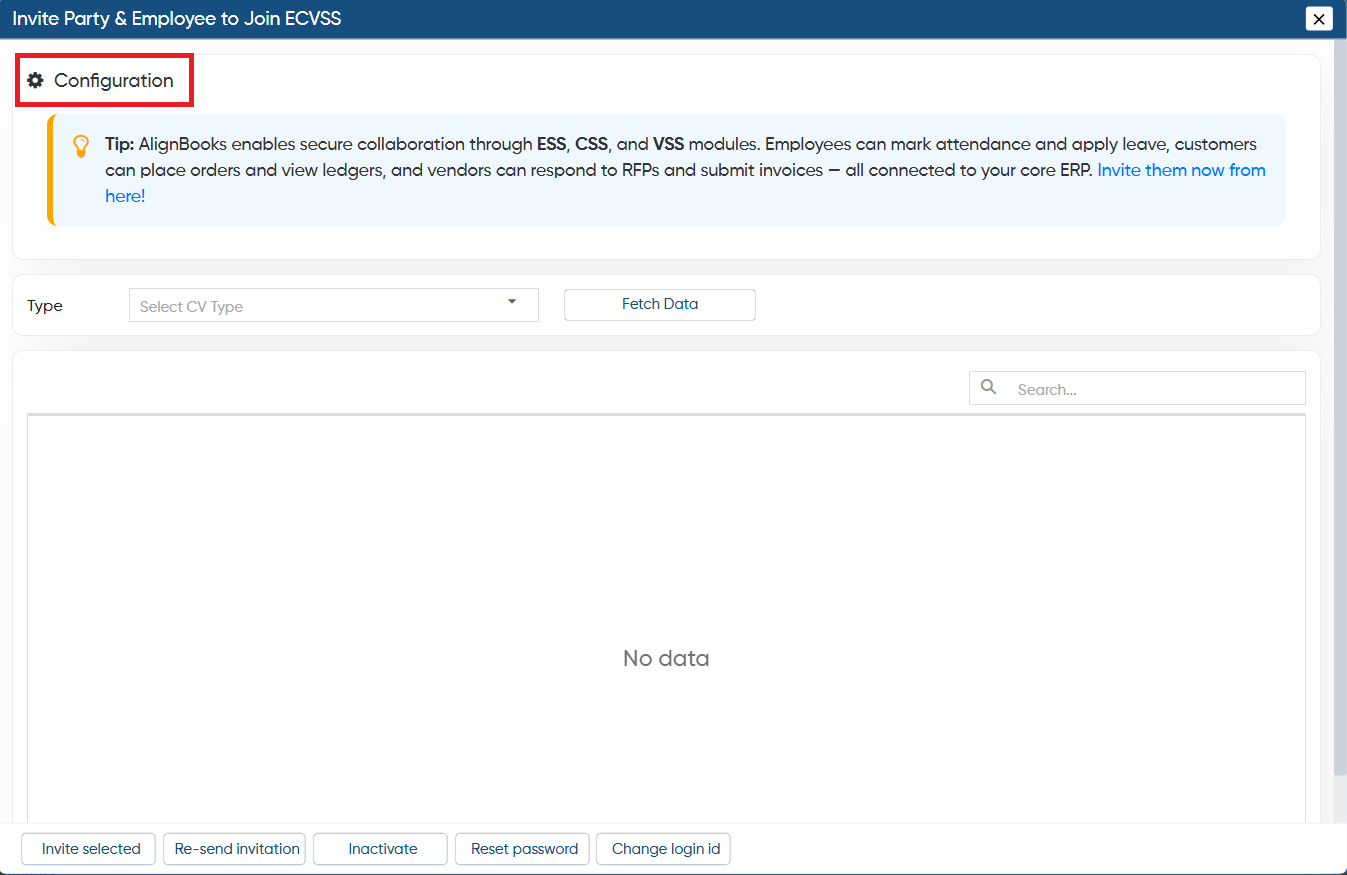
Click on the ‘Configuration’ icon.
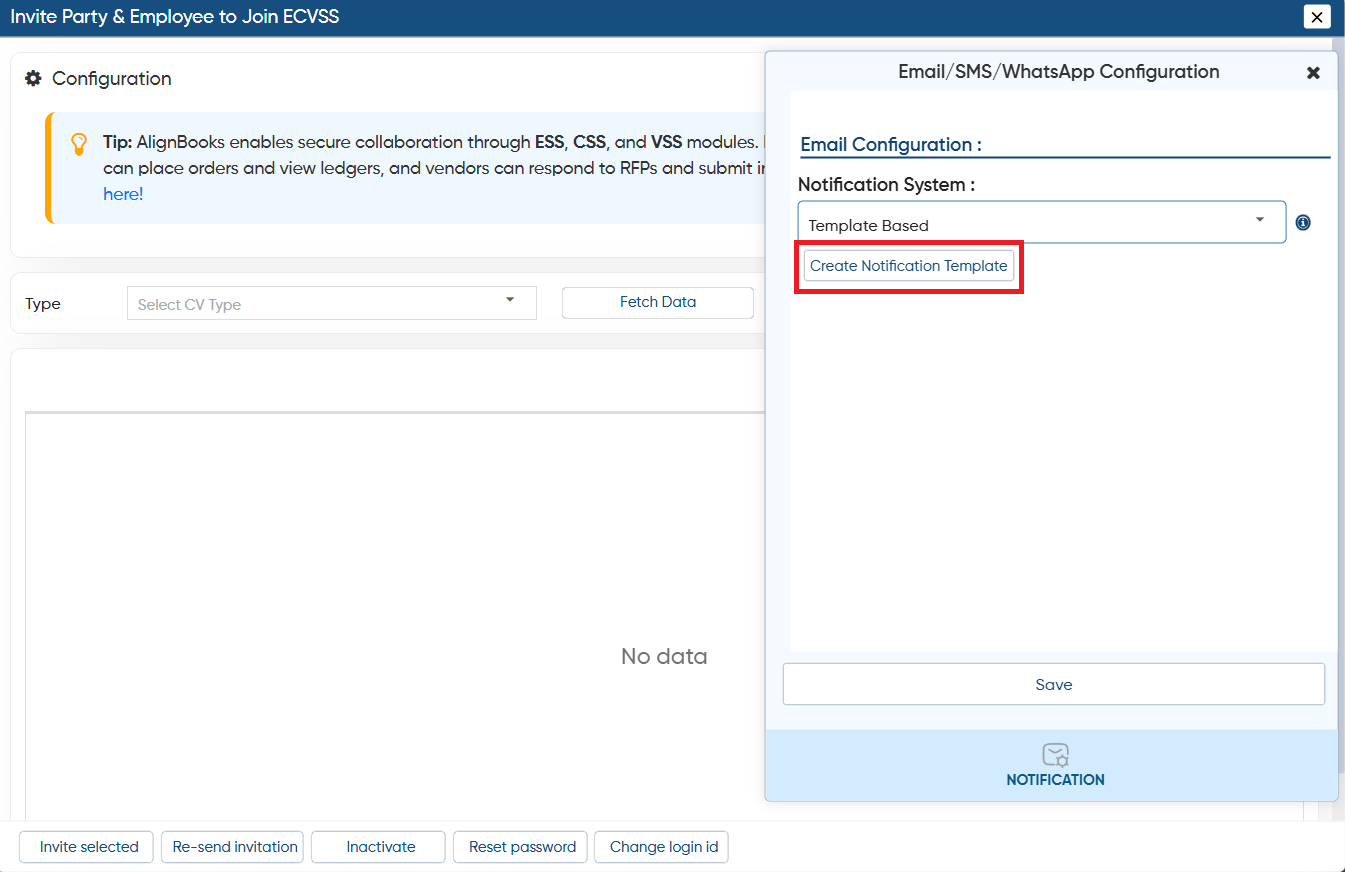
In ‘Notification System’ option select ‘TemplateBased’ option.
-
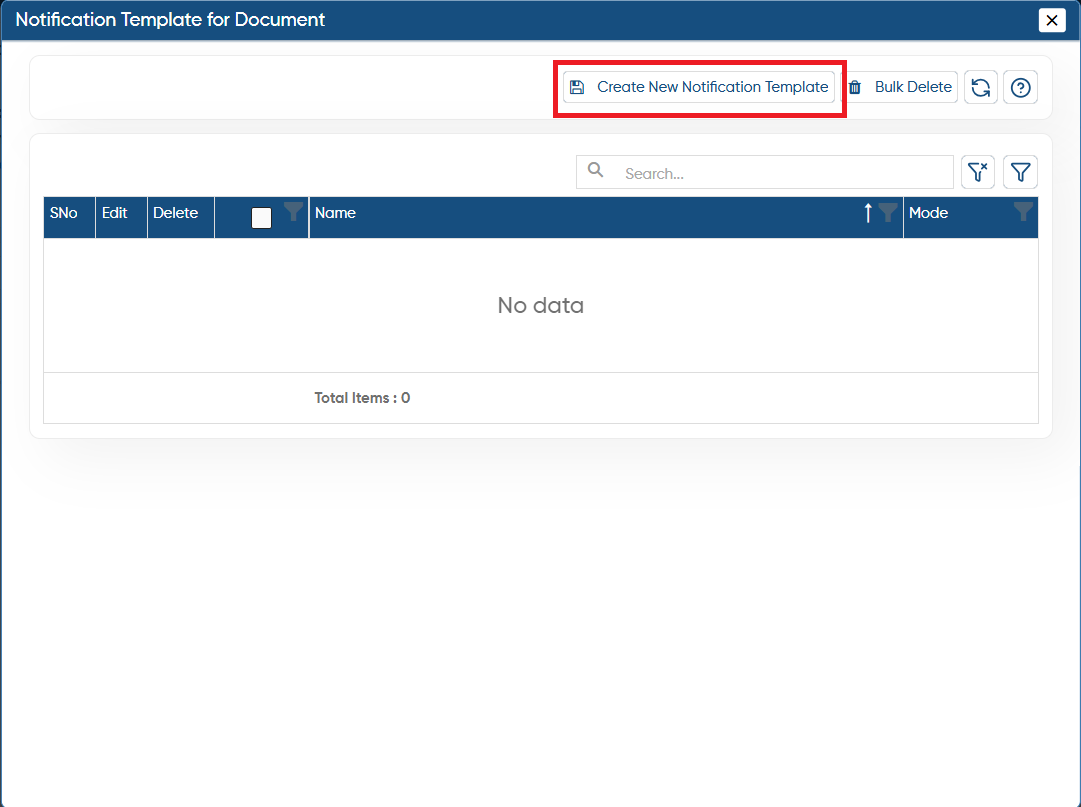
Then click on the ‘Create Notification Template’ button.
-
Again, click on the ‘Create New Con_NotificationTemplate’ button.
-
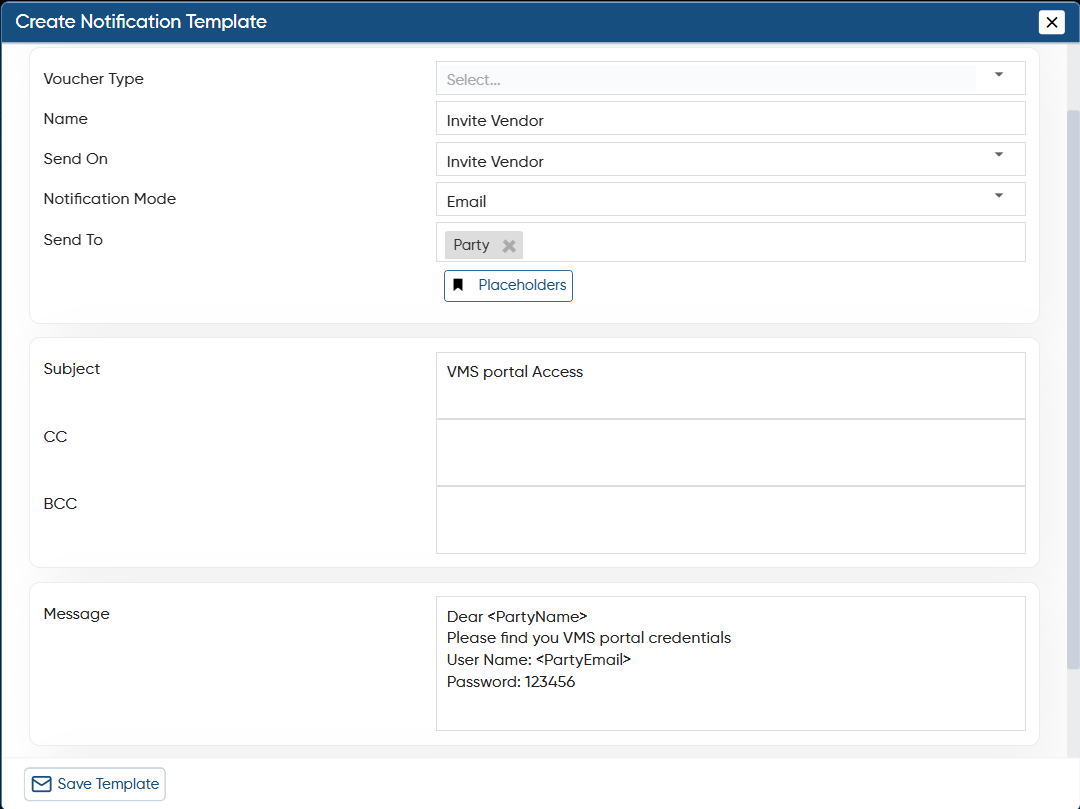
Now, create the message template to share the VMS Portal details to the Vendor after the approval of registration details.
-
Click on the ‘Save Template’ button.
Note: Once the vendor registration is approved at each level, the vendor will automatically receive an email containing their VMS portal login credentials.
|
Now you can generate a registration link in AlignBooks and share it with your vendors, so they can fill out and submit their details directly through the form.
-
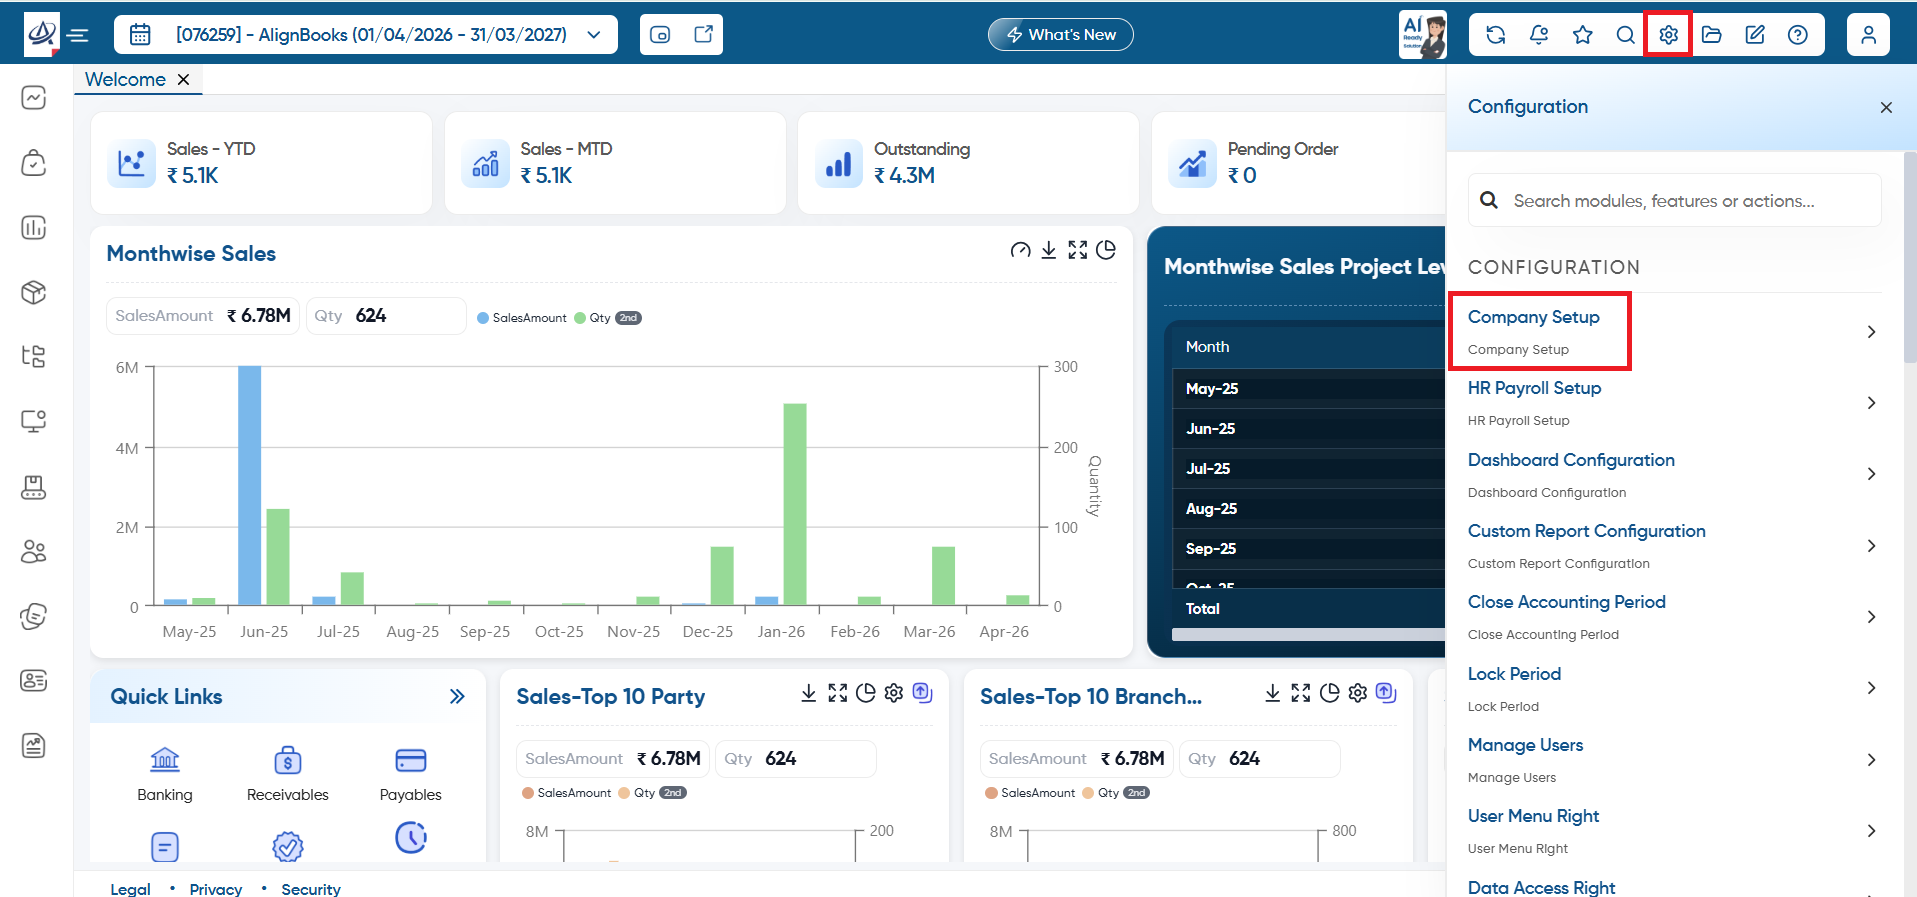
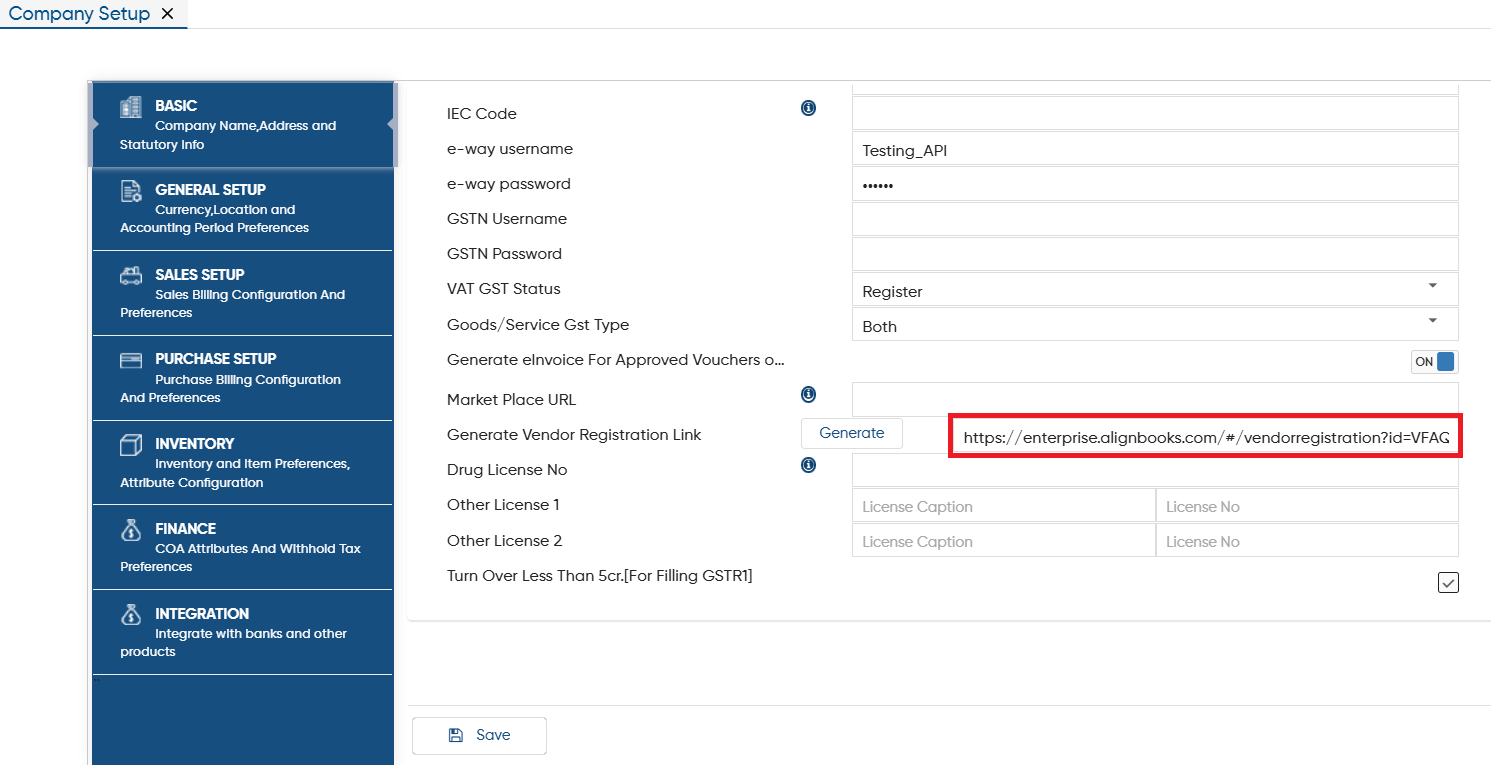
To generate the link, click on the ‘Configuration’ icon and select ‘Company Setup’ option.
-
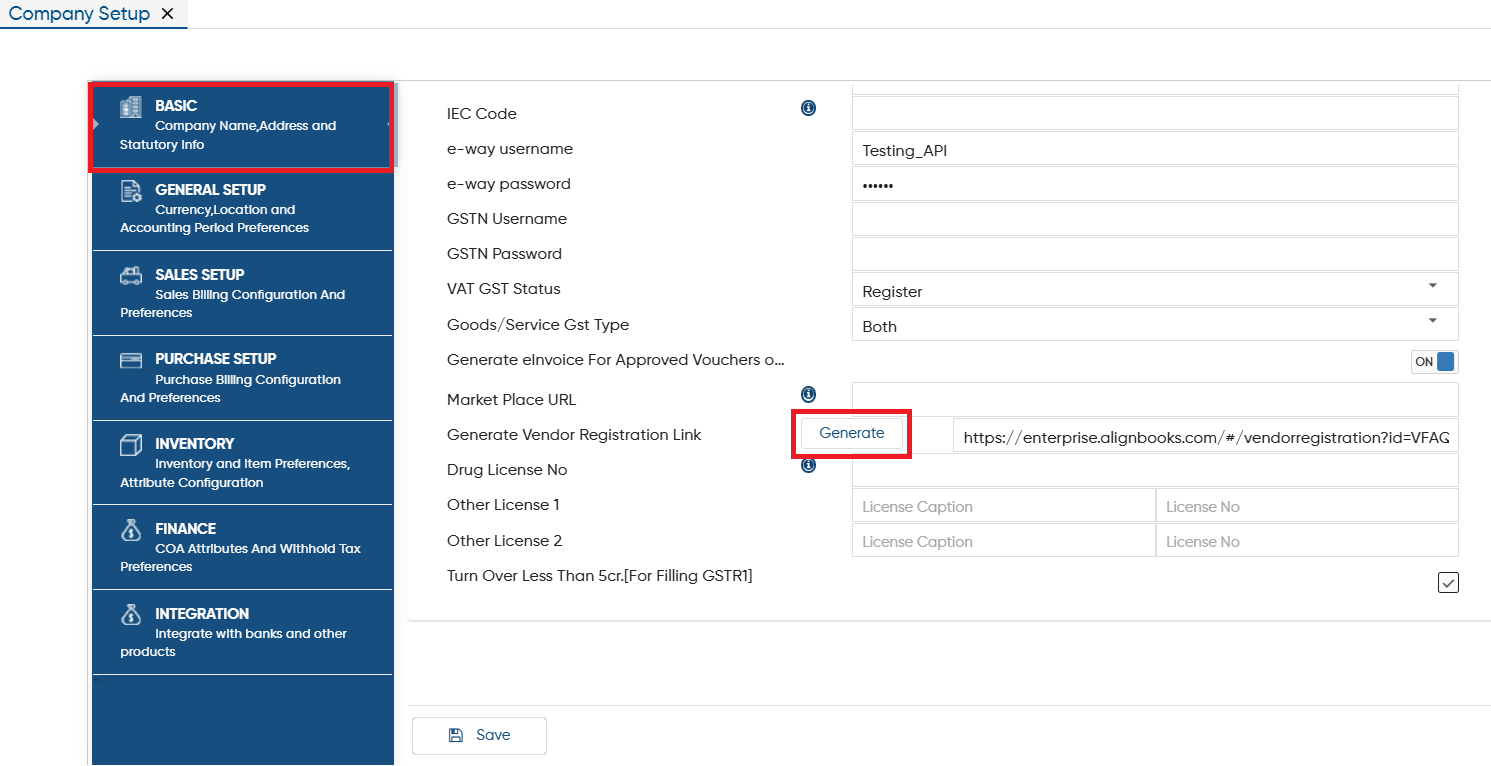
The Basic setup page will open automatically. Scroll down to the Generate Vendor Registration Link section and click the Generate button.
-
AlignBooks automatically generates the Vendor Registration link. You can simply copy the link and share it with your vendors so they can complete their registration on their own.
-
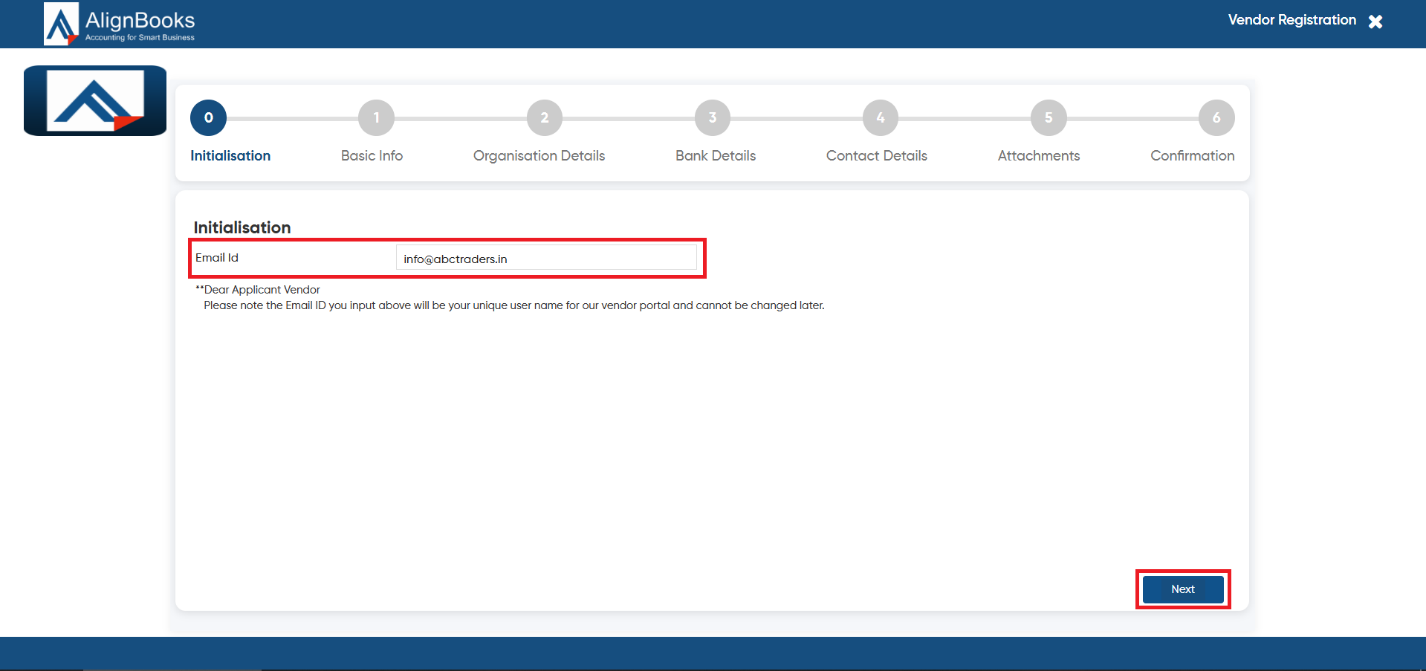
Through the given link, this form will open where your vendor needs to fill the form. To initialize it mention the Email Id.
-
Click on the ‘Next’ button.
-
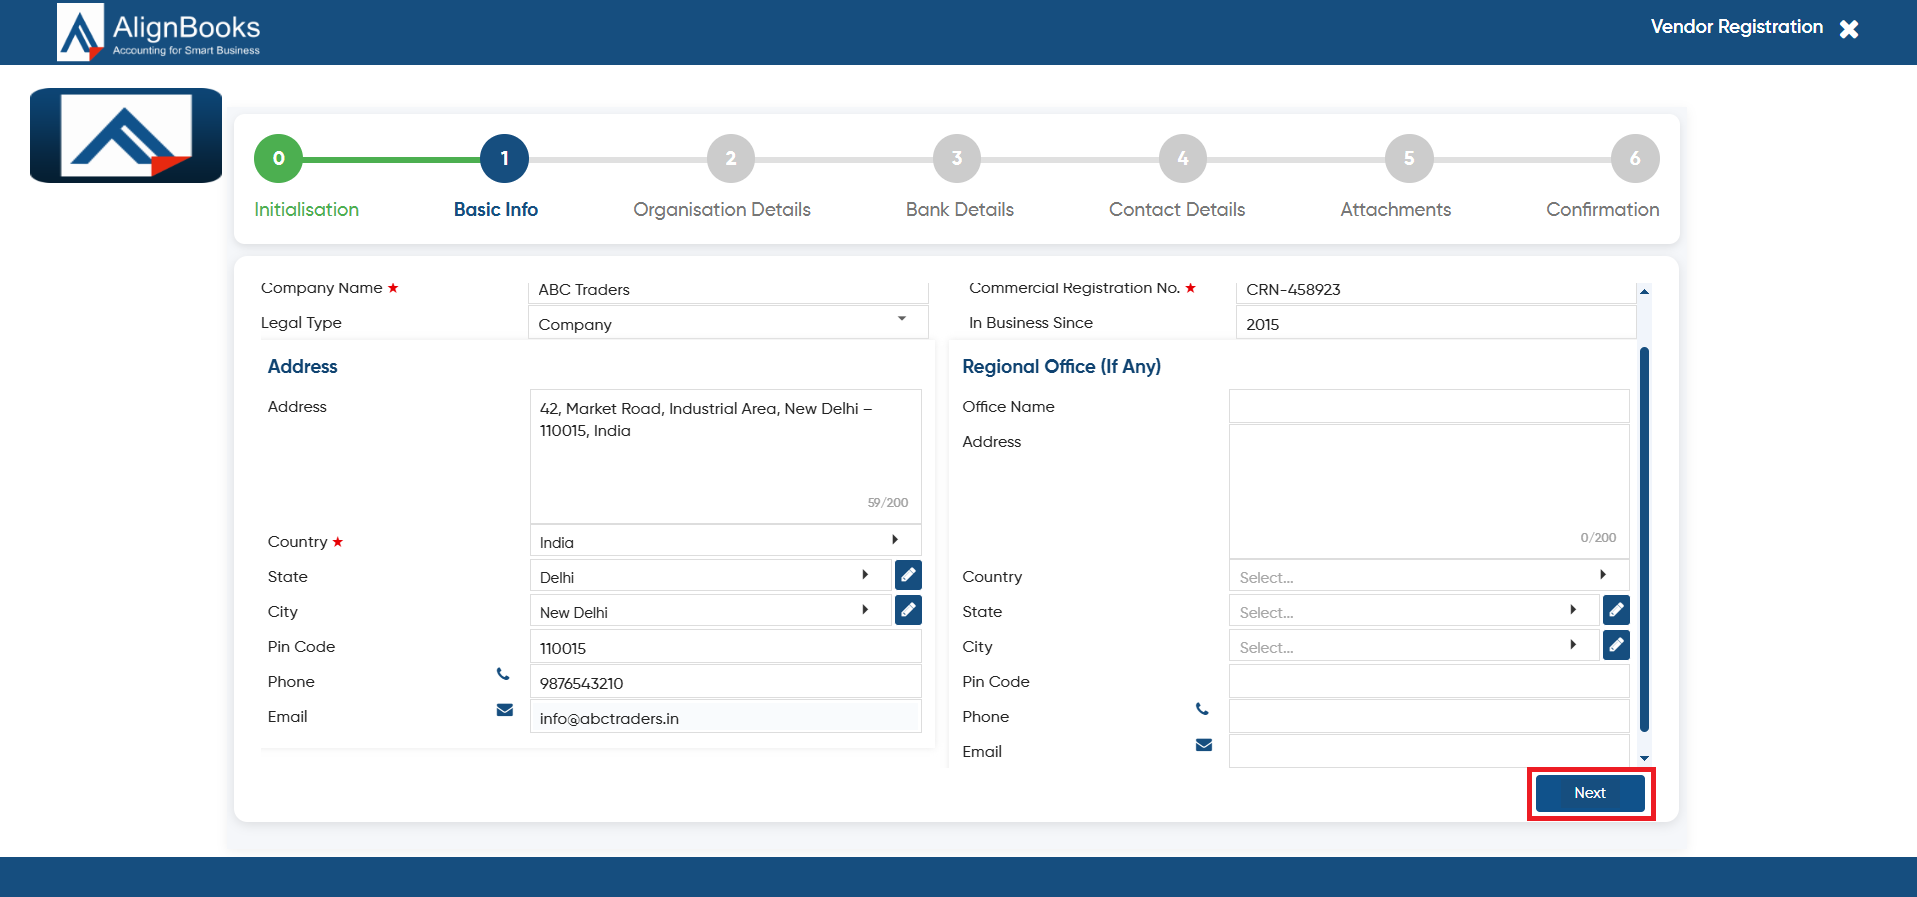
In ‘Basic Info’ tab, mention the basic information of your company and click on the ‘Next’ button.
-
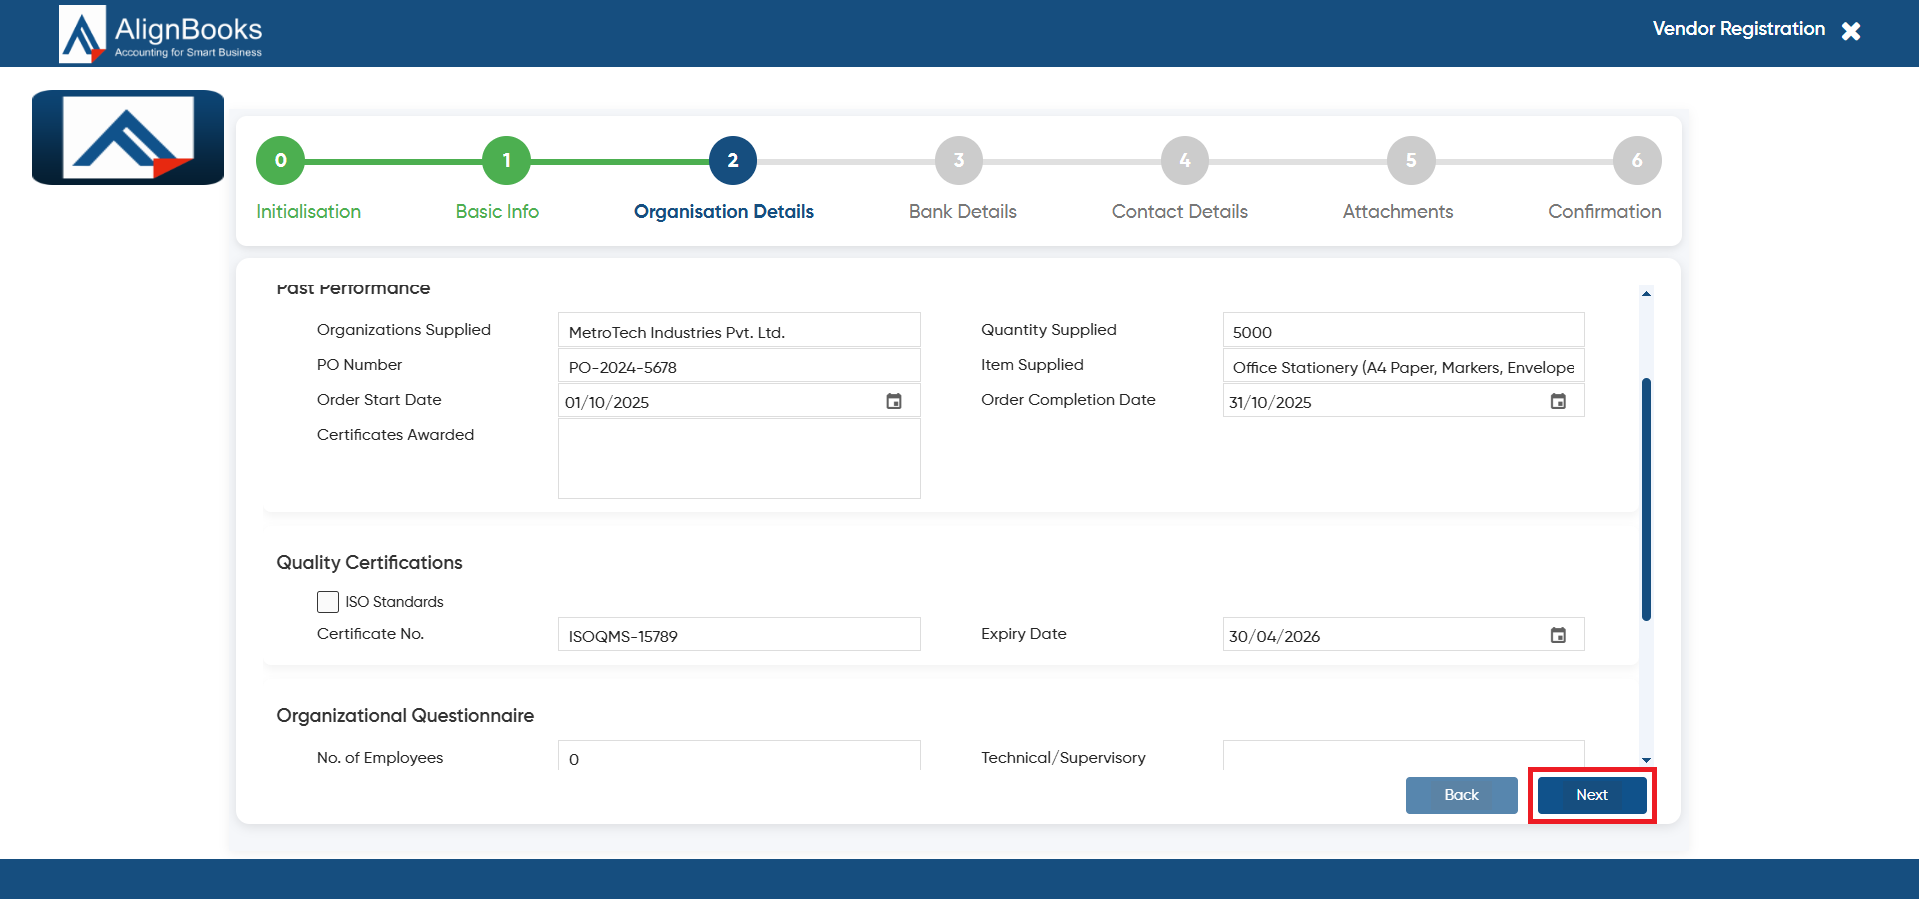
Mention the ‘Organisation Details’, and click on the ‘Next’ button.
-
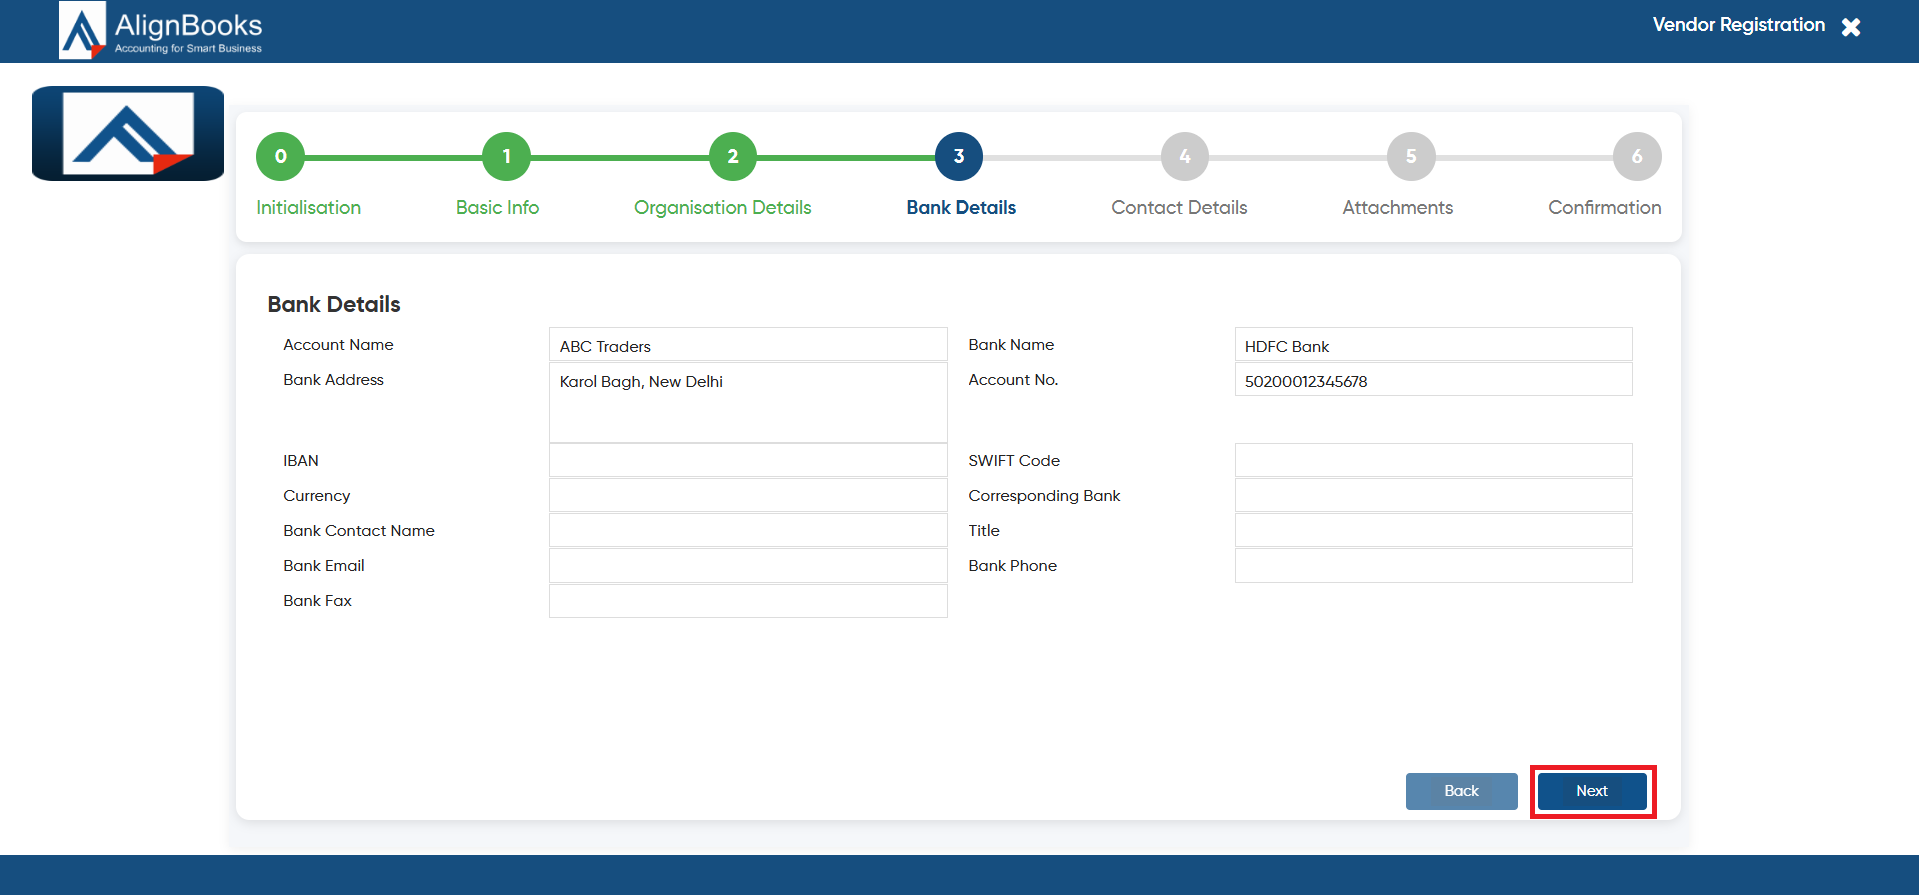
Thereafter, vendor need to provide the Bank Details and click on the ‘Next’ button.
-
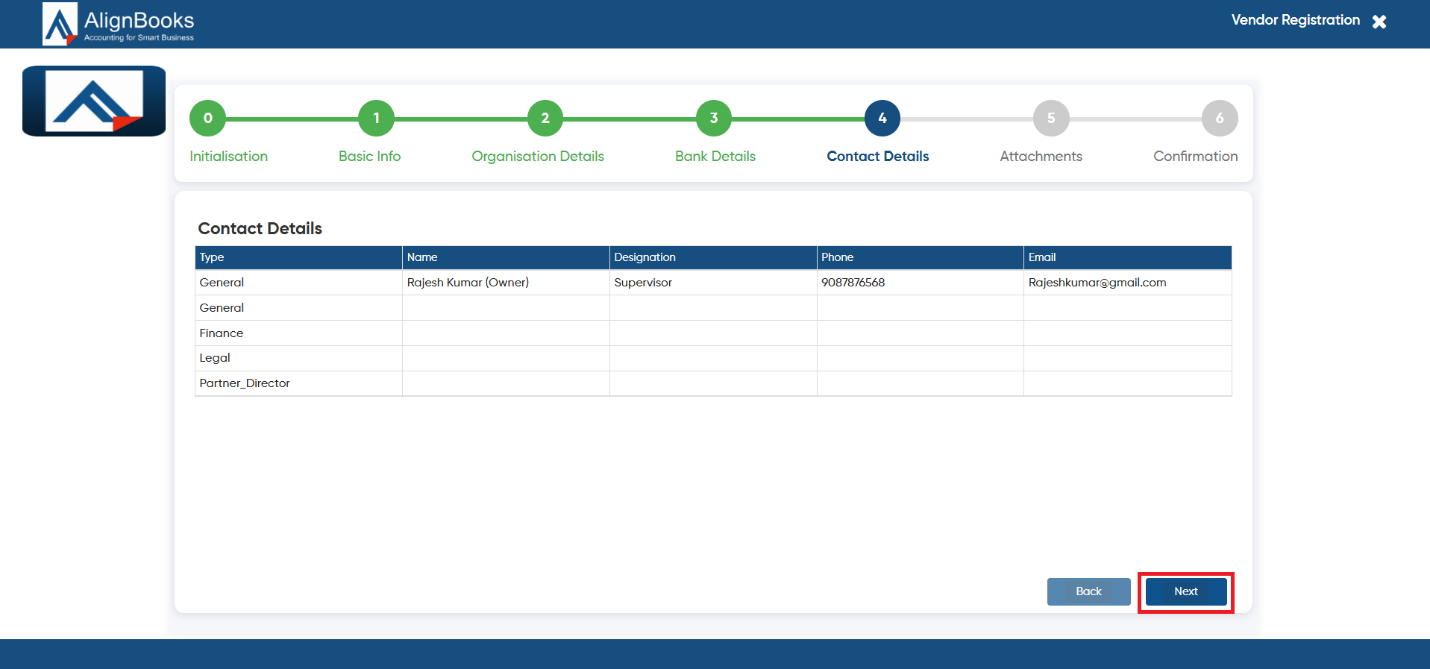
Next tab is ‘Contact Details’, the vendor will provide contact information and click on the ‘Next’ button.
-
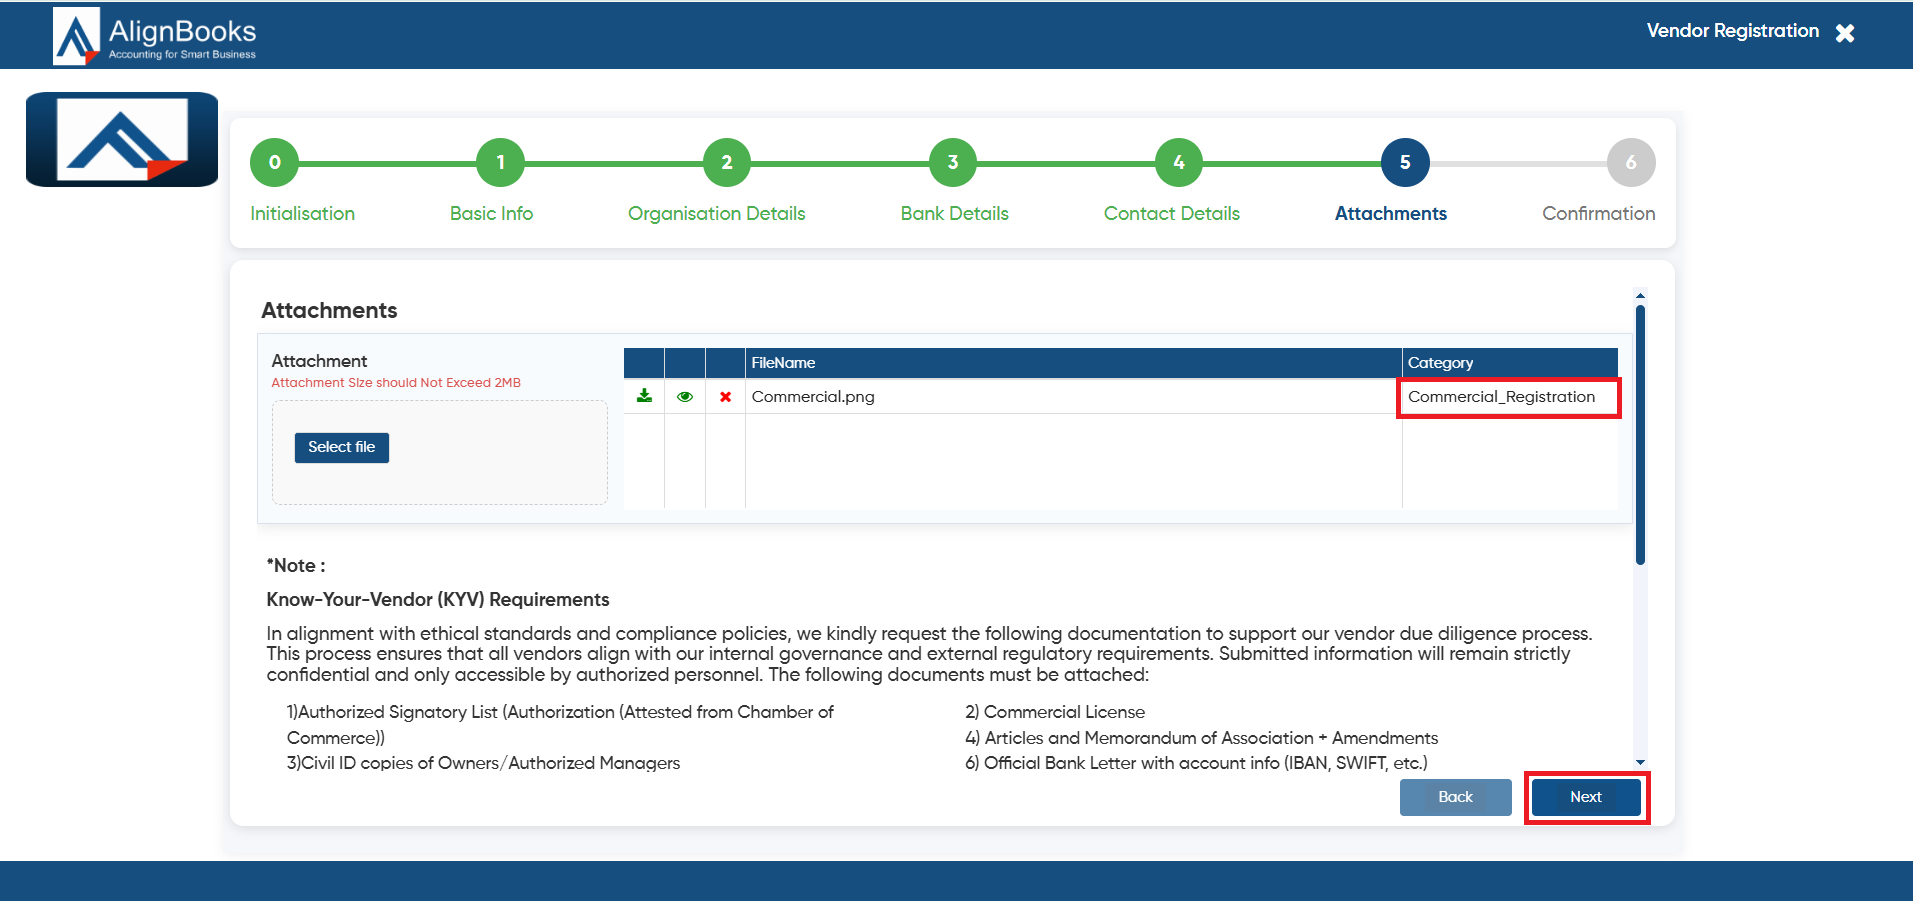
In the Attachments tab, the vendor must upload required documents such as signature proof, commercial registration, license, etc., and select the appropriate document category for each upload. Then, click the Next button to continue.
-
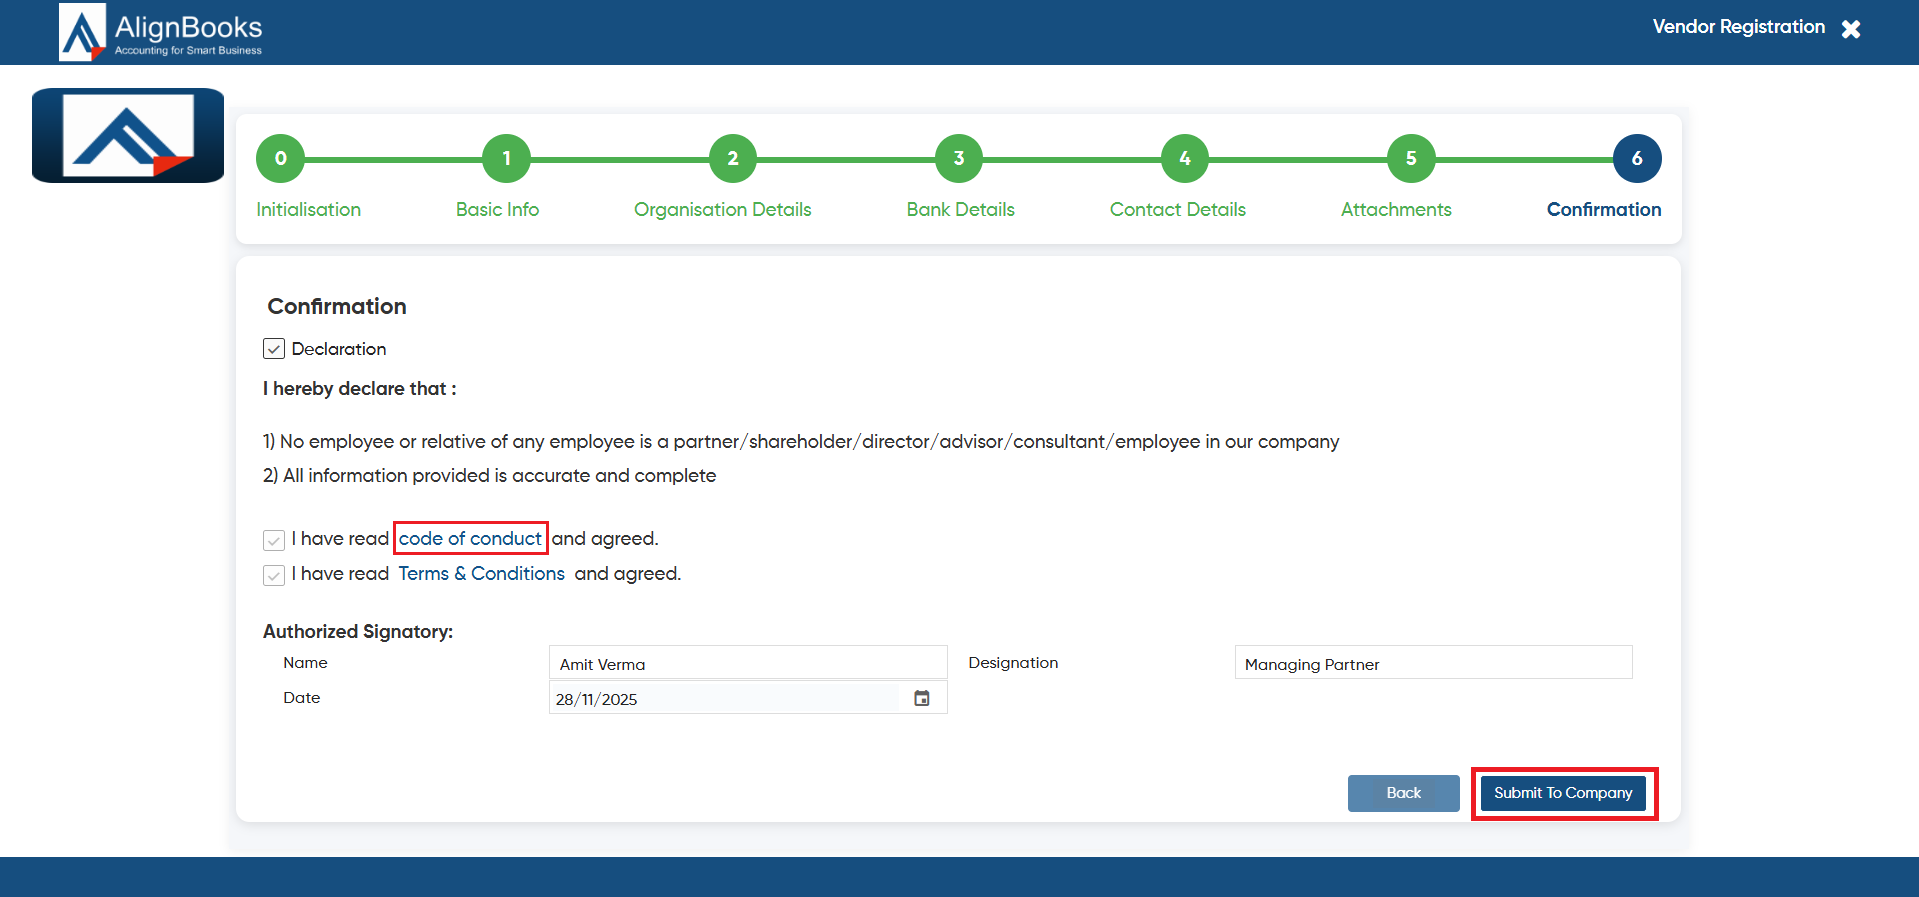
In the final tab, vendors must review the declaration and mark the checkbox to confirm their acceptance.
-
Tick the checkbox for ‘Code of Conduct and Terms & Conditions’. If you want to review them, simply click on the ‘Code of Conduct and Terms & Conditions’ link.
-
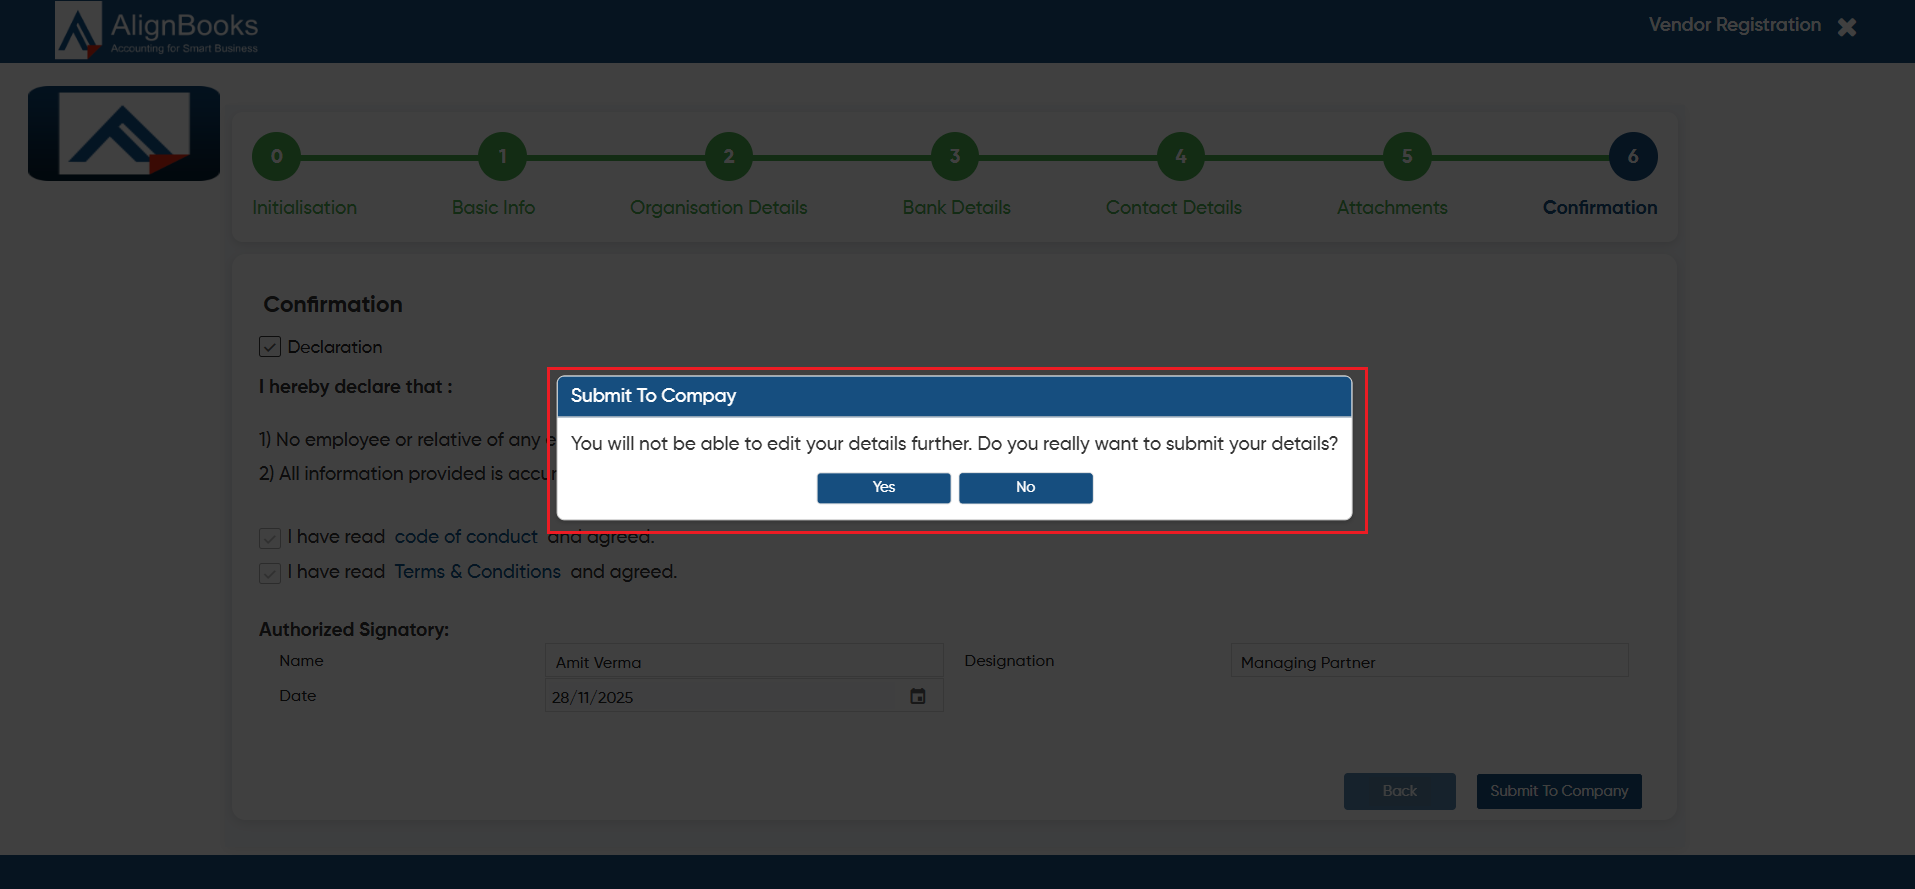
Finally, click the Submit to Company button to complete the submission.
-
A confirmation window will appear, click on the ‘Yes’ button.
-
After the successfully submission of the vendor details thankyou message will appear.
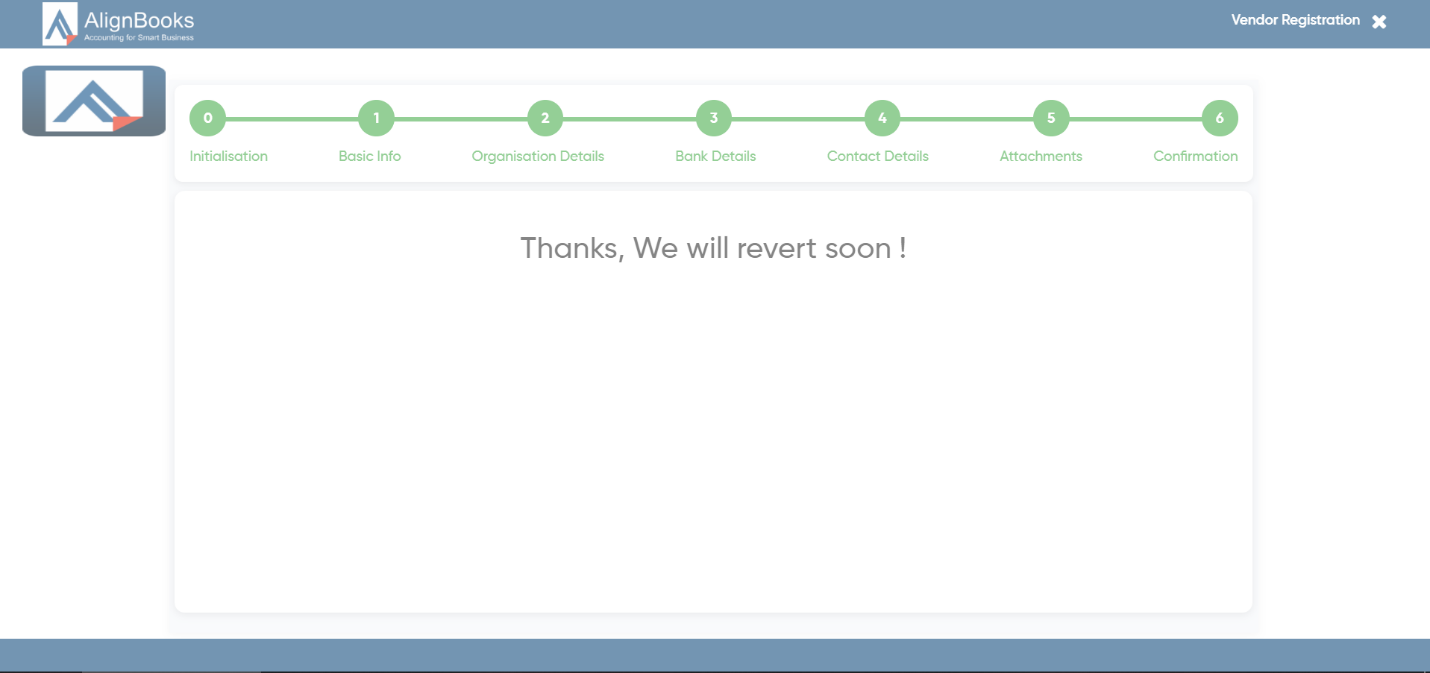
After submitting their registration details, the vendor will receive a Thank You message by email.
And, once the registration is approved, the vendor will automatically be added to your vendor list, and they will receive another notification containing their VMS portal login details.